前段工程化之Vue單文件組件 + Vue腳手架
Vue單文件組件
3.1 傳統組件的問題和解決方案
1.問題
1.全局定義 的組件必須保證組件的名稱不重複
2.字符串模板缺少語法高亮,在HTML有多行的時候,須要用到醜陋的\
3.不支持 CSS意味着當HTML和JavaScript組件化時,CSS明顯被遺漏4.沒有構建步驟限制,只能使用HTML和ES5 JavaScript,而不能使用預處理器(如:Babel)
2.解決方案
針對傳統組件的問題,Vue 提供了一個解決方案一使用 Vue單文件組件。
3.2 Vue單文件組件的基本用法
單文件組件的組成結構
-
template 組件的模板區域javascript
-
script 業務邏輯區域css
-
style 樣式區域

html
<template>
  <div>
    <h1>這是App根組件</h1>
  </div>
</template>

<script>
  export default {
    // data用來定義咱們的私有數據
    data() {
      return {

      }
    },
    methods: {
      // methods 用來定義咱們的行爲!
    }
  }
</script>

<style scoped>
  /* 定義當前組件的私有樣式 */
  h1 {
    color: pink;
  }
</style>
3.3 webpack 中配置Vue 組件的加載器
1 運行 npm i vue-loader vue-template-compiler -D 命令
2 在webpack.config.js配置文件中,添加vue-loader的配置項以下:
下面是全部的配置項:vue
const path = require('path'); // 導入 node.js 中專門操做路徑的模塊!
const HtmlWebpackPlugin = require('html-webpack-plugin');
const htmlPlugin = new HtmlWebpackPlugin({ // 建立插件的實例對象
    template: './src/index.html', // 指定要用到的模板文件
    filename: 'index.html' // 指定生成的文件的名稱,該文件存在於內存中,在目錄中不顯示
});
const VueLoaderPlugin = require('vue-loader/lib/plugin');
module.exports = {
    mode: 'development', // mode 用來指定構建模式
    entry: path.join(__dirname, './src/index.js'), // 打包入口文件路徑
    output: {
        path: path.join(__dirname, './dist'), // 輸出文件存放路徑
        filename: 'bundle.js' // 輸出文件的名稱
  },
    // 全部第三方模塊的匹配規則
  module: {
    rules: [
      { test: /\.css$/, use: ['style-loader', 'css-loader', 'postcss-loader'] },
      { test: /\.less$/, use: ['style-loader', 'css-loader', 'less-loader'] },
      { test: /\.scss$/, use: ['style-loader', 'css-loader', 'sass-loader'] },
      { test: /\.jpg|png|gif|bmp|ttf|eot|svg|woff|woff2$/, use: 'url-loader?limit=16940' },

      //exclude 爲排除項,表示 babe1-loader不須要處理node modules中的js文件
      { test: /\.js$/, use: 'babel-loader', exclude: /node_modules/},
      { test: /\.vue$/, use: 'vue-loader'}
    ]
  },
  plugins:     // plugins 數組是webpack打包期間會用到的一些插件列表
    [htmlPlugin, new VueLoaderPlugin()],

}
3.4 在 webpack 項目中 使用 Vue
1 運行 npm i vue -S 命令
2 在src->index.js入口文件中,經過import Vue from'vue'來導入vue構造函數
3 建立vue的實例對象,並指定要控制的el區域
4 經過render 函數渲染App根組件
下面是indexx.js文件中的全部代碼!java
import $ from 'jquery'
import './css/1.css'
import './css/1.less'
import './css/1.scss'
$(function() {
$('p').css('color', 'red').css('fontSize', '30px');
$('li:odd').css('color', 'red').css('fontSize', '30px');
$('li:even').css('color', 'yellow').css('fontSize', '30px');
})
class Person {
static info = 'lvhang'
}
console.log(Person.info);
// ------------------------------
// 導入Vue構造函數
import Vue from 'vue'
// 導入vue單文件組件[App根組件]
import App from './components/App.vue'
const vm = new Vue({
// 指定 vm 實例要控制的頁面區域
el: '#app',
// 經過render函數,把指定的組件渲染到el區域中
render: h => h(App)
});
## 3.5 webpack 打包發佈
### 上線以前須要經過webpack將應用進行總體打包,能夠經過package.json文件配置打包命令:
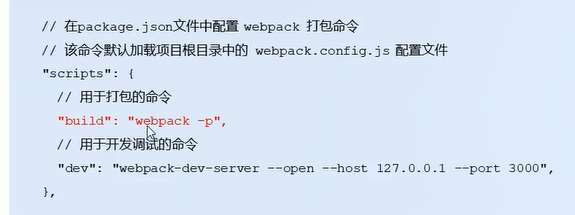
### 在package.json文件中配置 webpack 打包命令
### 該命令默認加載項目根目錄中的 webpack.config.js配置文件
```json
"scripts": {
"test": "echo \"Error: no test specified\" && exit 1",
"dev": "webpack-dev-server --open --host 127.0.0.1 --port 8034",
"build": "webpack -p"
}
4 Vue腳手架
4.1 Vue腳手架的基本用法
Vue腳手架用於快速生成Vue項目基礎架構,其官網地址爲:https://cli.vuejs.org/zh/
使用步驟:
1.安裝最新版本的Vue腳手架:
打開控制檯 cmd 回車 輸入 cnpm i -g @vue/clinode
在控制檯輸入vue -V 查看當前的Vue的版本號jquery
C:\Users\Administrator>vue -V
@vue/cli 4.5.6webpack
基於4.x版本的腳手架建立Vue項目
基於交互式命令行建立
下面一個步驟就是讓你選擇要安裝的項選中項點擊空格前面的括號裏出現空格就表明選中了這個項目以後按回車就進入下一個選項了!【忘了截圖,自行腦補吧!】web
以後進入下一個頁面:vue-router
Use history mode for router? (Requires proper server setup for index fallback in production)【對路由器使用歷史記錄模式? (須要適當的服務器設置以在生產中進行索引回退)】
進入下一個界面
進入下一項:
進入下一項:
由於單獨的文件中結構清晰,不容易混亂,方便查看!
進入下一項:
正在初始化項目的基本結構下載模板,依賴包等等!!
進入下一項:
C:\Users\Administrator>cd vue_proj_01
C:\Users\Administrator\vue_proj_01>npm run serve
瀏覽器中截圖以下:
以上就是基於交互式命令行 的方式 建立 新版 的vue項目
‘偶,有一點忘記說了,就是你在命令行建立項目的時候若是你不指定路徑他就會按照默認的路徑爲你保存項目(C盤哦)因此記得在指定文件夾中打開文件哈!就像我這樣!以下圖:
vue create vue_proj_01
$ cd vue_proj_01
 $ npm run serve
 上面一句代碼運行以後會出現下面的地址
  DONE  Compiled successfully in 2663ms                                                                       10:43:59 PM


  App running at:
  - Local:   http://localhost:8080/
  - Network: unavailable

  Note that the development build is not optimized.
  To create a production build, run npm run build.
基於 圖形化界面 的方式 , 建立新版的vue項目
一、在控制檯中輸入: vue ui
瀏覽器彈出:
第二步:
第三步:
第四步:
第五步:
第六步:
第七步:
第八步:
第九步:
第十步:搞定!
基於 2.x 的就模板 , 建立 舊版 vue 項目
第一步:
在控制檯 輸入:cnpm i -g @vue/cli-init
第二步:建立項目的名稱:
vue init webpack vue_proj_03_2_x
第三步:
第四步:項目描述
第五步:
第六步:
第七步:
第八步:
第九步:
第十步:
第十一步:
第十二步:
下載的速度好慢啊!
4.2 Vue 腳手架生成的項目結構分析
4.3 Vue 腳手架的自定義配置
1 經過package.json 配置項目
第一步:再命令行上輸入 npm run serve (這個不必定,得看你package.json中的腳本名字是什麼! )
若是想讓瀏覽器自動打開【端口號8888,自動打開是open設置爲true】,需配置package.json 看下面的代碼:
{
  "name": "vue_proj_02_ui",
  "version": "0.1.0",
  "private": true,
  "scripts": {
    "serve": "vue-cli-service serve",
    "build": "vue-cli-service build",
    "lint": "vue-cli-service lint"
  },
  "dependencies": {
    "core-js": "^3.6.5",
    "vue": "^3.0.0-0",
    "vue-router": "^4.0.0-0"
  },
  "devDependencies": {
    "@vue/cli-plugin-babel": "~4.5.0",
    "@vue/cli-plugin-eslint": "~4.5.0",
    "@vue/cli-plugin-router": "~4.5.0",
    "@vue/cli-service": "~4.5.0",
    "@vue/compiler-sfc": "^3.0.0-0",
    "@vue/eslint-config-standard": "^5.1.2",
    "babel-eslint": "^10.1.0",
    "eslint": "^6.7.2",
    "eslint-plugin-import": "^2.20.2",
    "eslint-plugin-node": "^11.1.0",
    "eslint-plugin-promise": "^4.2.1",
    "eslint-plugin-standard": "^4.0.0",
    "eslint-plugin-vue": "^7.0.0-0"
  },
  "vue": {
    "devServer": {
      "port": 8888,
      "open": true
    }
  }
}
注意:不推薦使用這種配置方式。由於packagejson主要用來管理包的配置信息;爲了方便維護,推薦將vue腳手架相關的配置,單獨定義到vue.config.js配置文件中。
2 經過單獨的配置文件配置項目【vue.config.js】推薦使用!
配置好了以後,還要再次運行npm run serve
5 Element-UI的基本使用
Element-UI:一套爲開發者、設計師和產品經理準備的基於vue2.0的桌面端組件庫。
官網地址爲:http://element-cn.eleme.io/#/zh-cN
1 基於命令行的方式手動安裝
第一步 cnpm i element-ui -S
第二步: 打開src的main.js進行後續的配置(導入ElementUI相關的資源)
import Vue from 'vue'
import App from './App.vue'
import router from './router'

// 手動配置 element-ui
import ElementUI from 'element-ui'
import 'element-ui/lib/theme-chalk/index.css'
Vue.use(ElementUI)

Vue.config.productionTip = false

new Vue({
  router,
  render: h => h(App)
}).$mount('#app')
2 基於圖形化界面自動安裝
要進行上面的案例你必須得安裝cli的依賴才行!
如何安裝clil 請訪問下面的網址:
https://blog.csdn.net/qq_35081380/article/details/98734282
- 1. Vue之單文件組件
- 2. vue組件續和前端工程化
- 3. Vue-Router路由Vue-CLI腳手架和模塊化開發 之單文件組件
- 4. vue-cli腳手架的.babelrc文件
- 5. Vue | 25 工具 - 單文件組件
- 6. Vue系列(三):組件及數據傳遞、路由、單文件組件、vue-cli腳手架
- 7. Vue.2.0.5-單文件組件
- 8. vue單文件組件
- 9. Vue單文件組件
- 10. Vue 單文件組件
- 更多相關文章...
- • ASP AdRotator 組件 - ASP 教程
- • ASP Global.asa 文件 - ASP 教程
- • IDEA下SpringBoot工程配置文件沒有提示
- • 互聯網組織的未來:剖析GitHub員工的任性之源
-
每一个你不满意的现在,都有一个你没有努力的曾经。