復刻死亡之書自動設置攝像機景深
復刻死亡之書自動設置攝像機景深
git地址:https://gitee.com/asiworld/NoteBook_unity.gitgit
bilibili視頻地址:https://space.bilibili.com/15766978c#
CSDN主頁:https://blog.csdn.net/JianShengShuaiestide
簡述
unity 官方發佈了一個demo叫作<死亡之書>,場景是一個森林,裏面有一個特別酷的效果,叫作自動對焦,意思就是當我很近的觀察一個物體的時候會形成很淺的景深,也就是背景虛化很大,只有對焦的位置上的物體纔是清晰的, oop
oop
我也作了一個相似的效果,其中主要用到的插件就是官方提供的PostProcessing,如今看一下我復刻的這個功能的效果spa
能夠看到場景中只有一個紅色的cube是實景,其餘的都是虛化的,.net
死亡之書導入說明
導入死亡之書的時候會報錯,解決方法是吧[Min]修改一個[UnityEngine.Min]插件
復刻步驟
添加基本腳本並設置
- 引入PostProcessing
- .攝像機修改layer爲PostProcessing
- 在攝像機上面加入PostProcessLayer
- 抗鋸齒改成TAA
- PostProcessVolume
-
- new 一個profile
- 添加一個效果 Add Effect Depth of Field
- Depth of Field的全部效果都勾選上
- 添加一個Collider 到 PostProcessVolume的相同的gameobject或者 勾選PostProcessVolume 的 Is Global選項<!--推薦選擇前者-->
- 修改上面四個值就能獲得如圖效果
自動對焦物體
-
思路
我想的是在一個環境中 有不少豎條狀的模型,咱們相機在其中旋轉,屏幕中間爲聚焦模型,攝像機在中間旋轉,能夠看到聚焦的效果code
-
擺放場景
按照喜歡加入一點燈光會有本身的效果orm
-
加入腳本
```c#
using DG.Tweening;視頻using UnityEngine;
using UnityEngine.Rendering.PostProcessing;public class SetFocusDistance : MonoBehaviour
{
private Ray ray;
private RaycastHit hit;
private Camera m_camera;
private PostProcessVolume m_PostProcessVolume;
public DepthOfField m_DepthOfField;
public Vector3 m_v3Rotation;
public float smooth = 5.0F;
public MeshRenderer m_meshRenderer;// Start is called before the first frame update
void Start()
{
m_camera = GetComponent<Camera>();
m_PostProcessVolume = GetComponent<PostProcessVolume>();
m_DepthOfField = m_PostProcessVolume.profile.GetSetting<DepthOfField>();
transform.DORotate(m_v3Rotation, 1.0f).SetLoops(-1, LoopType.Incremental).SetEase(Ease.Linear);
}// Update is called once per frame
void Update()
{ray = Camera.main.ScreenPointToRay(new Vector3(Screen.width / 2, Screen.height / 2)); if (Physics.Raycast(ray, out hit))//射線發出並碰撞到外殼,那麼手臂就應該朝向碰撞點 { m_DepthOfField.aperture.value = Mathf.Lerp( m_DepthOfField.focusDistance.value, 1.5f, Time.deltaTime * smooth); Debug.DrawLine(transform.position, hit.point); m_DepthOfField.focusDistance.value = Mathf.Lerp( m_DepthOfField.focusDistance.value, hit.distance + m_camera.nearClipPlane, Time.deltaTime * smooth); m_meshRenderer = hit.transform.GetComponent<MeshRenderer>(); if (!DOTween.IsTweening(m_meshRenderer.material)) { m_meshRenderer.material.DOColor(Color.red, 1.0f).SetLoops(2, LoopType.Yoyo); } } else { m_DepthOfField.aperture.value = Mathf.Lerp( m_DepthOfField.focusDistance.value, 20, Time.deltaTime * smooth); m_DepthOfField.focusDistance.value = Mathf.Lerp( m_DepthOfField.focusDistance.value, 20.0f, Time.deltaTime * smooth); }}
}#### 修改參數 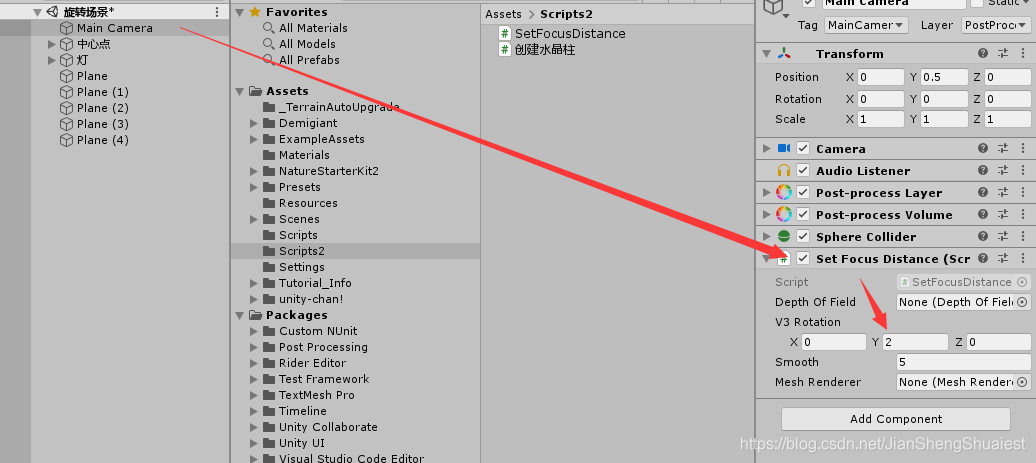 就能夠獲得一個很炫酷的效果了
擴展
原理就是相機的一些光圈,對焦,像距等知識,其實能夠擴展成一個拍照軟件,或者加入到遊戲中的關注敵人的概念,下面我就本身作了一個關於拍照的效果.
[外鏈圖片轉存失敗,源站可能有防盜鏈機制,建議將圖片保存下來直接上傳(img-STJCMKQz-1582364876107)(readme.assets/2020-02-22 16-24-3520202221654202.gif)]
- 1. 網絡攝像機 - 顯示設置二
- 2. 網絡攝像機 - 顯示設置三
- 3. LOREX 攝像機 Bit Rate 設置
- 4. 網絡攝像機 - 顯示設置四
- 5. 攝像頭自動對焦
- 6. [Unity][攝像機]動態代碼設置Camera的CullingMask遮罩
- 7. Binder機制情景分析之深刻驅動
- 8. JZ2440 攝像頭驅動之設置屬性_學習筆記
- 9. Spring Boot - 原理深刻 - 自動配置
- 10. 網絡攝像頭 Foscam F19821P 攝像頭設置方法
- 更多相關文章...
- • MySQL AS:設置別名 - MySQL教程
- • TCP滑動窗口機制深度剖析 - TCP/IP教程
- • IntelliJ IDEA代碼格式化設置
- • SpringBoot中properties文件不能自動提示解決方法
-
每一个你不满意的现在,都有一个你没有努力的曾经。