Android項目覆盤4
我的主頁:chengang.plus/html
文章將會同步到我的微信公衆號:Android部落格linux
UVC協議文檔網址:www.usb.org/documents?s…android
主要下載USB Video Class 1_5,關注下載zip包中的UVC 1.5 Class specification.pdf文件,裏面有接口相關的解釋。git
Android盒子控制攝像頭項目已經差很少4年了,不少知識點已經忘記,如今從新溫固一遍,下面兩篇文章能夠幫助回顧。api
下邊兩個網址中能夠找到代碼中各類結構體的解釋:app
一、Linux kernel下的UVC
咱們先從Android官網git clone一下kernel的源碼:
android.googlesource.com/kernel/gold…
git clone android.googlesource.com/kernel/gold…
clone到本地以後就能夠經過Source Insight查看源碼了。查看源碼以前先project -> rebuild project,這樣代碼中各對象之間能夠點擊跳轉。
1.1 初始化
goldfish\drivers\media\usb\uvc\uvc_driver.c
static int __init uvc_init(void) {
	int ret;
	ret = usb_register(&uvc_driver.driver);
	return 0;
}

struct uvc_driver uvc_driver = {
	.driver = {
		.name		= "uvcvideo",
		.probe		= uvc_probe,
		.disconnect	= uvc_disconnect,
		.suspend	= uvc_suspend,
		.resume		= uvc_resume,
		.reset_resume	= uvc_reset_resume,
		.id_table	= uvc_ids,
		.supports_autosuspend = 1,
	},
};
複製代碼
在入口函數uvc_init中,核心的一行是usb_register,也就是註冊USB設備,在註冊完成以後會調用uvc_probe函數。
goldfish\include\linux\usb.h
struct usb_driver {
	const char *name;

	int (*probe) (struct usb_interface *intf,
		      const struct usb_device_id *id);
複製代碼
看看這個uvc_probe函數:
goldfish\drivers\media\usb\uvc\uvc_driver.c
static int uvc_probe(struct usb_interface *intf, const struct usb_device_id *id) {
	struct usb_device *udev = interface_to_usbdev(intf);
	struct uvc_device *dev;
	int ret;

	if (id->idVendor && id->idProduct)
		uvc_trace(UVC_TRACE_PROBE, "Probing known UVC device %s "
				"(%04x:%04x)\n", udev->devpath, id->idVendor,
				id->idProduct);
	else
		uvc_trace(UVC_TRACE_PROBE, "Probing generic UVC device %s\n",
				udev->devpath);

    uvc_parse_control(dev);//1
    v4l2_device_register(&intf->dev, &dev->vdev);//2
    uvc_ctrl_init_device(dev);//3
    uvc_scan_device(dev);
    uvc_register_chains(dev);
    usb_set_intfdata(intf, dev);
    ret = uvc_status_init(dev);
    usb_enable_autosuspend(udev);
}
複製代碼
- 每個攝像頭設備在底層初始化完成以後,都會有一個vendorId和productId。
uvc_parse_control會根據設備的vendorId和productId去對特定廠商的攝像頭作一些適配。v4l2_device_register,該方法將設備註冊到v4l2,v4l2是Video for linux2的簡稱,爲linux中關於視頻設備的內核驅動。該方法在goldfish\drivers\media\v4l2-core\v4l2-device.c中。uvc_ctrl_init_device,初始化設備控制。
1.2 初始化設備控制
這裏是咱們須要重點關注的。能夠先跟蹤一下這個調用棧。
goldfish\drivers\media\usb\uvc\uvc_ctrl.c
int uvc_ctrl_init_device(struct uvc_device *dev) {
    list_for_each_entry(entity, &dev->entities, list) {
		struct uvc_control *ctrl;
		unsigned int bControlSize = 0, ncontrols;
		__u8 *bmControls = NULL;
		//第一部分
		if (UVC_ENTITY_TYPE(entity) == UVC_VC_EXTENSION_UNIT) {
			bmControls = entity->extension.bmControls;
			bControlSize = entity->extension.bControlSize;
		} else if (UVC_ENTITY_TYPE(entity) == UVC_VC_PROCESSING_UNIT) {
			bmControls = entity->processing.bmControls;
			bControlSize = entity->processing.bControlSize;
		} else if (UVC_ENTITY_TYPE(entity) == UVC_ITT_CAMERA) {
			bmControls = entity->camera.bmControls;
			bControlSize = entity->camera.bControlSize;
		}
		//第二部分
		/* Initialize all supported controls */
		ctrl = entity->controls;
		for (i = 0; i < bControlSize * 8; ++i) {
			if (uvc_test_bit(bmControls, i) == 0)
				continue;

			ctrl->entity = entity;
			ctrl->index = i;

			uvc_ctrl_init_ctrl(dev, ctrl);
			ctrl++;
		}
	}
}
複製代碼
1.2.1 ENTITY類型過濾
用於區分終端類型,重點關注UVC_ITT_CAMERA類型,看看這個類型在UVC協議文檔裏面的定義:

攝像頭傳感器,僅用於描述攝像頭終端。那麼代碼裏面的描述是:
goldfish\include\uapi\linux\usb\video.h
/* B.2. Input Terminal Types */
#define UVC_ITT_VENDOR_SPECIFIC 0x0200
#define UVC_ITT_CAMERA 0x0201
#define UVC_ITT_MEDIA_TRANSPORT_INPUT 0x0202
複製代碼
1.2.2 初始化uvc_control
從第一部分中取出camera.bmControls和camera.bControlSize,這兩個變量是幹嗎的呢,仍是看協議文檔:


bControlSize是對應着bmControls的位大小; bmControls對應着攝像頭支持的控制參數,若是控制參數位置爲1,表示支持該控制。
1.2.2.1 方法uvc_ctrl_init_ctrl
接下來調用uvc_ctrl_init_ctrl方法:
goldfish\drivers\media\usb\uvc\uvc_ctrl.c
static void uvc_ctrl_init_ctrl(struct uvc_device *dev, struct uvc_control *ctrl) {
	const struct uvc_control_info *info = uvc_ctrls;
	const struct uvc_control_info *iend = info + ARRAY_SIZE(uvc_ctrls);
	const struct uvc_control_mapping *mapping = uvc_ctrl_mappings;
	const struct uvc_control_mapping *mend = mapping + ARRAY_SIZE(uvc_ctrl_mappings);

	for (; info < iend; ++info) {
		if (uvc_entity_match_guid(ctrl->entity, info->entity) &&
		    ctrl->index == info->index) {
			uvc_ctrl_add_info(dev, ctrl, info);
			break;
		 }
	}

	if (!ctrl->initialized)
		return;

	for (; mapping < mend; ++mapping) {
		if (uvc_entity_match_guid(ctrl->entity, mapping->entity) &&
		    ctrl->info.selector == mapping->selector)
			__uvc_ctrl_add_mapping(dev, ctrl, mapping);
	}
}
複製代碼
1.2.2.2 結構體uvc_control_info
- uvc_ctrls,這個結構體的類型是
uvc_control_info,是一個靜態數組。能夠理解爲一個實體類別下對應着多個控制功能,每一個功能有對應着不一樣的操做方式,以當前項目須要用到的功能舉例:
static struct uvc_control_info uvc_ctrls[] = {
	{
		.entity		= UVC_GUID_UVC_CAMERA,
		.selector	= UVC_CT_PANTILT_ABSOLUTE_CONTROL,
		.index		= 11,
		.size		= 8,
		.flags		= UVC_CTRL_FLAG_SET_CUR
				| UVC_CTRL_FLAG_GET_RANGE
				| UVC_CTRL_FLAG_RESTORE
				| UVC_CTRL_FLAG_AUTO_UPDATE,
	},
	{
		.entity		= UVC_GUID_UVC_CAMERA,
		.selector	= UVC_CT_PANTILT_RELATIVE_CONTROL,
		.index		= 12,
		.size		= 4,
		.flags		= UVC_CTRL_FLAG_SET_CUR | UVC_CTRL_FLAG_GET_MIN
				| UVC_CTRL_FLAG_GET_MAX | UVC_CTRL_FLAG_GET_RES
				| UVC_CTRL_FLAG_GET_DEF
				| UVC_CTRL_FLAG_AUTO_UPDATE,
	},
}
複製代碼
-
entity 實體是一種類型,
UVC_GUID_UVC_CAMERA只是其中一種,還有UVC_GUID_UVC_PROCESSING等。 -
selector 對應的是實體下的一種功能,好比相對絕對轉動。
-
index 對應着在
uvc_ctrls中的序號。
/* Bit index in bmControls */
- size 對應着具體操做位的長度,好比上邊列舉出來的
UVC_CT_PANTILT_ABSOLUTE_CONTROL和UVC_CT_PANTILT_RELATIVE_CONTROL控制,看看在協議文檔中的定義:
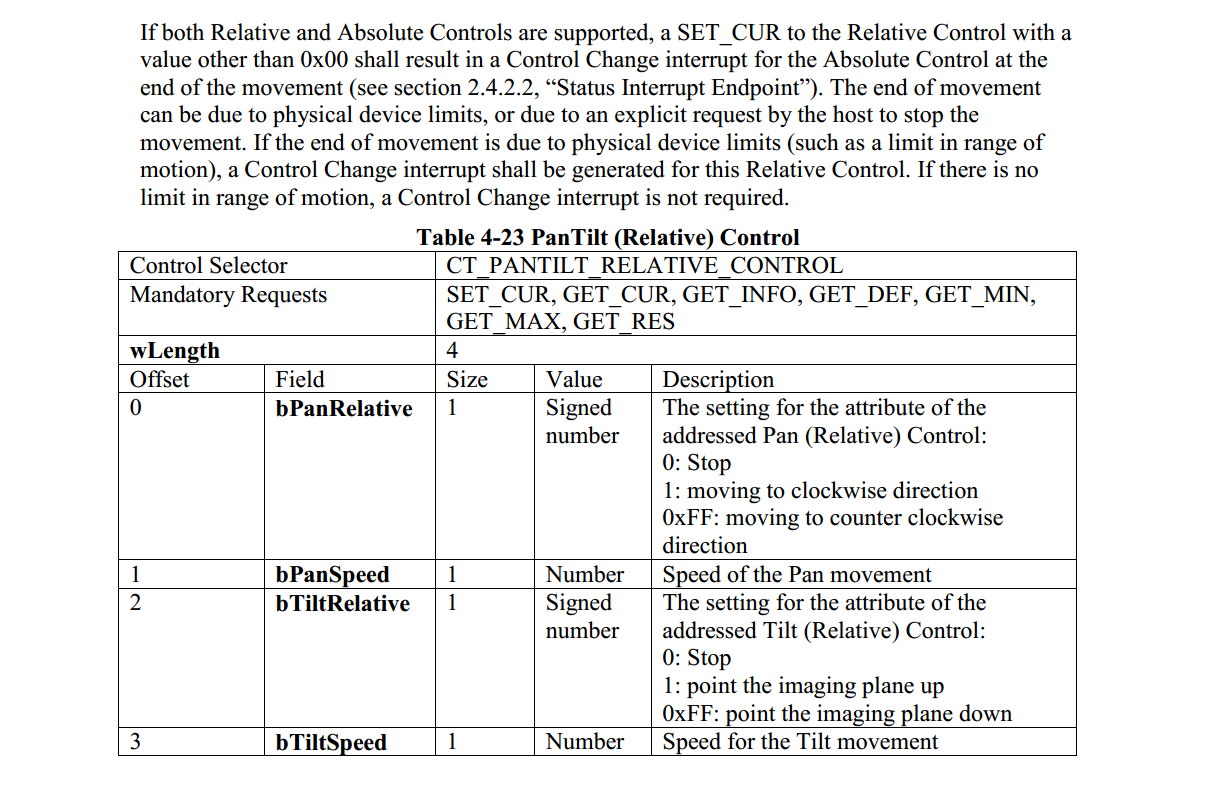

對於PanTilt Absolute來講,高四位表明着左右的角度,低四位表明着上下的角度,都是有符號整數,總共八位,因此size爲8。
對於PanTilt Relative來講,總共四位,每一位表明不一樣的控制屬性,第一位表示左右相對;第二位表示左右控制的速度;第三位表示上下相對;第四位表示上下的速度。因此size爲4。
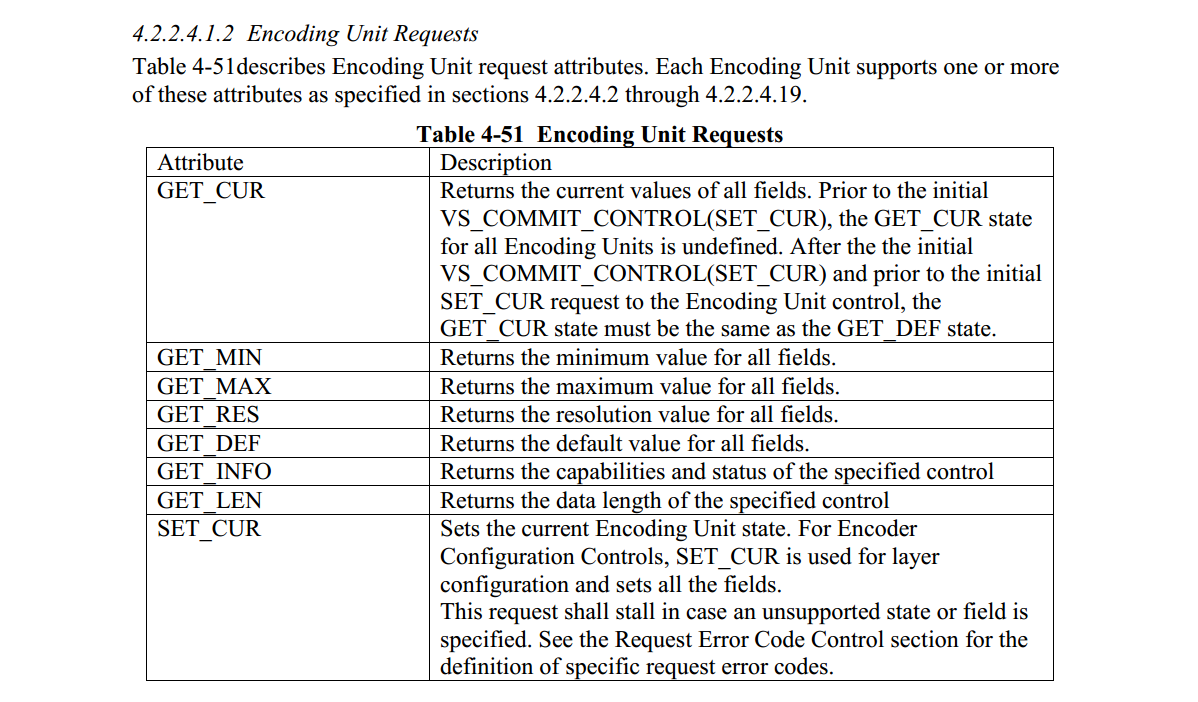
- flags 表示對於這些
selector支持的功能操做: 詳細的解釋以下:
1.2.2.3 結構體uvc_control_mapping
uvc_ctrl_mappings是uvc_control_mapping類型的結構體變量,也是一個靜態的結構體,簡略看下里面定義了啥:
static struct uvc_control_mapping uvc_ctrl_mappings[] = {
    {
		.id		= V4L2_CID_PAN_ABSOLUTE,
		.name		= "Pan (Absolute)",
		.entity		= UVC_GUID_UVC_CAMERA,
		.selector	= UVC_CT_PANTILT_ABSOLUTE_CONTROL,
		.size		= 32,
		.offset		= 0,
		.v4l2_type	= V4L2_CTRL_TYPE_INTEGER,
		.data_type	= UVC_CTRL_DATA_TYPE_UNSIGNED,
	},
	{
		.id		= V4L2_CID_TILT_ABSOLUTE,
		.name		= "Tilt (Absolute)",
		.entity		= UVC_GUID_UVC_CAMERA,
		.selector	= UVC_CT_PANTILT_ABSOLUTE_CONTROL,
		.size		= 32,
		.offset		= 32,
		.v4l2_type	= V4L2_CTRL_TYPE_INTEGER,
		.data_type	= UVC_CTRL_DATA_TYPE_UNSIGNED,
	},
}
複製代碼
能夠看到這裏的id開頭都是V4L2,而entity和selector都對應着uvc_control_info uvc_ctrls中定義的entity和selector。
另外v4l2_type對應着設置的數據類型,data_type則定義了數據爲有符號仍是無符號。
這個結構體從個人理解來看,就是將UVC定義的控制,映射到v4l2,並創建二者之間的關係。
1.2.2.4 方法uvc_ctrl_add_info
這個方法核心就一行代碼:
goldfish\drivers\media\usb\uvc\uvc_ctrl.c
static int uvc_ctrl_add_info(struct uvc_device *dev, struct uvc_control *ctrl, const struct uvc_control_info *info) {
    ctrl->info = *info;
}
複製代碼
將上一步uvc_control_info變量給到uvc_control的info。uvc_control的定義以下:
goldfish\drivers\media\usb\uvc\uvcvideo.h
struct uvc_control {
	struct uvc_entity *entity;
	struct uvc_control_info info;

	__u8 index;	/* Used to match the uvc_control entry with a uvc_control_info. */
	__u8 dirty:1,
	     loaded:1,
	     modified:1,
	     cached:1,
	     initialized:1;

	__u8 *uvc_data;
};
複製代碼
1.2.2.5 方法__uvc_ctrl_add_mapping
一樣的,將uvc_control_mapping數據賦值到uvc_control對象中:
goldfish\drivers\media\usb\uvc\uvc_ctrl.c
static int __uvc_ctrl_add_mapping(struct uvc_device *dev,
	struct uvc_control *ctrl, const struct uvc_control_mapping *mapping)
{
	struct uvc_control_mapping *map;
	map = kmemdup(mapping, sizeof(*mapping), GFP_KERNEL);
	map->menu_info = kmemdup(mapping->menu_info, size, GFP_KERNEL);
	list_add_tail(&map->list, &ctrl->info.mappings);
}
複製代碼
uvc_control_info的mappings做爲鏈表頭,將map->list添加到後面。
1.3 總結
在初始化的過程當中能夠將UVC協議的文檔跟代碼創建聯繫,以幫助理解代碼的邏輯。待理解了各類數據類型定義的原理及流程以後,發現其實現了UVC與V4L2的鏈接,這樣下一步的工做就比較好開展了。
UVC初始化的部分到這裏告一段落,接下來要根據具體需求作一些定製的工做。
- 1. Android項目總結覆盤4
- 2. Android項目覆盤1
- 3. Android項目覆盤2
- 4. Android項目覆盤3
- 5. 項目覆盤
- 6. Android項目總結覆盤5
- 7. wangEditor | 項目覆盤
- 8. 4-24 覆盤
- 9. 一個項目的覆盤
- 10. 如何作好項目覆盤 - 海星覆盤圖
- 更多相關文章...
- • Mozilla 項目 - 瀏覽器信息
- • Maven 項目模板 - Maven教程
- • 三篇文章瞭解 TiDB 技術內幕——說存儲
- • NewSQL-TiDB相關
-
每一个你不满意的现在,都有一个你没有努力的曾经。
- 1. 跳槽面試的幾個實用小技巧,不妨看看!
- 2. Mac實用技巧 |如何使用Mac系統中自帶的預覽工具將圖片變成黑白色?
- 3. Mac實用技巧 |如何使用Mac系統中自帶的預覽工具將圖片變成黑白色?
- 4. 如何使用Mac系統中自帶的預覽工具將圖片變成黑白色?
- 5. Mac OS非兼容Windows軟件運行解決方案——「以VMware & Microsoft Access爲例「
- 6. 封裝 pyinstaller -F -i b.ico excel.py
- 7. 數據庫作業三ER圖待完善
- 8. nvm安裝使用低版本node.js(非命令安裝)
- 9. 如何快速轉換圖片格式
- 10. 將表格內容分條轉換爲若干文檔
- 1. Android項目總結覆盤4
- 2. Android項目覆盤1
- 3. Android項目覆盤2
- 4. Android項目覆盤3
- 5. 項目覆盤
- 6. Android項目總結覆盤5
- 7. wangEditor | 項目覆盤
- 8. 4-24 覆盤
- 9. 一個項目的覆盤
- 10. 如何作好項目覆盤 - 海星覆盤圖