圖像顯示深刻學習二:setContentView(...)過程分析
這裏首先研究一下setContentView(...)執行的具體過程,爲後面的窗口機制分析作準備。java
首先從最宏觀的角度來講,咱們在學習android的過程當中第一次遇到關於View方法就是setContentView(),隨着學習的加深,咱們發現當代碼中要實例化一個View的時候,不少時候是經過LayoutInflater來進行的,那爲何setContentView()不須要經過這種方式?答案就在源碼裏面尋找吧:android
---- Acvtivity.java ----
public void setContentView(@LayoutRes int layoutResID) {
getWindow().setContentView(layoutResID);
initWindowDecorActionBar();
}
final void attach(Context context, ActivityThread aThread,
Instrumentation instr, IBinder token, int ident,
Application application, Intent intent, ActivityInfo info,
CharSequence title, Activity parent, String id,
NonConfigurationInstances lastNonConfigurationInstances,
Configuration config, String referrer, IVoiceInteractor voiceInteractor) {
attachBaseContext(context);
mFragments.attachHost(null /*parent*/);
mWindow = new PhoneWindow(this);
mWindow.setCallback(this);
mWindow.setOnWindowDismissedCallback(this);
mWindow.getLayoutInflater().setPrivateFactory(this);
if (info.softInputMode != WindowManager.LayoutParams.SOFT_INPUT_STATE_UNSPECIFIED) {
mWindow.setSoftInputMode(info.softInputMode);
}
if (info.uiOptions != 0) {
mWindow.setUiOptions(info.uiOptions);
}
....
}
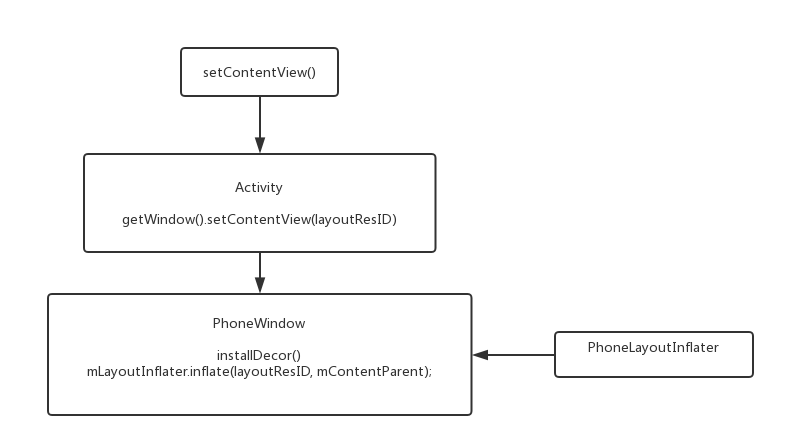
上述代碼來源於最基礎的Activity類,咱們從最基本的看起便可,在代碼能夠看到主要作了兩個操做:app
獲取window進行設置contentViewide
初始化ActionBar佈局
從上方咱們能夠推測,初始化contentView的過程,實際上是在window中進行的,而這個window的具體實現則是PhoneWindow,在Activity的attach方法中咱們能夠知道,所以須要進入的PhoneWindow中過去查看setContentView():post
---- PhoneWindow.java ----
// This is the view in which the window contents are placed. It is either
// mDecor itself, or a child of mDecor where the contents go.
private ViewGroup mContentParent;
// This is the top-level view of the window, containing the window decor.
private DecorView mDecor;
@Override
public void setContentView(int layoutResID) {
if (mContentParent == null) {
//初始化DecorView
installDecor();
} else if (!hasFeature(FEATURE_CONTENT_TRANSITIONS)) {
mContentParent.removeAllViews();
}
if (hasFeature(FEATURE_CONTENT_TRANSITIONS)) {
final Scene newScene = Scene.getSceneForLayout(mContentParent, layoutResID,
getContext());
transitionTo(newScene);
} else {
//調用inflate初始化
mLayoutInflater.inflate(layoutResID, mContentParent);
}
mContentParent.requestApplyInsets();
final Callback cb = getCallback();
if (cb != null && !isDestroyed()) {
cb.onContentChanged();
}
}
在上述代碼中FEATURE_CONTENT_TRANSITIONS是5.0增長的一個標識來識別是否進行實現Activity或者Fragment切換時的異常複雜的動畫效果,咱們能夠省略來進行代碼分析:學習
installDecor(),初始化DecorView以及mContentParent操做動畫
調用LayoutInflater.inflate()方法初始化佈局ui
---- PhoneWindow.java ----
private void installDecor() {
if (mDecor == null) {
//此方法new了一個DecorView
mDecor = generateDecor();
mDecor.setDescendantFocusability(ViewGroup.FOCUS_AFTER_DESCENDANTS);
mDecor.setIsRootNamespace(true);
if (!mInvalidatePanelMenuPosted && mInvalidatePanelMenuFeatures != 0) {
mDecor.postOnAnimation(mInvalidatePanelMenuRunnable);
}
}
if (mContentParent == null) {
//進行mContentParent初始化的過程
mContentParent = generateLayout(mDecor);
// Set up decor part of UI to ignore fitsSystemWindows if appropriate.
mDecor.makeOptionalFitsSystemWindows();
...
}
在DecorView和mContentParent初始化完成後,系統再調用inflate()方法來進行佈局的初始化的過程,咱們須要知道具體是哪一個LayoutInflater來完成工做的:this
// PhoneWindow.java ----

public PhoneWindow(Context context) {
       super(context);
       mLayoutInflater = LayoutInflater.from(context);
   }
 //LayoutInflater.java ----

 public static LayoutInflater from(Context context) {
       LayoutInflater LayoutInflater =
               (LayoutInflater) context.getSystemService(Context.LAYOUT_INFLATER_SERVICE);

       if (LayoutInflater == null) {
           throw new AssertionError("LayoutInflater not found.");
       }
       return LayoutInflater;
   }
//ContextImpl.java

@Override
   public Object getSystemService(String name) {
       return SystemServiceRegistry.getSystemService(this, name);

   }
//SystemServiceRegistry

registerService(Context.LAYOUT_INFLATER_SERVICE, LayoutInflater.class,
               new CachedServiceFetcher<LayoutInflater>() {
           @Override
           public LayoutInflater createService(ContextImpl ctx) {
               return new PhoneLayoutInflater(ctx.getOuterContext());

           }});
咱們看到inflater的初始化來自於from方法,這在咱們擼代碼的時候其實也常常會那麼寫,可是點到進去會發現是個抽象類,而inflater由context.getSystemService()獲取,因爲context的具體實現類是ContextImpl,咱們再一次追溯,知道在SystemServiceRegistry中找到了具體實現類:PhoneLayoutInflater。
接着咱們回溯到PhoneWindow的mLayoutInflater.inflate(layoutResID, mContentParent),其實到這步就已經跟咱們在佈局中使用LayoutInflater的效果同樣了。 but,咱們要有好奇心,點進去看看咱們跳回inflate()這個方法,跳回PhoneLayoutInflater中進行查看,發現裏面並無inflate方法,那隻能從新回到LayoutInflater.java中了,發現找了半天並無什麼卵用,不過了解到LayoutInlfater的具體實現是PhoneLayoutInflater對咱們也是頗有幫助的。
//LayoutInflater.java
public View inflate(@LayoutRes int resource, @Nullable ViewGroup root, boolean attachToRoot) {
//獲取資源文件
final Resources res = getContext().getResources();
if (DEBUG) {
Log.d(TAG, "INFLATING from resource: \"" + res.getResourceName(resource) + "\" ("
+ Integer.toHexString(resource) + ")");
}
//獲取xml解析器XmlResourceParser
final XmlResourceParser parser = res.getLayout(resource);
try {
//返回解析後獲得的View
return inflate(parser, root, attachToRoot);
} finally {
parser.close();
}
}
```
最終仍是比較簡單的,咱們在inflate中看到,其實得到XmlResourceParser解析器,而後將佈局文件添加到了根佈局當中。
等等最後還有一個方法:
```java
//PhoneWindow.java
final Callback cb = getCallback();
if (cb != null && !isDestroyed()) {
cb.onContentChanged();
}
```
這個callback是幹哈用的,點進去:
```java
public void setCallback(Callback callback) {
mCallback = callback;
}
/**
* Return the current Callback interface for this window.
*/
public final Callback getCallback() {
return mCallback;
}
```
咱們只能找到setCallBack()這個方法的具體位置,咱們在上面的activity找到了window=new PhoneWindow()這個實現:
```java
//activity
final void attach(Context context, ActivityThread aThread,
Instrumentation instr, IBinder token, int ident,
Application application, Intent intent, ActivityInfo info,
CharSequence title, Activity parent, String id,
NonConfigurationInstances lastNonConfigurationInstances,
Configuration config, String referrer, IVoiceInteractor voiceInteractor) {
attachBaseContext(context);
mFragments.attachHost(null /*parent*/);
mWindow = new PhoneWindow(this);
mWindow.setCallback(this);
mWindow.setOnWindowDismissedCallback(this);
mWindow.getLayoutInflater().setPrivateFactory(this);
if (info.softInputMode != WindowManager.LayoutParams.SOFT_INPUT_STATE_UNSPECIFIED) {
mWindow.setSoftInputMode(info.softInputMode);
}
if (info.uiOptions != 0) {
mWindow.setUiOptions(info.uiOptions);
}
....
}
```
mWindow.setCallback(this)這句話是否是夠了!嗯哼!那麼 cb.onContentChanged()這個方法其實就是調用了在activity中的onContentChanged方法,這是通知ContentView發生改變的方法,咱們能夠重寫進行一些你喜歡的操做。
----
####總結
畫張圖吧,這樣比較好理解:

- 1. 圖像顯示深刻學習三:窗口機制分析
- 2. 圖像顯示深刻學習一:Activity啓動過程
- 3. setContentView 加載過程分析
- 4. 深度學習下的醫學圖像分析(二)
- 5. iOS 深刻分析大圖顯示問題
- 6. 【Android】解析SetContentView過程
- 7. opencv圖像顯示imshow()源碼分析
- 8. 深刻剖析Kubernetes學習筆記:深刻理解鏡像(08)
- 9. 深刻剖析Kubernetes學習筆記:深刻理解鏡像(07)
- 10. Halcon學習之顯示圖像
- 更多相關文章...
- • Swift 析構過程 - Swift 教程
- • ADO 顯示 - ADO 教程
- • Kotlin學習(二)基本類型
- • Tomcat學習筆記(史上最全tomcat學習筆記)
-
每一个你不满意的现在,都有一个你没有努力的曾经。