create-react-app 源碼學習(上)
原文地址 Nealyang/personalBlog
前言
對於前端工程構建,不少公司、BU 都有本身的一套構建體系,好比咱們正在使用的 def,或者 vue-cli 或者 create-react-app,因爲筆者最近一直想搭建一個我的網站,秉持着呼吸不停,折騰不止的原則,編碼的過程當中,仍是不想太過於枯燥。在 coding 以前,搭建本身的項目架構的時候,忽然想,爲何以前搭建過不少的項目架構不能直接拿來用,卻仍是要從 0 到 1 的去寫 webpack 去下載相關配置呢?遂!學習下 create-react-app 源碼,而後本身搞一套吧~css
create-react-app 源碼
代碼的入口在 packages/create-react-app/index.js下,核心代碼在createReactApp.js中,雖然有大概 900+行代碼,可是刪除註釋和一些友好提示啥的大概核心代碼也就六百多行吧,咱們直接來看前端
index.js

index.js 的代碼很是的簡單,其實就是對 node 的版本作了一下校驗,若是版本號低於 8,就退出應用程序,不然直接進入到核心文件中,createReactApp.js中vue
createReactApp.js
createReactApp 的功能也很是簡單其實,大概流程:node
- 命令初始化,好比自定義
create-react-app --info的輸出等 - 判斷是否輸入項目名稱,若是有,則根據參數去跑安裝,若是沒有,給提示,而後退出程序
- 修改 package.json
- 拷貝
react-script下的模板文件
準備工做:配置 vscode 的 debug 文件
{
            "type": "node",
            "request": "launch",
            "name": "CreateReactApp",
            "program": "${workspaceFolder}/packages/create-react-app/index.js",
            "args": [
                "study-create-react-app-source"
            ]
        },
        {
            "type": "node",
            "request": "launch",
            "name": "CreateReactAppNoArgs",
            "program": "${workspaceFolder}/packages/create-react-app/index.js"
        },
        {
            "type": "node",
            "request": "launch",
            "name": "CreateReactAppTs",
            "program": "${workspaceFolder}/packages/create-react-app/index.js",
            "args": [
                "study-create-react-app-source-ts --typescript"
            ]
        }
這裏咱們添加三種環境,其實就是 create-react-app 的不一樣種使用方式react
create-react-app study-create-react-app-sourcecreate-react-appcreate-react-app study-create-react-app-source-ts --typescript
commander 命令行處理程序
commander 文檔傳送門webpack
let projectName;

const program = new commander.Command(packageJson.name)
  .version(packageJson.version)//create-react-app -v 時候輸出的值 packageJson 來自上面 const packageJson = require('./package.json');
  .arguments('<project-directory>') //定義 project-directory ,必填項
  .usage(`${chalk.green('<project-directory>')} [options]`)
  .action(name => {
    projectName = name;//獲取用戶的輸入,存爲 projectName
  })
  .option('--verbose', 'print additional logs')
  .option('--info', 'print environment debug info')
  .option(
    '--scripts-version <alternative-package>',
    'use a non-standard version of react-scripts'
  )
  .option('--use-npm')
  .option('--use-pnp')
  .option('--typescript')
  .allowUnknownOption()
  .on('--help', () => {// on('option', cb) 語法,輸入 create-react-app --help 自動執行後面的操做輸出幫助
    console.log(`    Only ${chalk.green('<project-directory>')} is required.`);
    console.log();
    console.log(
      `    A custom ${chalk.cyan('--scripts-version')} can be one of:`
    );
    console.log(`      - a specific npm version: ${chalk.green('0.8.2')}`);
    console.log(`      - a specific npm tag: ${chalk.green('@next')}`);
    console.log(
      `      - a custom fork published on npm: ${chalk.green(
        'my-react-scripts'
      )}`
    );
    console.log(
      `      - a local path relative to the current working directory: ${chalk.green(
        'file:../my-react-scripts'
      )}`
    );
    console.log(
      `      - a .tgz archive: ${chalk.green(
        'https://mysite.com/my-react-scripts-0.8.2.tgz'
      )}`
    );
    console.log(
      `      - a .tar.gz archive: ${chalk.green(
        'https://mysite.com/my-react-scripts-0.8.2.tar.gz'
      )}`
    );
    console.log(
      `    It is not needed unless you specifically want to use a fork.`
    );
    console.log();
    console.log(
      `    If you have any problems, do not hesitate to file an issue:`
    );
    console.log(
      `      ${chalk.cyan(
        'https://github.com/facebook/create-react-app/issues/new'
      )}`
    );
    console.log();
  })
  .parse(process.argv);
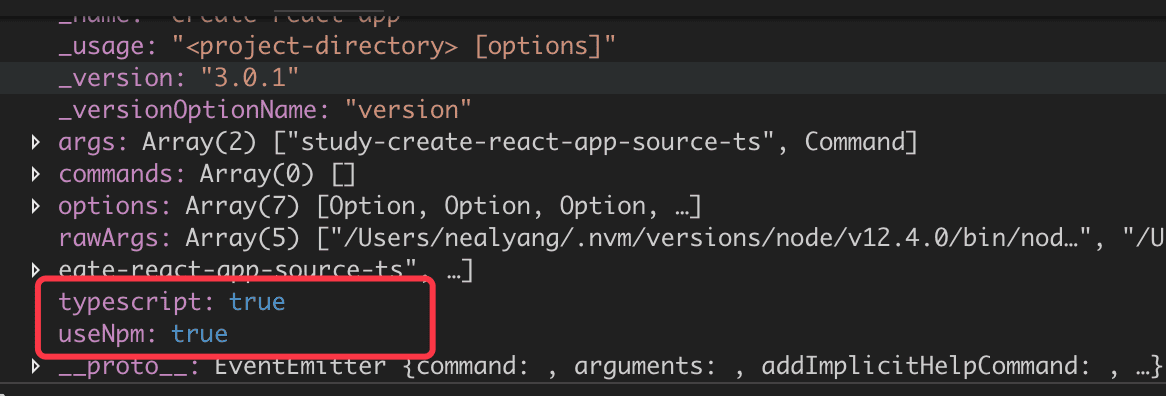
關於 commander 的使用,這裏就不介紹了,對於 create-react-app 的流程咱們須要知道的是,它,初始化了一些 create-react-app 的命令行環境,這一波操做後,咱們能夠看到 program 張這個樣紙:git

接着往下走github

當咱們 debug 啓動 noArgs 環境的時候,走到這裏就結束了,判斷 projectName 是否爲 undefined,而後輸出相關提示信息,退出~web
createApp
在查看 createApp function 以前,咱們再回頭看下命令行的一些參數定義,方便咱們理解 createApp 的一些參數vue-cli
咱們使用
{
            "type": "node",
            "request": "launch",
            "name": "CreateReactAppTs",
            "program": "${workspaceFolder}/packages/create-react-app/index.js",
            "args": [
                "study-create-react-app-source-ts",
                "--typescript",
                "--use-npm"
            ]
        }
debugger 咱們項目的時候,就能夠看到,program.typescript 爲 true,useNpm 爲 true,固然,這些也都是咱們在commander中定義的 options,因此源碼裏面 createApp 中,咱們傳入的參數分別爲:
- projectName : 項目名稱
- program.verbose 是否輸出額外信息
- program.scriptsVersion 傳入的腳本版本
- program.useNpm 是否使用 npm
- program.usePnp 是否使用 Pnp
- program.typescript 是否使用 ts
- hiddenProgram.internalTestingTemplate 給開發者用的調試模板路徑
function createApp(
  name,
  verbose,
  version,
  useNpm,
  usePnp,
  useTypescript,
  template
) {
  const root = path.resolve(name);//path 拼接路徑
  const appName = path.basename(root);//獲取文件名

  checkAppName(appName);//檢查傳入的文件名合法性
  fs.ensureDirSync(name);//確保目錄存在,若是不存在則建立一個
  if (!isSafeToCreateProjectIn(root, name)) { //判斷新建這個文件夾是否安全,不然直接退出
    process.exit(1);
  }

  console.log(`Creating a new React app in ${chalk.green(root)}.`);
  console.log();

  const packageJson = {
    name: appName,
    version: '0.1.0',
    private: true,
  };
  fs.writeFileSync(
    path.join(root, 'package.json'),
    JSON.stringify(packageJson, null, 2) + os.EOL
  );//寫入 package.json 文件

  const useYarn = useNpm ? false : shouldUseYarn();//判斷是使用 yarn 呢仍是 npm
  const originalDirectory = process.cwd();
  process.chdir(root);
  if (!useYarn && !checkThatNpmCanReadCwd()) {//若是是使用npm,檢測npm是否在正確目錄下執行
    process.exit(1);
  }

  if (!semver.satisfies(process.version, '>=8.10.0')) {//判斷node環境,輸出一些提示信息, 並採用舊版本的 react-scripts
    console.log(
      chalk.yellow(
        `You are using Node ${
          process.version
        } so the project will be bootstrapped with an old unsupported version of tools.\n\n` +
          `Please update to Node 8.10 or higher for a better, fully supported experience.\n`
      )
    );
    // Fall back to latest supported react-scripts on Node 4
    version = 'react-scripts@0.9.x';
  }

  if (!useYarn) {//關於 npm、pnp、yarn 的使用判斷,版本校驗等
    const npmInfo = checkNpmVersion();
    if (!npmInfo.hasMinNpm) {
      if (npmInfo.npmVersion) {
        console.log(
          chalk.yellow(
            `You are using npm ${
              npmInfo.npmVersion
            } so the project will be bootstrapped with an old unsupported version of tools.\n\n` +
              `Please update to npm 5 or higher for a better, fully supported experience.\n`
          )
        );
      }
      // Fall back to latest supported react-scripts for npm 3
      version = 'react-scripts@0.9.x';
    }
  } else if (usePnp) {
    const yarnInfo = checkYarnVersion();
    if (!yarnInfo.hasMinYarnPnp) {
      if (yarnInfo.yarnVersion) {
        console.log(
          chalk.yellow(
            `You are using Yarn ${
              yarnInfo.yarnVersion
            } together with the --use-pnp flag, but Plug'n'Play is only supported starting from the 1.12 release.\n\n` +
              `Please update to Yarn 1.12 or higher for a better, fully supported experience.\n`
          )
        );
      }
      // 1.11 had an issue with webpack-dev-middleware, so better not use PnP with it (never reached stable, but still)
      usePnp = false;
    }
  }

  if (useYarn) {
    let yarnUsesDefaultRegistry = true;
    try {
      yarnUsesDefaultRegistry =
        execSync('yarnpkg config get registry')
          .toString()
          .trim() === 'https://registry.yarnpkg.com';
    } catch (e) {
      // ignore
    }
    if (yarnUsesDefaultRegistry) {
      fs.copySync(
        require.resolve('./yarn.lock.cached'),
        path.join(root, 'yarn.lock')
      );
    }
  }

  run(
    root,
    appName,
    version,
    verbose,
    originalDirectory,
    template,
    useYarn,
    usePnp,
    useTypescript
  );
}
代碼很是簡單,部分註釋已經加載代碼中,簡單的說就是對一個本地環境的一些校驗,版本檢查啊、目錄建立啊啥的,若是建立失敗,則退出,若是版本較低,則使用對應低版本的create-react-app,最後調用 run 方法
checkAppName
這些工具方法,其實在寫咱們本身的構建工具的時候,也能夠直接 copy 的哈,因此這裏咱們也是簡單看下里面的實現,
checkAPPName 方法主要的核心代碼是validate-npm-package-name package,從名字便可看出,檢查是否爲合法的 npm 包名
var done = function (warnings, errors) {
  var result = {
    validForNewPackages: errors.length === 0 && warnings.length === 0,
    validForOldPackages: errors.length === 0,
    warnings: warnings,
    errors: errors
  }
  if (!result.warnings.length) delete result.warnings
  if (!result.errors.length) delete result.errors
  return result
}
...
...
var validate = module.exports = function (name) {
  var warnings = []
  var errors = []

  if (name === null) {
    errors.push('name 不能使 null')
    return done(warnings, errors)
  }

  if (name === undefined) {
    errors.push('name 不能是 undefined')
    return done(warnings, errors)
  }

  if (typeof name !== 'string') {
    errors.push('name 必須是 string 類型')
    return done(warnings, errors)
  }

  if (!name.length) {
    errors.push('name 的長度必須大於 0')
  }

  if (name.match(/^\./)) {
    errors.push('name 不能以點開頭')
  }

  if (name.match(/^_/)) {
    errors.push('name 不能如下劃線開頭')
  }

  if (name.trim() !== name) {
    errors.push('name 不能包含前空格和尾空格')
  }

  // No funny business
  // var blacklist = [
  //   'node_modules',
  //   'favicon.ico'
  // ]
  blacklist.forEach(function (blacklistedName) {
    if (name.toLowerCase() === blacklistedName) { //不能是「黑名單」內的
      errors.push(blacklistedName + ' is a blacklisted name')
    }
  })

  // Generate warnings for stuff that used to be allowed
  // 爲之前容許的內容生成警告

 // 後面的就再也不贅述了

  return done(warnings, errors)
}

最終,checkAPPName返回的東西如截圖所示,後面寫代碼能夠直接拿來借鑑!借鑑~

isSafeToCreateProjectIn
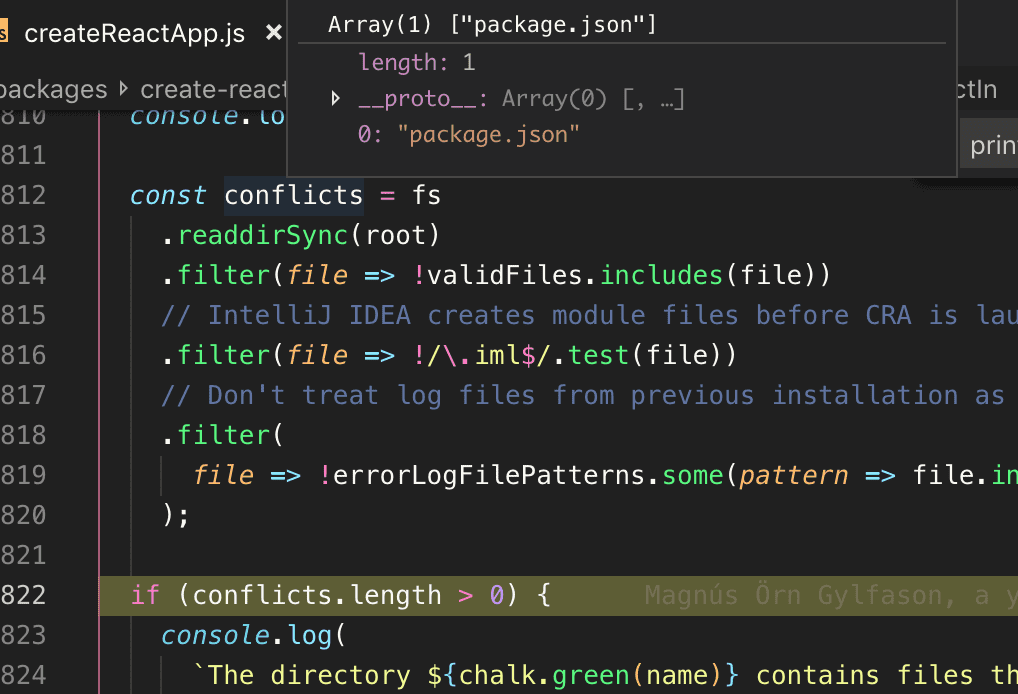
所謂安全性校驗,其實就是檢查當前目錄下是否存在已有文件。
checkNpmVersion

後面的代碼也都比較簡單,這裏就不展開說了,版本比較實用的是一個semver package.
run
代碼跑到這裏,該檢查的都檢查了,雞也不叫了、狗也不咬了,該乾點正事了~
run 主要作的事情就是安裝依賴、拷貝模板。

getInstallPackage作的事情很是簡單,根據傳入的 version 和原始路徑 originalDirectory 去獲取要安裝的 package 列表,默認狀況下version 爲 undefined,獲取到的 packageToInstall 爲react-scripts,也就是咱們如上圖的 resolve 回調。
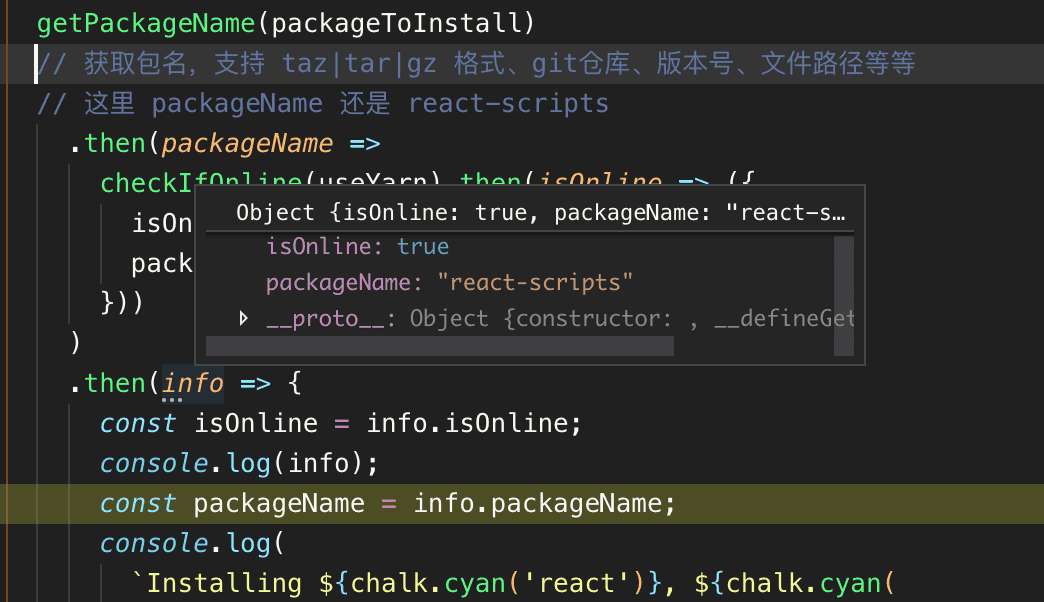
最終,咱們拿到須要安裝的 info 爲
{
  isOnline:true,
  packageName:"react-scripts"
}
當咱們梳理好須要安裝的 package 後,就交給 npm 或者 yarn 去安裝咱們的依賴便可
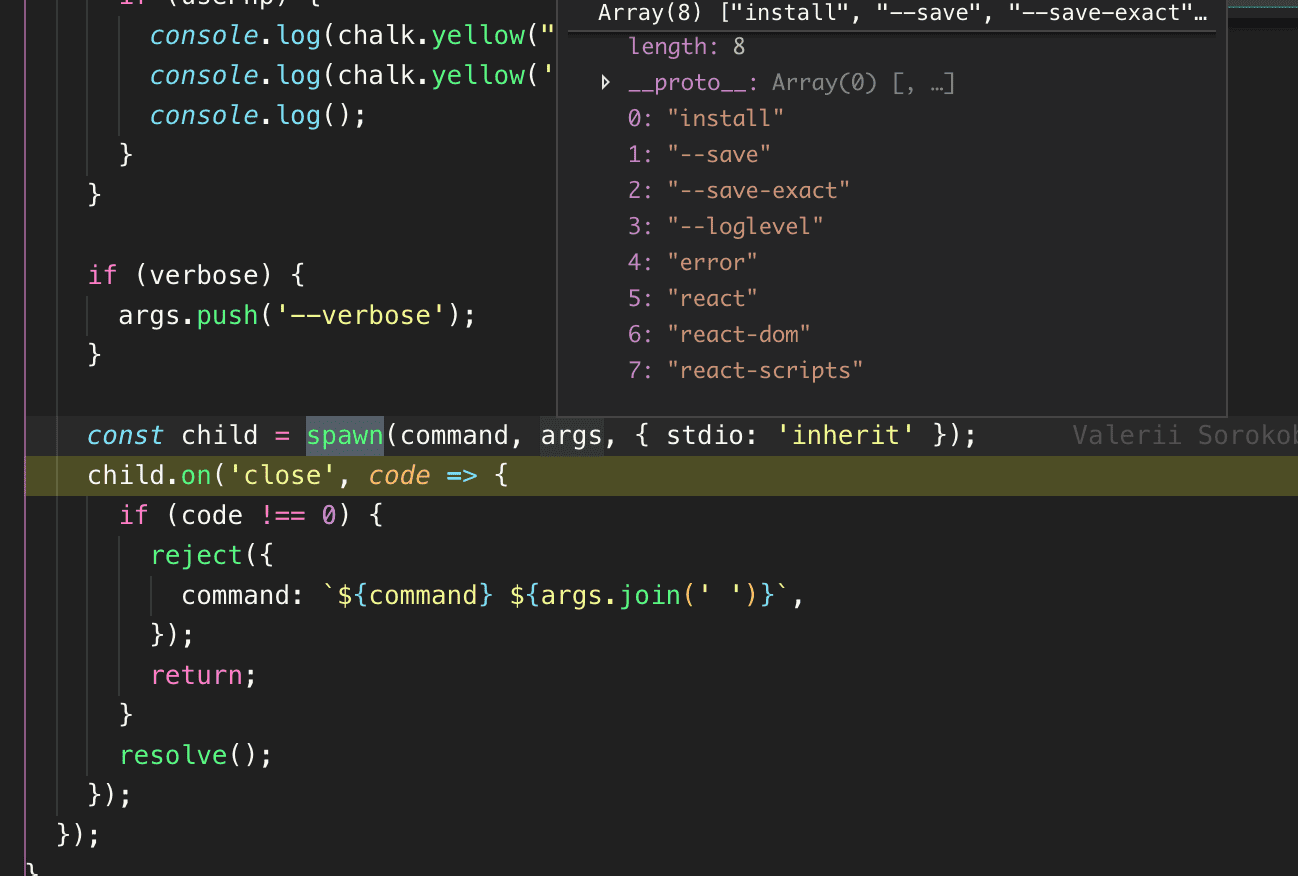
在spawn執行完命令後會有一個回調,判斷code是否爲 0,而後 resolve Promise,
.then(async packageName => {
         // 安裝完 react, react-dom, react-scripts 以後檢查當前環境運行的node版本是否符合要求
        checkNodeVersion(packageName);
        // 檢查 package.json 中的版本號
        setCaretRangeForRuntimeDeps(packageName);

        const pnpPath = path.resolve(process.cwd(), '.pnp.js');

        const nodeArgs = fs.existsSync(pnpPath) ? ['--require', pnpPath] : [];

        await executeNodeScript(
          {
            cwd: process.cwd(),
            args: nodeArgs,
          },
          [root, appName, verbose, originalDirectory, template],
          `
        var init = require('${packageName}/scripts/init.js');
        init.apply(null, JSON.parse(process.argv[1]));
      `
        );
在 create-react-app以前的版本中,這裏是經過調用react-script下的 init方法來執行後續動做的。這裏經過調用executeNodeScript 方法
function executeNodeScript({ cwd, args }, data, source) {
  // cwd:"/Users/nealyang/Desktop/create-react-app/study-create-react-app-source"

  // data:
  // 0:"/Users/nealyang/Desktop/create-react-app/study-create-react-app-source"
  // 1:"study-create-react-app-source"
  // 2:undefined
  // 3:"/Users/nealyang/Desktop/create-react-app"
  // 4:undefined

  // source
  // "  var init = require('react-scripts/scripts/init.js');
  //   init.apply(null, JSON.parse(process.argv[1]));
  // "

  return new Promise((resolve, reject) => {
    const child = spawn(
      process.execPath,
      [...args, '-e', source, '--', JSON.stringify(data)],
      { cwd, stdio: 'inherit' }
    );

    child.on('close', code => {
      if (code !== 0) {
        reject({
          command: `node ${args.join(' ')}`,
        });
        return;
      }
      resolve();
    });
  });
}
executeNodeScript 方法主要是經過 spawn 來經過 node命令執行react-script下的 init 方法。因此截止當前,create-react-app完成了他的工做: npm i ,
react-script/init.js
修改 vscode 的 debugger 配置,而後咱們來 debugger react-script 下的 init 方法
function init(appPath, appName, verbose, originalDirectory, template) {
// 獲取當前包中包含 package.json 所在的文件夾路徑
const ownPath = path.dirname(
//"/Users/nealyang/Desktop/create-react-app/packages/react-scripts"
require.resolve(path.join(__dirname, '..', 'package.json'))
);
const appPackage = require(path.join(appPath, 'package.json')); //項目目錄下的 package.json
const useYarn = fs.existsSync(path.join(appPath, 'yarn.lock')); //經過判斷目錄下是否有 yarn.lock 來判斷是否使用 yarn
// Copy over some of the devDependencies
appPackage.dependencies = appPackage.dependencies || {};
// react:"16.8.6"
// react-dom:"16.8.6"
// react-scripts:"3.0.1"
const useTypeScript = appPackage.dependencies['typescript'] != null;
// Setup the script rules 設置 script 命令
appPackage.scripts = {
start: 'react-scripts start',
build: 'react-scripts build',
test: 'react-scripts test',
eject: 'react-scripts eject',
};
// Setup the eslint config 這是 eslint 的配置
appPackage.eslintConfig = {
extends: 'react-app',
};
// Setup the browsers list 組件autoprefixer、bable-preset-env、eslint-plugin-compat、postcss-normalize共享使用的配置項 (感謝網友指正)
appPackage.browserslist = defaultBrowsers;
// 寫入咱們須要建立的目錄下的 package.json 中
fs.writeFileSync(
path.join(appPath, 'package.json'),
JSON.stringify(appPackage, null, 2) + os.EOL
);
const readmeExists = fs.existsSync(path.join(appPath, 'README.md'));
if (readmeExists) {
fs.renameSync(
path.join(appPath, 'README.md'),
path.join(appPath, 'README.old.md')
);
}
// Copy the files for the user 獲取模板的路徑
const templatePath = template //"/Users/nealyang/Desktop/create-react-app/packages/react-scripts/template"
? path.resolve(originalDirectory, template)
: path.join(ownPath, useTypeScript ? 'template-typescript' : 'template');
if (fs.existsSync(templatePath)) {
// 這一步就過度了, 直接 copy! appPath:"/Users/nealyang/Desktop/create-react-app/study-create-react-app-source"
fs.copySync(templatePath, appPath);
} else {
console.error(
`Could not locate supplied template: ${chalk.green(templatePath)}`
);
return;
}
// Rename gitignore after the fact to prevent npm from renaming it to .npmignore 重命名gitignore以防止npm將其重命名爲.npmignore
// See: https://github.com/npm/npm/issues/1862
try {
fs.moveSync(
path.join(appPath, 'gitignore'),
path.join(appPath, '.gitignore'),
[]
);
} catch (err) {
// Append if there's already a `.gitignore` file there
if (err.code === 'EEXIST') {
const data = fs.readFileSync(path.join(appPath, 'gitignore'));
fs.appendFileSync(path.join(appPath, '.gitignore'), data);
fs.unlinkSync(path.join(appPath, 'gitignore'));
} else {
throw err;
}
}
let command;
let args;
if (useYarn) {
command = 'yarnpkg';
args = ['add'];
} else {
command = 'npm';
args = ['install', '--save', verbose && '--verbose'].filter(e => e);
}
args.push('react', 'react-dom');
// args Array
// 0:"install"
// 1:"--save"
// 2:"react"
// 3:"react-dom"
// 安裝其餘模板依賴項(若是存在)
const templateDependenciesPath = path.join(//"/Users/nealyang/Desktop/create-react-app/study-create-react-app-source/.template.dependencies.json"
appPath,
'.template.dependencies.json'
);
if (fs.existsSync(templateDependenciesPath)) {
const templateDependencies = require(templateDependenciesPath).dependencies;
args = args.concat(
Object.keys(templateDependencies).map(key => {
return `${key}@${templateDependencies[key]}`;
})
);
fs.unlinkSync(templateDependenciesPath);
}
// 安裝react和react-dom以便與舊CRA cli向後兼容
// 沒有安裝react和react-dom以及react-scripts
// 或模板是presetend(經過--internal-testing-template)
if (!isReactInstalled(appPackage) || template) {
console.log(`Installing react and react-dom using ${command}...`);
console.log();
const proc = spawn.sync(command, args, { stdio: 'inherit' });
if (proc.status !== 0) {
console.error(`\`${command} ${args.join(' ')}\` failed`);
return;
}
}
if (useTypeScript) {
verifyTypeScriptSetup();
}
if (tryGitInit(appPath)) {
console.log();
console.log('Initialized a git repository.');
}
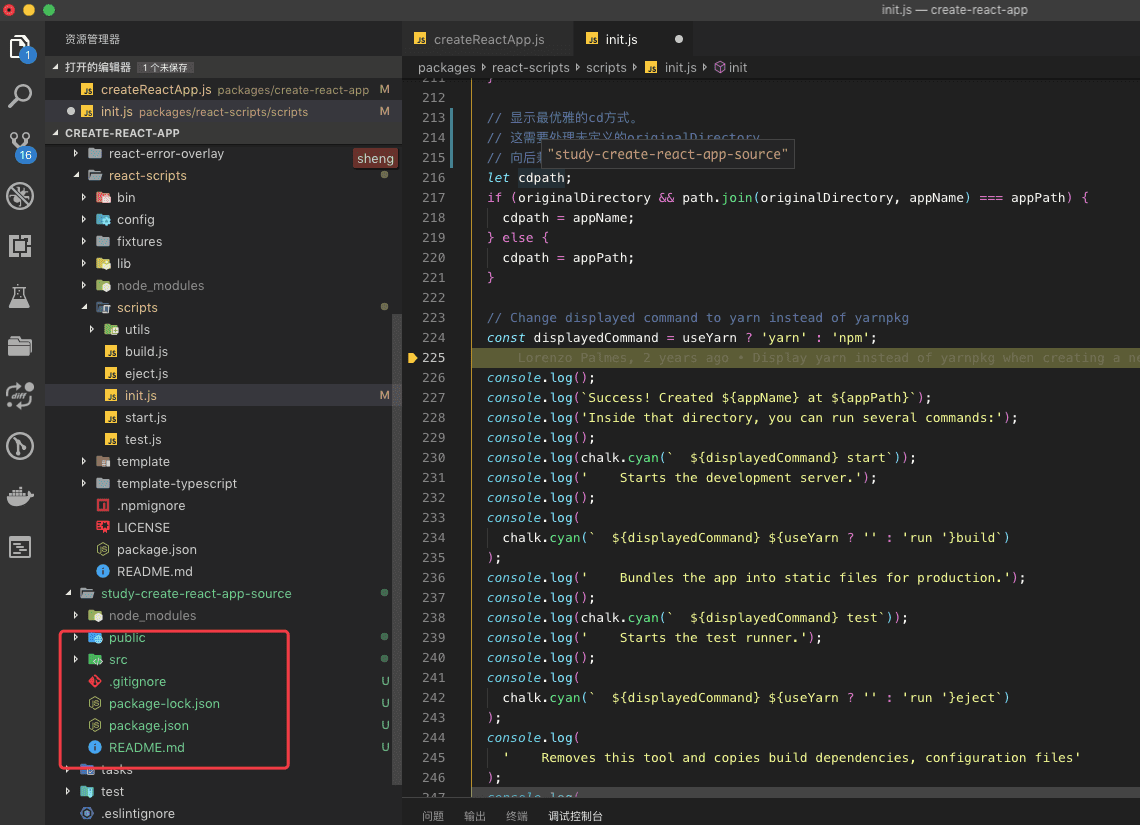
// 顯示最優雅的cd方式。
// 這須要處理未定義的originalDirectory
// 向後兼容舊的global-cli。
let cdpath;
if (originalDirectory && path.join(originalDirectory, appName) === appPath) {
cdpath = appName;
} else {
cdpath = appPath;
}
// Change displayed command to yarn instead of yarnpkg
const displayedCommand = useYarn ? 'yarn' : 'npm';
console.log('xxxx....xxxxx');
}
初始化方法主要作的事情就是修改目標路徑下的 package.json,添加一些配置命令,而後 copy!react-script 下的模板到目標路徑下。
走到這一步,咱們的項目基本已經初始化完成了。
因此咱們 copy 了這麼多 scripts
start: 'react-scripts start',
    build: 'react-scripts build',
    test: 'react-scripts test',
    eject: 'react-scripts eject',
到底是如何工做的呢,其實也不難,就是一些開發、測試、生產的環境配置。鑑於篇幅,咱就下一篇來分享下大佬們的前端構建的代碼寫法吧~~
總結
原本想用一張流程圖解釋下,可是。。。create-react-app 着實沒有作啥!咱仍是等下一篇分析完,本身寫構建腳本的時候再畫一下總體流程圖(架構圖)吧~

ok~ 簡單概述下:
- 判斷 node 版本,若是大版本小於 8 ,則直接退出(截止目前是 8)
- createReactApp.js 初始化一些命令參數,而後再去判斷是否傳入了 packageName,不然直接退出
- 各類版本的判斷,而後經過
cross-spawn來用命令行執行全部的安裝 - 當全部的依賴安裝完後,依舊經過命令行,初始化 node 環境,來執行 react-script 下的初始化方法:修改 package.json 中的一些配置、以及 copy 模板文件
- 處理完成,給出用戶友好提示
通篇看完 package 的職能後,發現,哇,這有點簡答啊~~其實,咱們學習源碼的其實就是爲了學習大佬們的一些邊界狀況處理,在後面本身開發的時候再去 copy~ 借鑑一些判斷方法的編寫。後面會再簡單分析下react-scripts,而後寫一個本身的一些項目架構腳本~
- 1. create-react-app 源碼學習(上)
- 2. Koa2 源碼學習(上)
- 3. [源碼學習]Android JsBridge源碼學習
- 4. create-react-app 源碼學習
- 5. 源碼學習
- 6. Bootstrap學習筆記上(帶源碼)
- 7. Underscore.js 源碼學習筆記(上)
- 8. Tomcat 源碼學習 HTTP 請求 (上)
- 9. 跟着源碼學習VUE之上手
- 10. 1.最俗學習之-Vue源碼學習-引入篇(上)
- 更多相關文章...
- • 您已經學習了 XML Schema,下一步學習什麼呢? - XML Schema 教程
- • 我們已經學習了 SQL,下一步學習什麼呢? - SQL 教程
- • Tomcat學習筆記(史上最全tomcat學習筆記)
- • 適用於PHP初學者的學習線路和建議
-
每一个你不满意的现在,都有一个你没有努力的曾经。