SpringBoot2.0基礎案例(01):環境搭建和RestFul風格接口
本文源碼
GitHub:知了一笑
https://github.com/cicadasmile/spring-boot-base
1、SpringBoot 框架的特色
一、SpringBoot2.0 特色
1)SpringBoot繼承了Spring優秀的基因,上手難度小
2)簡化配置,提供各類默認配置來簡化項目配置
3)內嵌式容器簡化Web項目,簡化編碼
Spring Boot 則會幫助開發着快速啓動一個 web 容器,在 Spring Boot 中,只須要在 pom 文件中添加以下一個 starter-web 依賴便可.java
<dependency>
    <groupId>org.springframework.boot</groupId>
    <artifactId>spring-boot-starter-web</artifactId>
</dependency>
4)發展趨勢看
微服務是將來發展的趨勢,項目會從傳統架構慢慢轉向微服務架構,由於微服務可使不一樣的團隊專一於更小範圍的工做職責、使用獨立的技術、更安全更頻繁地部署。git
2、搭建SpringBoot的環境
一、建立一個Maven項目

二、引入核心依賴
<dependency>
    <groupId>org.springframework.boot</groupId>
    <artifactId>spring-boot-starter-web</artifactId>
</dependency>
三、編寫配置文件
application.ymlgithub
# 端口
server:
  port: 8001
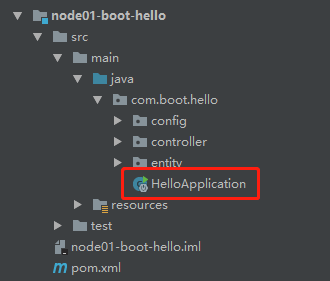
四、啓動文件註解
import org.springframework.boot.SpringApplication;
import org.springframework.boot.autoconfigure.SpringBootApplication;
@SpringBootApplication
public class HelloApplication {
    public static void main(String[] args) {
        SpringApplication.run(HelloApplication.class,args) ;
    }
}
絲毫沒有問題,就這樣吧啓動上面這個類,springboot的基礎環境就搭建好了。
想一想以前的Spring框架的環境搭建,是否是就是這個感受:意會一下吧。web
3、SpringBoot2.0 幾個入門案例
一、建立一個Web接口
import com.boot.hello.entity.ProjectInfo;
import org.springframework.web.bind.annotation.RequestMapping;
import org.springframework.web.bind.annotation.RestController;
/**
 * SpringBoot 2.0 第一個程序
 */
@RestController
public class HelloController {
    @RequestMapping("/getInfo")
    public ProjectInfo getInfo (){
        ProjectInfo info = new ProjectInfo() ;
        info.setTitle("SpringBoot 2.0 基礎教程");
        info.setDate("2019-06-05");
        info.setAuthor("知了一笑");
        return info ;
    }
}
@RestController 註解 等價 @Controller + @ResponseBody 返回Json格式數據。spring
二、參數映射
1)首先看看SpringBoot 如何區分環境 安全
安全
這裏標識配置加載指定的配置文件。springboot
2)參數配置
application-pro.yml架構
user:
  author: 知了一笑
  title: SpringBoot 2.0 程序開發
  time: 2019-07-05
3)參數內容讀取mvc
@Component
public class ParamConfig {
    @Value("${user.author}")
    private String author ;
    @Value("${user.title}")
    private String title ;
    @Value("${user.time}")
    private String time ;
    // 省略 get 和 set 方法
}
4)調用方式app
/**
 * 環境配置,參數綁定
 */
@RestController
public class ParamController {

    @Resource
    private ParamConfig paramConfig ;

    @RequestMapping("/getParam")
    public String getParam (){
        return "["+paramConfig.getAuthor()+";"+
                paramConfig.getTitle()+";"+
                paramConfig.getTime()+"]" ;
    }
}
三、RestFul 風格接口和測試
1)Rest風格接口
/**
 * Rest 風格接口測試
 */
@RestController // 等價 @Controller + @ResponseBody 返回Json格式數據
@RequestMapping("rest")
public class RestApiController {
    private static final Logger LOG = LoggerFactory.getLogger(RestApiController.class) ;
    /**
     * 保存
     */
    @RequestMapping(value = "/insert",method = RequestMethod.POST)
    public String insert (UserInfo userInfo){
        LOG.info("===>>"+userInfo);
        return "success" ;
    }
    /**
     * 查詢
     */
    @RequestMapping(value = "/select/{id}",method = RequestMethod.GET)
    public String select (@PathVariable Integer id){
        LOG.info("===>>"+id);
        return "success" ;
    }
}
2)測試代碼
@RunWith(SpringJUnit4ClassRunner.class)
@SpringBootTest(classes = MockServletContext.class)
@WebAppConfiguration
public class TestRestApi {

    private MockMvc mvc;
    @Before
    public void setUp() throws Exception {
        mvc = MockMvcBuilders.standaloneSetup(new RestApiController()).build();
    }

    /**
     * 測試保存接口
     */
    @Test
    public void testInsert () throws Exception {
        RequestBuilder request = null;
        request = post("/rest/insert/")
                .param("id", "1")
                .param("name", "測試大師")
                .param("age", "20");
        mvc.perform(request)
                .andExpect(content().string(equalTo("success")));
    }

    /**
     * 測試查詢接口
     */
    @Test
    public void testSelect () throws Exception {
        RequestBuilder request = null;
        request = get("/rest/select/1");
        mvc.perform(request)
                .andExpect(content().string(equalTo("success")));
    }
}
這樣SpringBoot2.0的入門案例就結束了,簡單,優雅,有格調。
4、源代碼地址
GitHub地址:知了一笑
https://github.com/cicadasmile
碼雲地址:知了一笑
https://gitee.com/cicadasmile


相關文章
- 1. thinkphp5.0極速搭建restful風格接口層實例
- 2. Restful風格接口淺析
- 3. RESTful風格接口(基於springboot)
- 4. Spring基礎案例---spring環境搭建和IOC實例
- 5. 01 Cesium基礎篇--環境搭建
- 6. 【RESTful風格】軟件接口設計中RESTful風格
- 7. yii2 restful 風格搭建(二)接口認證
- 8. node上轉接RESTful風格接口
- 9. 零基礎跟我學 koa2+nodejs框架 restful api接口風格
- 10. django基礎篇01-環境的搭建和項目的建立
- 更多相關文章...
- • Swift 環境搭建 - Swift 教程
- • Rust 環境搭建 - RUST 教程
- • 適用於PHP初學者的學習線路和建議
- • IntelliJ IDEA 代碼格式化配置和快捷鍵
相關標籤/搜索
每日一句
-
每一个你不满意的现在,都有一个你没有努力的曾经。
最新文章
歡迎關注本站公眾號,獲取更多信息
