「譯」如何在懸停時建立菜單圖像動畫

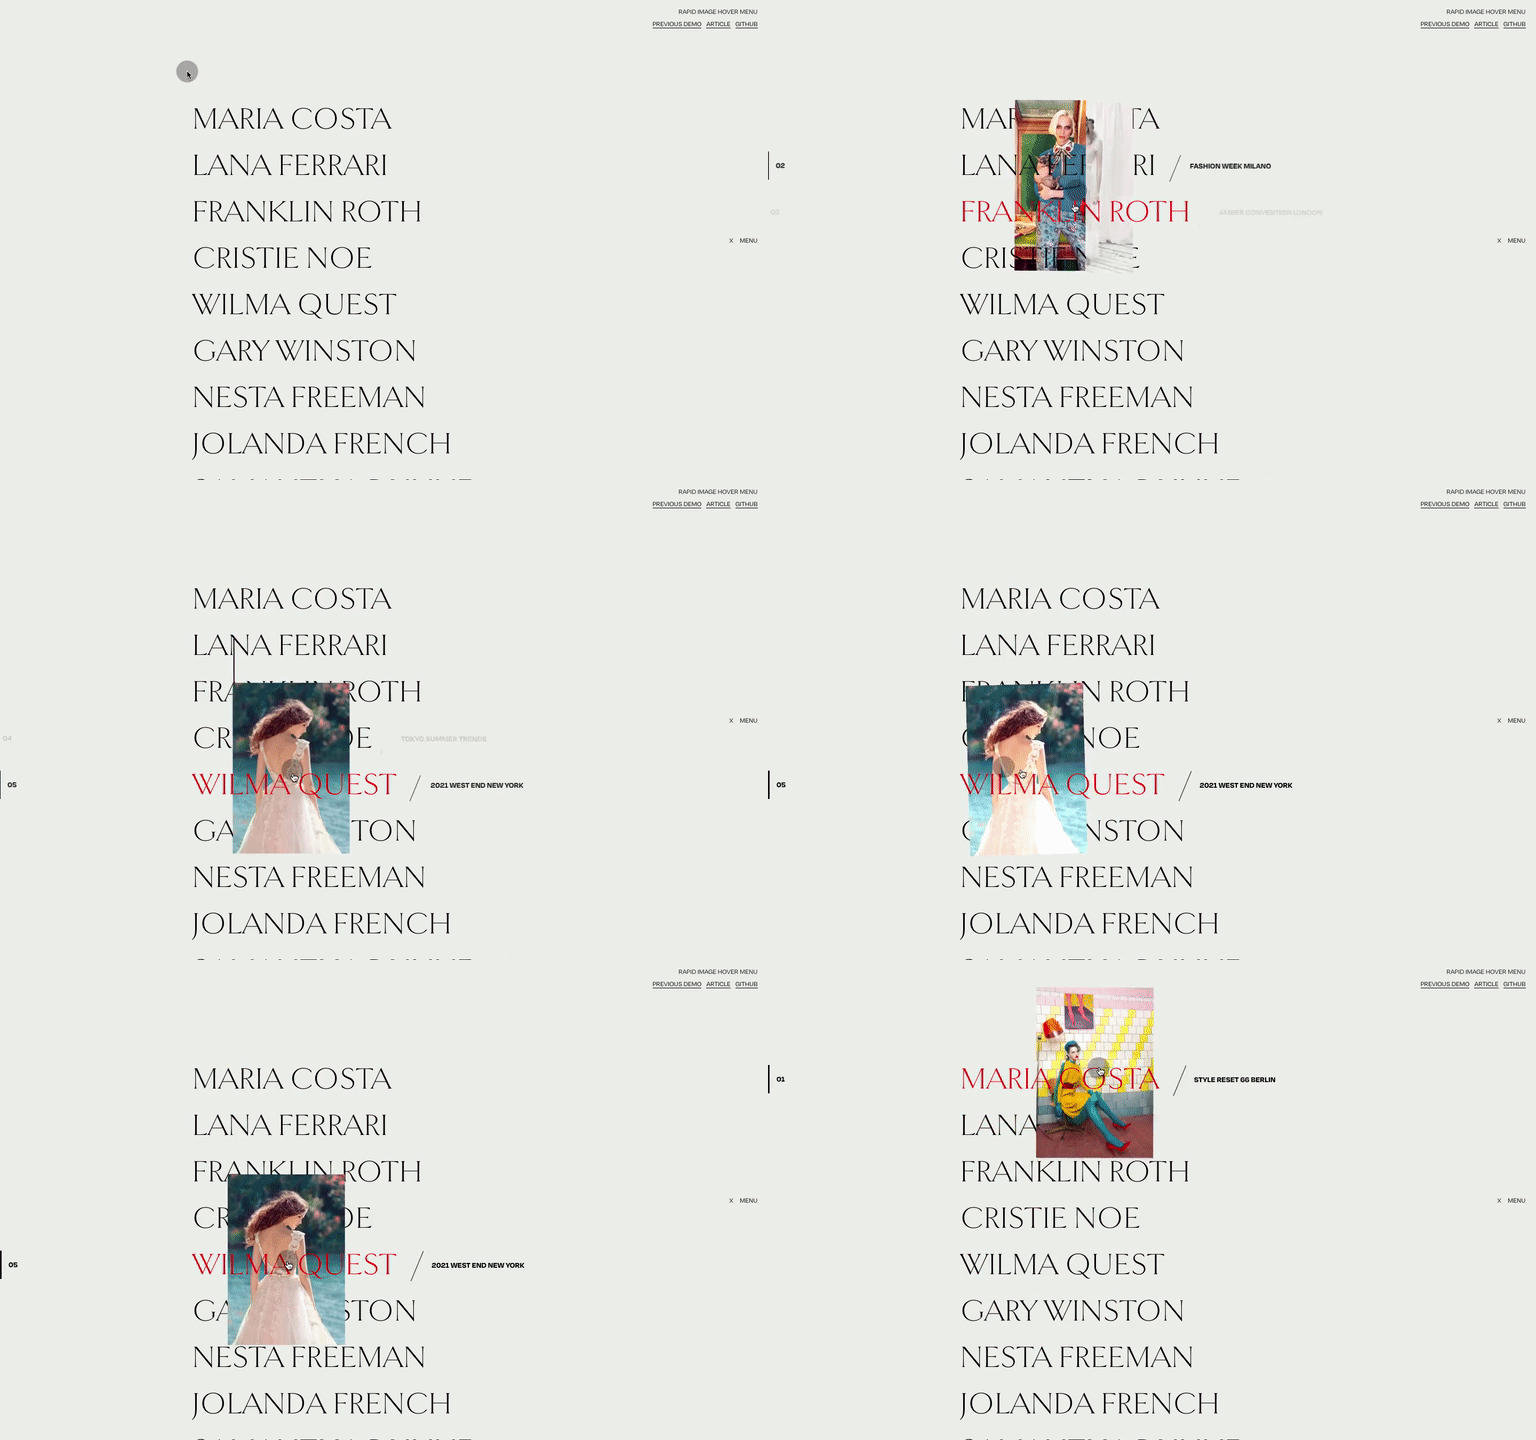
在 Codrops,咱們喜歡嘗試有趣的懸停效果。早在 2018 年,咱們就探索了一組有趣的懸停動畫以獲取連接。咱們將其稱爲「圖像顯示懸停效果」,它展現瞭如何在懸停菜單項時使圖像以精美的動畫出現。看完 Marvin Schwaibold 出色的做品集以後,我想在更大的菜單上再次嘗試這種效果,並在移動鼠標時添加漂亮的搖擺效果。使用一些過濾器,這也能夠變得更加生動。css
若是您對其餘相似效果感興趣,請查看如下內容:html
所以,咱們今天來看看如何建立這種圖像懸停展現動畫:git

若干標記和樣式
咱們將爲每一個菜單項使用嵌套結構,由於咱們將在頁面加載和懸停時顯示幾個文本元素。github
可是咱們不會在加載或懸停效果上使用文本動畫,由於咱們感興趣的是如何使圖像顯示在每一個菜單項目上。當我想實現某種效果時,我要作的第一件事就是使用 HTML 編寫所需的簡單結構。讓咱們看一下代碼:api
<a class="menu__item">
    <span class="menu__item-text">
        <span class="menu__item-textinner">Maria Costa</span>
    </span>
    <span class="menu__item-sub">Style Reset 66 Berlin</span>
    <div class="hover-reveal">
        <div class="hover-reveal__inner">
            <div class="hover-reveal__img" style="background-image: url(img/1.jpg);"></div>
        </div>
    </div>
</a>
爲了構造圖像的標記,咱們須要將源圖保存在某個地方。咱們將在 menu__item 上使用 data 屬性,例如 data-img="img/1.jpg"。稍後咱們將詳細介紹。數組
接下來,咱們將對其進行一些樣式設置:緩存
.hover-reveal {
    position: absolute;
    z-index: -1;
    width: 220px;
    height: 320px;
    top: 0;
    left: 0;
    pointer-events: none;
    opacity: 0;
}

.hover-reveal__inner {
    overflow: hidden;
}

.hover-reveal__inner,
.hover-reveal__img {
    width: 100%;
    height: 100%;
    position: relative;
}

.hover-reveal__img {
    background-size: cover;
    background-position: 50% 50%;
}
咱們將繼續添加其餘特定於咱們想要的的動態效果樣式(如變換)。app
接下來,讓咱們看看 JavaScript 部分代碼。ide
使用 JavaScript
咱們將使用 GSAP,除了懸停動畫外,還將使用自定義光標和平滑滾動。爲此,咱們將使用來自年度開發活動使人讚歎的 平滑滾動庫。因爲這些都是可選的,而且超出了咱們要展現的菜單效果範圍,因此在這裏就再也不贅述。svg
首先,咱們要預加載全部圖像。出於本演示目的,咱們在頁面加載時執行此操做,但這是可選的。
完成後,咱們能夠初始化平滑滾動實例、自定義光標和咱們的 menu 實例。
接下來是JavaScript 部分代碼(index.js),以下所示:
import Cursor from './cursor';
import {preloader} from './preloader';
import LocomotiveScroll from 'locomotive-scroll';
import Menu from './menu';

const menuEl = document.querySelector('.menu');

preloader('.menu__item').then(() => {
    const scroll = new LocomotiveScroll({el: menuEl, smooth: true});
    const cursor = new Cursor(document.querySelector('.cursor'));
    new Menu(menuEl);
});
如今,讓咱們爲 menu 建立一個類(在 menu.js 中):
import {gsap} from 'gsap';
import MenuItem from './menuItem';

export default class Menu {
    constructor(el) {
        this.DOM = {el: el};
        this.DOM.menuItems = this.DOM.el.querySelectorAll('.menu__item');
        this.menuItems = [];
        [...this.DOM.menuItems].forEach((item, pos) => this.menuItems.push(new MenuItem(item, pos, this.animatableProperties)));

        ...
    }
    ...
}
到目前爲止,咱們已經參考了主要元素(菜單 <nav>
元素)和菜單元素。咱們還將建立一個 MenuItem 實例數組。可是,讓咱們稍後再介紹。
如今,咱們要實現鼠標移到菜單項上時更新 transform(X 和 Y 轉換)值,可是咱們也可能想更新其餘屬性。在咱們這個演示案例中,咱們會另外更新旋轉和 CSS 過濾器值(亮度)。爲此,讓咱們建立一個存儲此配置的對象:
constructor(el) {
    ...

    this.animatableProperties = {
        tx: {previous: 0, current: 0, amt: 0.08},
        ty: {previous: 0, current: 0, amt: 0.08},
        rotation: {previous: 0, current: 0, amt: 0.08},
        brightness: {previous: 1, current: 1, amt: 0.08}
    };
}
經過圖像插值,能夠在移動鼠標時實現平滑的動畫效果。previous 和 current 是咱們須要進行插值處理的部分。這些「可動畫化」屬性的 current 值將以特定的增量介於這兩個值之間。amt 的值是要內插的數量。例如,如下公式將計算咱們當前的 translationX 值:
this.animatableProperties.tx.previous = MathUtils.lerp(this.animatableProperties.tx.previous, this.animatableProperties.tx.current, this.animatableProperties.tx.amt);
最後,咱們能夠顯示菜單項,默認狀況下它們是隱藏的。這只是小部分額外的東西,並且徹底是可選的,但這絕對是一個不錯的附加組件,它能夠延遲頁面加載來顯示每一個項目。
constructor(el) {
    ...

    this.showMenuItems();
}
showMenuItems() {
    gsap.to(this.menuItems.map(item => item.DOM.textInner), {
        duration: 1.2,
        ease: 'Expo.easeOut',
        startAt: {y: '100%'},
        y: 0,
        delay: pos => pos*0.06
    });
}
Menu 類就是這樣。接下來,咱們將研究如何建立 MenuItem 類以及一些輔助變量和函數。
所以,讓咱們開始導入 GSAP 庫(咱們將使用它來顯示和隱藏圖像),一些輔助函數以及 images 文件夾中的圖像。
接下來,咱們須要在任何給定時間訪問鼠標的位置,由於圖像將跟隨其移動。咱們能夠在 mousemove 上更新此值。咱們還將緩存其位置,以即可以計算 X 軸和 Y 軸的速度和移動方向。
所以,到目前爲止,這就是 menuItem.js 文件中須要的內容:
import {gsap} from 'gsap';
import { map, lerp, clamp, getMousePos } from './utils';
const images = Object.entries(require('../img/*.jpg'));

let mousepos = {x: 0, y: 0};
let mousePosCache = mousepos;
let direction = {x: mousePosCache.x-mousepos.x, y: mousePosCache.y-mousepos.y};

window.addEventListener('mousemove', ev => mousepos = getMousePos(ev));

export default class MenuItem {
    constructor(el, inMenuPosition, animatableProperties) {
        ...
    }
    ...
}
傳遞其位置索引和 animatableProperties 以前對象所描述部分。「動畫」屬性值在不一樣菜單項之間共享和更新的結果,將使圖像的移動和旋轉得以連續展示。
如今,爲了可以以一種精美的方式顯示和隱藏菜單項圖像,咱們須要建立在開始時顯示的特定標記,並將其添加到對應項。請記住,默認狀況下,咱們的菜單項以下:
<a class="menu__item" data-img="img/3.jpg">
    <span class="menu__item-text"><span class="menu__item-textinner">Franklin Roth</span></span>
    <span class="menu__item-sub">Amber Convention London</span>
</a>
讓咱們在項目上添加如下結構:
<div class="hover-reveal">
    <div class="hover-reveal__inner" style="overflow: hidden;">
        <div class="hover-reveal__img" style="background-image: url(pathToImage);">
        </div>
    </div>
</div>
隨着咱們移動鼠標,hover-reveal 對象將負責移動。
這個 hover-reveal 元素與 hover-reveal__img 元素(帶有背景圖片)將一塊兒協同來實現花俏的顯示、不顯示動畫效果。
layout() {
    this.DOM.reveal = document.createElement('div');
    this.DOM.reveal.className = 'hover-reveal';
    this.DOM.revealInner = document.createElement('div');
    this.DOM.revealInner.className = 'hover-reveal__inner';
    this.DOM.revealImage = document.createElement('div');
    this.DOM.revealImage.className = 'hover-reveal__img';
    this.DOM.revealImage.style.backgroundImage = `url(${images[this.inMenuPosition][1]})`;
    this.DOM.revealInner.appendChild(this.DOM.revealImage);
    this.DOM.reveal.appendChild(this.DOM.revealInner);
    this.DOM.el.appendChild(this.DOM.reveal);
}
同時 MenuItem 構造函數也完成了:
constructor(el, inMenuPosition, animatableProperties) {
    this.DOM = {el: el};
    this.inMenuPosition = inMenuPosition;
    this.animatableProperties = animatableProperties;
    this.DOM.textInner = this.DOM.el.querySelector('.menu__item-textinner');
    this.layout();
    this.initEvents();
}
最後是初始化一些事件,咱們須要在懸停項目時顯示圖像,而在離開項目時將其隱藏。
另外,將鼠標懸停時,咱們須要更新 animatableProperties 對象屬性,並隨着鼠標移動來移動、旋轉和更改圖像的亮度:
initEvents() {
    this.mouseenterFn = (ev) => {
        this.showImage();
        this.firstRAFCycle = true;
        this.loopRender();
    };
    this.mouseleaveFn = () => {
        this.stopRendering();
        this.hideImage();
    };

    this.DOM.el.addEventListener('mouseenter', this.mouseenterFn);
    this.DOM.el.addEventListener('mouseleave', this.mouseleaveFn);
}
如今讓咱們編寫 showImage 和 hideImage 函數的代碼。
咱們能夠爲此建立一個 GSAP 時間軸。讓咱們首先將 reveal 元素的不透明度設置爲 1。另外,爲了使圖像出如今全部其餘菜單項的頂部,讓咱們將該項目的 z-index 設置爲較高的值。
接下來,咱們能夠對圖像的外觀進行動畫處理。讓咱們這樣作:根據鼠標 x 軸的移動方向(在 direction.x 中有此方向)來決定圖像在左側仍是右側顯示。爲此,圖像元素(revealImage)須要將其 translationX 值動畫化爲其父元素(revealInner元素)的相對側。
基本上就是這樣:
主要內容就這些:
showImage() {
    gsap.killTweensOf(this.DOM.revealInner);
    gsap.killTweensOf(this.DOM.revealImage);

    this.tl = gsap.timeline({
        onStart: () => {
            this.DOM.reveal.style.opacity = this.DOM.revealInner.style.opacity = 1;
            gsap.set(this.DOM.el, {zIndex: images.length});
        }
    })
    // animate the image wrap
    .to(this.DOM.revealInner, 0.2, {
        ease: 'Sine.easeOut',
        startAt: {x: direction.x < 0 ? '-100%' : '100%'},
        x: '0%'
    })
    // animate the image element
    .to(this.DOM.revealImage, 0.2, {
        ease: 'Sine.easeOut',
        startAt: {x: direction.x < 0 ? '100%': '-100%'},
        x: '0%'
    }, 0);
}
要隱藏圖像,咱們只須要反轉此邏輯便可:
hideImage() {
    gsap.killTweensOf(this.DOM.revealInner);
    gsap.killTweensOf(this.DOM.revealImage);

    this.tl = gsap.timeline({
        onStart: () => {
            gsap.set(this.DOM.el, {zIndex: 1});
        },
        onComplete: () => {
            gsap.set(this.DOM.reveal, {opacity: 0});
        }
    })
    .to(this.DOM.revealInner, 0.2, {
        ease: 'Sine.easeOut',
        x: direction.x < 0 ? '100%' : '-100%'
    })
    .to(this.DOM.revealImage, 0.2, {
        ease: 'Sine.easeOut',
        x: direction.x < 0 ? '-100%' : '100%'
    }, 0);
}
如今,咱們只須要更新 animatableProperties 對象屬性,以便圖像能夠平滑地移動,旋轉和改變其亮度。咱們在 requestAnimationFrame 循環中執行此操做。在每一個週期中,咱們都會插值先前值和當前值,所以事情會輕鬆進行。
咱們要旋轉圖像並根據鼠標的 X 軸速度(或從上一個循環開始的距離)更改其亮度。所以,咱們須要計算每一個週期的距離,這能夠經過從緩存的鼠標位置中減去鼠標位置來得到。
咱們也想知道咱們向哪一個方向移動鼠標,由於旋轉將取決於鼠標。向左移動時,圖像旋轉爲負值;向右移動時,圖像旋轉爲正值。
接下來,咱們要更新 animatableProperties 值。對於 translationX 和 translationY,咱們但願將圖像的中心定位在鼠標所在的位置。請注意,圖像元素的原始位置在菜單項的左側。
根據鼠標的速度、距離及其方向,旋轉角度能夠從 -60 度變爲 60 度。最終,亮度能夠從 1 變爲 4,這也取決於鼠標的速度、距離。
最後,咱們將這些值與以前的循環值一塊兒使用,並使用插值法設置最終值,而後在爲元素設置動畫時會給咱們帶來平滑的感受。
這是 render 函數的樣子:
render() {
    this.requestId = undefined;

    if ( this.firstRAFCycle ) {
        this.calcBounds();
    }

    const mouseDistanceX = clamp(Math.abs(mousePosCache.x - mousepos.x), 0, 100);
    direction = {x: mousePosCache.x-mousepos.x, y: mousePosCache.y-mousepos.y};
    mousePosCache = {x: mousepos.x, y: mousepos.y};

    this.animatableProperties.tx.current = Math.abs(mousepos.x - this.bounds.el.left) - this.bounds.reveal.width/2;
    this.animatableProperties.ty.current = Math.abs(mousepos.y - this.bounds.el.top) - this.bounds.reveal.height/2;
    this.animatableProperties.rotation.current = this.firstRAFCycle ? 0 : map(mouseDistanceX,0,100,0,direction.x < 0 ? 60 : -60);
    this.animatableProperties.brightness.current = this.firstRAFCycle ? 1 : map(mouseDistanceX,0,100,1,4);

    this.animatableProperties.tx.previous = this.firstRAFCycle ? this.animatableProperties.tx.current : lerp(this.animatableProperties.tx.previous, this.animatableProperties.tx.current, this.animatableProperties.tx.amt);
    this.animatableProperties.ty.previous = this.firstRAFCycle ? this.animatableProperties.ty.current : lerp(this.animatableProperties.ty.previous, this.animatableProperties.ty.current, this.animatableProperties.ty.amt);
    this.animatableProperties.rotation.previous = this.firstRAFCycle ? this.animatableProperties.rotation.current : lerp(this.animatableProperties.rotation.previous, this.animatableProperties.rotation.current, this.animatableProperties.rotation.amt);
    this.animatableProperties.brightness.previous = this.firstRAFCycle ? this.animatableProperties.brightness.current : lerp(this.animatableProperties.brightness.previous, this.animatableProperties.brightness.current, this.animatableProperties.brightness.amt);

    gsap.set(this.DOM.reveal, {
        x: this.animatableProperties.tx.previous,
        y: this.animatableProperties.ty.previous,
        rotation: this.animatableProperties.rotation.previous,
        filter: `brightness(${this.animatableProperties.brightness.previous})`
    });

    this.firstRAFCycle = false;
    this.loopRender();
}
我但願這並不是難事,而且您已經對構建這種奇特效果有所瞭解。
若是您有任何疑問,請聯繫我 @codrops 或 @crnacura。
感謝您的閱讀!
在 Github 上找到這個項目。
該演示中使用的圖像是 Andrey Yakovlev 和 Lili Aleeva 製做的,使用的全部圖像均在 CC BY-NC-ND 4.0 得到許可。
- 1. [譯] 如何建立 BubblePicker – Android 多彩菜單動畫
- 2. 鼠標懸停出菜單
- 3. 在Mockplus中,如何做鼠標懸停時菜單下拉的效果?
- 4. css建立鼠標懸停下拉菜單樣式
- 5. CSS3鼠標懸停圖片動畫
- 6. ZooMove:jQuery插件可在懸停時縮放圖像
- 7. jQuery實現三級聯動菜單(鼠標懸停聯動)
- 8. CSS鼠標懸停border線條動畫
- 9. CSS3懸停效果和動畫Hover.css
- 10. 30個jQuery按鈕懸停動畫
- 更多相關文章...
- • XSD 如何使用? - XML Schema 教程
- • Eclipse 菜單 - Eclipse 教程
- • TiDB 在摩拜單車在線數據業務的應用和實踐
- • 適用於PHP初學者的學習線路和建議
-
每一个你不满意的现在,都有一个你没有努力的曾经。
- 1. 升級Gradle後報錯Gradle‘s dependency cache may be corrupt (this sometimes occurs
- 2. Smarter, Not Harder
- 3. mac-2019-react-native 本地環境搭建(xcode-11.1和android studio3.5.2中Genymotion2.12.1 和VirtualBox-5.2.34 )
- 4. 查看文件中關鍵字前後幾行的內容
- 5. XXE萌新進階全攻略
- 6. Installation failed due to: ‘Connection refused: connect‘安卓studio端口占用
- 7. zabbix5.0通過agent監控winserve12
- 8. IT行業UI前景、潛力如何?
- 9. Mac Swig 3.0.12 安裝
- 10. Windows上FreeRDP-WebConnect是一個開源HTML5代理,它提供對使用RDP的任何Windows服務器和工作站的Web訪問