跟 Web Components 打個啵
廣告招人:阿里巴巴招前端,在這裏你能夠享受大公司的福利和技術體系,也有小團隊的挑戰和成長空間。
聯繫: qingguang.meiqg at alibaba-inc.comjavascript
本文是一篇 Web Components 入門教程css
What are Web Components
Web Components 是 W3C 定義的新標準,目前還在草案階段。html
Why are they important
-
前端組件化前端
bootstraphtml5
// 初始化
  $('#myModal').modal({
    keyboard: false
  });

  // 顯示
  $('#myModal').modal('show');

  // 關閉事件
  $('#myModal').on('hidden.bs.modal', function (e) {
    // do something...
  });
atomjava
// 初始化組件
var dialog = new Dialog(
     trigger: '#trigger-btn',
   title: '我是自定義的標題',
   content: 'hello world',
   buttons: ['submit', 'cancel']
});

// 顯示
dialog.show();

// 關閉事件
dialog.after('hide', function() {
     // do something...
});
統一標準、減小輪子web
-
簡化代碼,提升可維護性bootstrap

<hangout-module>
  <hangout-chat from="Paul, Addy">
    <hangout-discussion>
      <hangout-message from="Paul" profile="profile.png"
           datetime="2013-07-17T12:02">
        <p>Feelin' this Web Components thing.</p>
        <p>Heard of it?</p>
      </hangout-message>
    </hangout-discussion>
  </hangout-chat>
  <hangout-chat>...</hangout-chat>
</hangout-module>
關鍵技術
HTML Imports跨域
HTML Templates瀏覽器
Custom Elements
Shadow DOM

雖然大部分瀏覽器還不支持 Web Components ,可是有個叫作 webcomponents.js 的兼容庫,可讓 Web Components 在不支持它的瀏覽器上運行起來。只要你在項目中引入這個庫,就能夠在其餘瀏覽器中將 Web Components 用起來。
HTML Imports
經過<link>標籤來引入 HTML 文件,使得咱們能夠用不一樣的物理文件來組織代碼。
<link rel="import" href="http://example.com/component.html" >
注意:受瀏覽器同源策略限制,跨域資源的 import 須要服務器端開啓 CORS。
Access-Control-Allow-Origin: example.com
經過import引入的 HTML 文件是一個包含了 html, css, javascript 的獨立 component。
<template>
    <style>
        .coloured {
            color: red;
        }
    </style>
    <p>My favorite colour is: <strong class="coloured">Red</strong></p>
</template>
<script>
    (function() {
        var element = Object.create(HTMLElement.prototype);
        var template = document.currentScript.ownerDocument.querySelector('template').content;
        element.createdCallback = function() {
            var shadowRoot = this.createShadowRoot();
            var clone = document.importNode(template, true);
            shadowRoot.appendChild(clone);
        };
        document.registerElement('favorite-colour', {
            prototype: element
        });
    }());
</script>
HTML Templates
關於 HTML 模板的做用不用多講,用過 mustache、handlbars 模板引擎就對 HTML 模板再熟悉不過了。但原來的模板要麼是放在 script 元素內,要麼是放在 textarea 元素內,HTML 模板元素終於給了模板一個名正言順的名分: <template>
原來的模板形式:
script 元素
<script type="text/template">
    <div>
        this is your template content.
    </div>
</script>
textarea 元素
<textarea style="display:none;">
    <div>
        this is your template content.
    </div>
</textarea>
如今的模板形式:
template 元素
<template>
    <div>
        this is your template content.
    </div>
</template>
主要有四個特性:
惰性:在使用前不會被渲染;
無反作用:在使用前,模板內部的各類腳本不會運行、圖像不會加載等;
內容不可見:模板的內容不存在於文檔中,使用選擇器沒法獲取;
可被放置於任意位置:即便是 HTML 解析器不容許出現的位置,例如做爲
<select>的子元素。
Custom Elements
自定義元素容許開發者定義新的 HTML 元素類型。帶來如下特性:
定義新元素
元素繼承
擴展原生 DOM 元素的 API
定義新元素
使用 document.registerElement() 建立一個自定義元素:
var Helloworld = document.registerElement('hello-world', {
  prototype: Object.create(HTMLElement.prototype)
});

document.body.appendChild(new Helloworld());
標籤名必須包含連字符 ' - '
合法的標籤名:
<hello-world>,<my-hello-world>不合法的標籤名:
<hello_world>,<HelloWorld>
元素繼承
若是 <button> 元素不能知足你的需求,能夠繼承它建立一個新元素,來擴展 <button> 元素:
var MyButton = document.registerElement('my-button', {
  prototype: Object.create(HTMLButtonElement.prototype)
});
擴展原生 API
var MyButtonProto = Object.create(HTMLButtonElement.prototype);

MyButtonProto.sayhello = function() {
  alert('hello');
};

var MyButton = document.registerElement('my-button', {
  prototype: MyButtonProto
});


var myButton = new MyButton();
document.body.appendChild(myButton);

myButton.sayhello(); // alert: "hello"
實例化
使用 new 操做符:
var myButton = new MyButton();
myButton.innerHTML = 'click me!';
document.body.appendChild(myButton);
或,直接在頁面插入元素:
<my-button>click me!</my-button>
生命週期
元素能夠定義特殊的方法,來注入其生存週期內的關鍵時間點。生命週期的回調函數名稱和時間點對應關係以下:
createdCallback: 建立元素實例時
attachedCallback: 向文檔插入實例時
detachedCallback: 從文檔移除實例時
attributeChangedCallback(attrName, oldVal, newVal): 添加,移除,或修改一個屬性時
var MyButtonProto = Object.create(HTMLButtonElement.prototype);

MyButtonProto.createdCallback = function() {
  this.innerHTML = 'Click Me!';
};

MyButtonProto.attachedCallback = function() {
  this.addEventListener('click', function(e) {
    alert('hello world');
  });
};

var MyButton = document.registerElement('my-button', {
  prototype: MyButtonProto
});

var myButton = new MyButton();
document.body.appendChild(myButton);
Shadow DOM
Shadow DOM 是一個 HTML 的新規範,其容許開發者封裝本身的 HTML 標籤、CSS 樣式和 JavaScript 代碼。Shadow DOM 使得開發人員能夠建立相似 <input type="range"> 這樣自定義的一級標籤。
web 開發經典問題:封裝。如何保護組件的樣式不被外部 css 樣式侵入,如何保護組件的 dom 結構不被頁面的其餘 javascript 腳本修改。你們都用過 Bootstrap,若是要使用其中的某些組件,例如 modal,一般會把組件的 DOM 結構複製過來。
<div class="modal fade">
<div class="modal-dialog">
<div class="modal-content">
<div class="modal-header">
<button type="button" class="close" data-dismiss="modal" aria-label="Close"><span aria-hidden="true">×</span></button>
<h4 class="modal-title">Modal title</h4>
</div>
<div class="modal-body">
<p>One fine body…</p>
</div>
<div class="modal-footer">
<button type="button" class="btn btn-default" data-dismiss="modal">Close</button>
<button type="button" class="btn btn-primary">Save changes</button>
</div>
</div><!-- /.modal-content -->
</div><!-- /.modal-dialog -->
</div><!-- /.modal -->
這樣一坨複製過來的代碼,大多數時候並無仔細瞭解,任什麼時候候一個不當心都有可能覆蓋了其中的一個 class 樣式,這裏面可能潛在不少小 bug。Shadow Dom 能夠很好的解決組件封裝問題。
一個例子說明,什麼是 Shadow DOM ?
瀏覽器渲染 <input type="range"> 標籤,顯示結果以下:
<input type="range">
看起來彷佛很簡單,只有一個 input 標籤而已。但其實是這樣的: 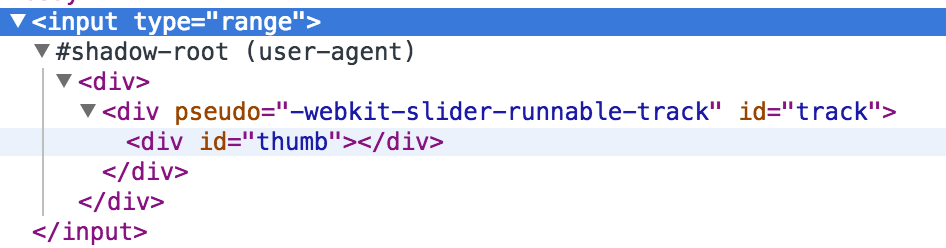
顯示 shadow dom 須要開啓 Chrome 開發者工具的 'Show user agent shadow DOM' 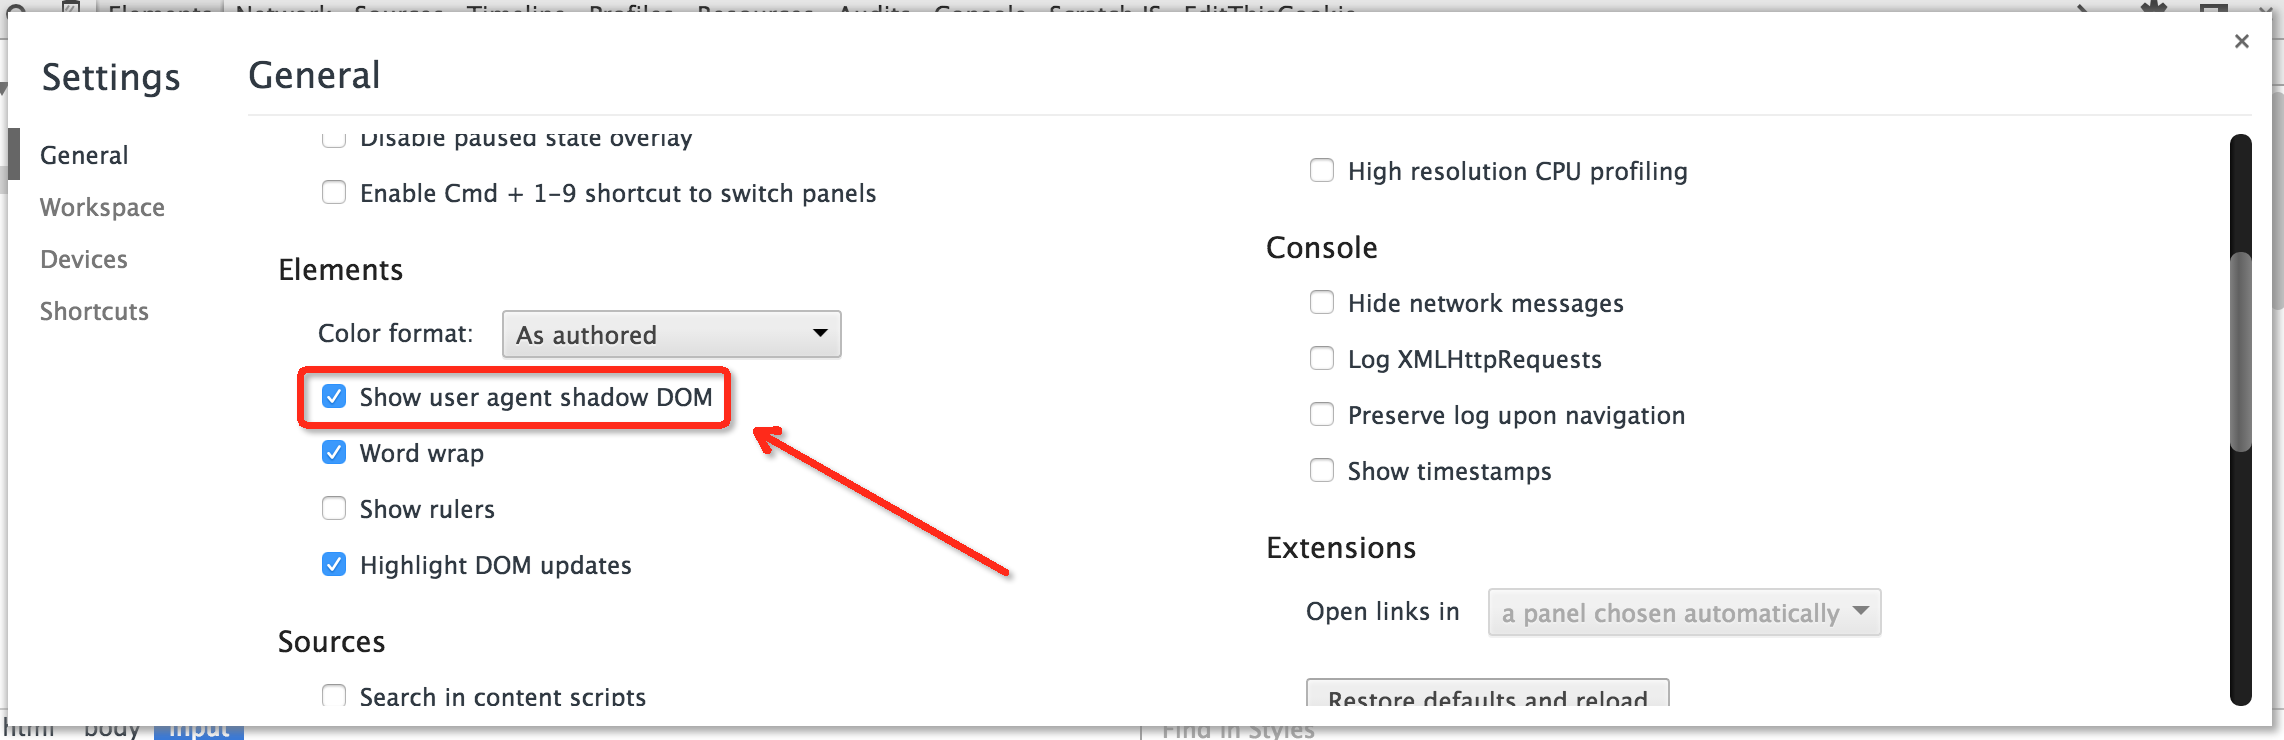
建立 Shadow DOM
使用 createShadowRoot 建立影子根節點,其他的操做跟普通 DOM 操做沒有太大區別。
<div class="widget">Hello, world!</div>
<script>
  var host = document.querySelector('.widget');
  var root = host.createShadowRoot();

  var header = document.createElement('h1');
  header.textContent = 'Hello, I am Shadow DOM.';

  var paragraph = document.createElement('p');
  paragraph.textContent = 'This is the content.';

  root.appendChild(header);
  root.appendChild(paragraph);
</script>
宿主節點的原有內容 Hello, world! 不會被渲染,取而代之的是 shadow root 裏的內容。
使用 content 標籤
<div class="widget">shadow dom</div>
<template>
<h1>Hello, I am <content></content></h1>
</template>
<script>
  var host = document.querySelector('.widget');
  var root = host.createShadowRoot();

  var template = document.querySelector('template').content;
  root.appendChild(document.importNode(template, true));
</script>
使用 <content> 標籤,咱們建立了一個插入,其將 .widget 中的文本投射出來,使之得以在咱們的影子節點 <h1> 中展現。上面的例子最終渲染成 Hello, I am shadow dom。
Shadow DOM 樣式
Shadow DOM 和常規 DOM 之間存在一個邊界,這個邊界能防止常規 DOM 的樣式泄露到 Shadow DOM 中來。
<style>
p.normal, p.shadow {
  color: red;
  font-size: 18px;
}
</style>
<p class="normal">我是一個普通文本</p>
<p class="shadow"></p>
<script>
    var host = document.querySelector('.shadow');
    var root = host.createShadowRoot();
    root.innerHTML = `
    <style>
    p {
      color: blue;
      font-size: 24px;
    }
    </style>
    <p>我是一個影子文本</p>`;
</script>
:host 選擇器
經過 :host 選擇器能夠設置宿主元素的樣式。
<style>
p {
  color: red;
  font-size: 18px;
}
</style>
<p class="normal">我是一個普通文本</p>
<p class="shadow"></p>
<script>
  var host = document.querySelector('.shadow');
  var root = host.createShadowRoot();
  root.innerHTML = `
  <style>
  :host(p.shadow) {
    color: blue;
    font-size: 24px;
  }
  </style>
  我是一個影子文本`;
</script>
注意上例中 shadow DOM 內的選擇器是 :host(p.shadow),而不是跟外部平級的 :host(p)。 由於:host(p) 的優先級低於外部的 p 選擇器,因此不會生效。須要使用 :host(p.shadow) 提高優先級,才能將 .shadow 中的樣式覆蓋。
::shadow 僞類選擇器
有時你可能會想讓使用者打破影子邊界的壁壘,讓他們可以給你的組件添加一些樣式,使用 ::shadow 僞類選擇器咱們能夠賦予用戶重寫咱們默認定義的自由。
<style>
p span,
p::shadow span {
  color: red;
  font-size: 18px;
}
</style>
<p class="normal"><span>我是一個普通文本</span></p>
<p class="shadow"></p>
<script>
  var host = document.querySelector('.shadow');
  var root = host.createShadowRoot();
  root.innerHTML = `
  <style>
  span {
    color: blue;
    font-size: 24px;
  }
  </style>
  <span>我是一個影子文本</span>`;
</script>
參考文獻
- 1. web Components 學習之路
- 2. web components
- 3. Web Components
- 4. # Web Components 全攬
- 5. Web Components 小欖
- 6. Web Components 簡述
- 7. Web Components簡述
- 8. 初探 web components
- 9. web components試用
- 10. Web Components之Custom Elements
- 更多相關文章...
- • 第一個MyBatis程序 - MyBatis教程
- • 第一個Hibernate程序 - Hibernate教程
- • Tomcat學習筆記(史上最全tomcat學習筆記)
- • Docker容器實戰(八) - 漫談 Kubernetes 的本質
-
每一个你不满意的现在,都有一个你没有努力的曾经。