抽絲剝繭RecyclerView - 化整爲零
技術不止,文章有料,關注公衆號
九心說,每週一篇高質好文,和九心在大廠路上肩並肩。android
前言
抽絲剝繭RecyclerView系列文章的目的在於幫助Android開發者提升對RecyclerView的認知,本文是整個系列的第一章。設計模式
RecyclerView已經出來好久了,不少開發者對於RecyclerView的使用早已信手拈來。以下就是一張使用網格佈局的RecyclerView:  不過,對於
不過,對於RecyclerView這種明星控件的瞭解僅停留在使用的程度,顯然是不可以讓咱們成爲高級工程師的。若是你看過RecyclerView包中的源碼,那你應該和個人心情同樣複雜,光一個RecyclerView.class文件的源碼就多達13000行。緩存
對於源碼閱讀方式,我很同意郭神在Glide源碼分析中所說:markdown
抽絲剝繭、點到即止。應該認準一個功能點,而後去分析這個功能點是如何實現的。但只要去追尋主體的實現邏輯便可,千萬不要試圖去搞懂每一行代碼都是什麼意思,那樣很容易會陷入到思惟黑洞當中,並且越陷越深。app
因此,我在閱讀RecyclerView源碼的時候先肯定好本身想好了解的功能點:ide
- 數據轉化爲具體的子視圖。
- 視圖回收利用方式。
- 佈局多樣性緣由。
- 佈局動畫多樣性緣由。
閱讀姿式 :我選擇了版本爲27.1.1的RecyclerView,不知道什麼緣由,我點進28.0.0版本的RecyclerView庫中查看RecyclerView.class代碼時,雖然類縮短至7000行,可是註釋沒了以及其餘的問題,我不得不使用其餘版本的RecyclerView庫。函數
想要深刻原理,沒有什麼是一遍調試解決不了的,若是有,那就是調試第二遍。源碼分析
目錄
1、RecyclerView使用和介紹
以LinearLayoutManager爲例,咱們看一下RecyclerView的使用方式:佈局
RecyclerView mRecyclerView = findViewById(R.id.recycle);
// 設置佈局方式
mRecyclerView.setLayoutManager(new LinearLayoutManager(this, LinearLayoutManager.VERTICAL, false));
// 適配器,MainAdapter繼承自RecyclerView.Adapter<VH extends RecyclerView.ViewHolder>
MainAdapter mAdapter = new MainAdapter();
mRecyclerView.setAdapter(mAdapter);
// 添加分割線的方法
// mRecyclerView.addItemDecoration();
// 設置佈局動畫的方法,能夠自定義
// mRecyclerView.setItemAnimator();
複製代碼
以及RecyclerView各個部分的做用:post
| 主要的類 | 做用 |
|---|---|
LayoutManager |
負責RecyclerView子View的佈局,經常使用的有LinearLayoutManager(線性佈局),還有GridLayoutManager(網格佈局)和StaggeredGridLayoutManager(瀑布佈局)等。 |
Adapter |
負責將數據轉變成視圖,使用時須要繼承該類。 |
ItemAnimator |
子視圖動畫,RecyclerView有默認的子視圖動畫,也可自定義實現。 |
ItemDecoration |
分隔線,需自定義實現。 |
以上是咱們使用RecyclerView的時候可以直觀看到的部分,還有一個很重要可是不直接使用的類: |
|
| 主要的類 | 做用 |
| :--: | :-- |
Recycler |
負責ViewHolder的回收和提供。 |
| ## 2、源碼分析 | |
| ### 1. RecyclerView三大工做流程 | |
RecyclerView的源碼那麼多,咱們先按照使用時的路線進行分析。 |
|
| ##### 1.1 構造函數 | |
一般,咱們會在佈局文件中使用RecyclerView,因此咱們的入口就變成了: |
|
| ``` | |
| public RecyclerView(@NonNull Context context, @Nullable AttributeSet attrs) { |
this(context, attrs, 0);
複製代碼
}
public RecyclerView(@NonNull Context context, @Nullable AttributeSet attrs, int defStyle) { super(context, attrs, defStyle); // ... 省略一些實例的初始化
if (attrs != null) {
    int defStyleRes = 0;
    TypedArray a = context.obtainStyledAttributes(attrs, styleable.RecyclerView, defStyle, defStyleRes);
    String layoutManagerName = a.getString(styleable.RecyclerView_layoutManager);
    // ... 這裏惟一值得關注就是看佈局文件是否指定LayoutManager
    a.recycle();
    this.createLayoutManager(context, layoutManagerName, attrs, defStyle, defStyleRes);
   // ...
} else {
    // ...
}
// ...
複製代碼
}
因爲咱們能夠在`RecyclerView`的佈局文件中使用` app:layoutManager`指定`LayoutManager`,若是指定了具體的`LayoutManager`,最終會在上面的`RecyclerView#createLayoutManager`方法中利用**反射**生成一個具體的`LayoutManager`實例。
##### 1.2 設置LayoutManager和Adapter
研究自定義View的時候,最快的研究方法就是直接查看`onMeasure`、`onLayout`和`onDraw`三大方法,研究`RecyclerView`也是如此。

上面咱們說到了佈局文件,以後,咱們會在`Activity`或者其餘地方獲取`RecyclerView`,再往下,咱們會爲`RecyclerView`設置`LayoutManager`(如未在佈局文件中設置的狀況下)、`Adapter`以及可能使用的`ItemDecoration`,這些方法都會調用`RecyclerView#requestLayout`方法,從而刷新`RecyclerView`。

先從`RecyclerView#setLayoutManager`講起:
複製代碼
public void setLayoutManager(@Nullable RecyclerView.LayoutManager layout) { if (layout != this.mLayout) { // 中止滾動 this.stopScroll(); if (this.mLayout != null) { // 由於是第一次設置,因此mLayout爲空 // ... 代碼省略 主要是對以前的LayoutManager 進行移除前的操做 } else { this.mRecycler.clear(); } this.mChildHelper.removeAllViewsUnfiltered(); this.mLayout = layout; if (layout != null) { // 對新的LayoutManager進行設置 this.mLayout.setRecyclerView(this); if (this.mIsAttached) { this.mLayout.dispatchAttachedToWindow(this); } } this.mRecycler.updateViewCacheSize(); // 重點 通知界面從新佈局和重繪 this.requestLayout(); } }
`RecyclerView#requestLayout`會刷新佈局,因此該跳到`ViewGroup`繪製的相關方法了?不,由於`RecyclView`中的`Adapter`爲空,`Adapter`爲空,就沒有數據,那看一個空視圖還有什麼意思呢?So,咱們還須要看設置適配器的`RecyclerView#setAdapter`方法:
複製代碼
public void setAdapter(@Nullable RecyclerView.Adapter adapter) { // 凍結當前佈局,不讓進行子佈局的更新 this.setLayoutFrozen(false); // 重點關注的方法 this.setAdapterInternal(adapter, false, true); this.processDataSetCompletelyChanged(false); // 再次請求佈局的從新繪製 this.requestLayout(); }
繼續深刻查看`RecyclerView#setAdapterInternal`方法:
複製代碼
private void setAdapterInternal(@Nullable RecyclerView.Adapter adapter, Boolean compatibleWithPrevious, Boolean removeAndRecycleViews) { if (this.mAdapter != null) { // 第一次進入mAdapter爲null,故不會進入該代碼塊 // 主要是對舊的mAdapter的數據監聽器解除註冊 this.mAdapter.unregisterAdapterDataObserver(this.mObserver); this.mAdapter.onDetachedFromRecyclerView(this); } if (!compatibleWithPrevious || removeAndRecycleViews) { // 更換適配器的時候移除全部的子View this.removeAndRecycleViews(); } this.mAdapterHelper.reset(); RecyclerView.Adapter oldAdapter = this.mAdapter; this.mAdapter = adapter; if (adapter != null) { // 新的適配器註冊數據監聽器 adapter.registerAdapterDataObserver(this.mObserver); adapter.onAttachedToRecyclerView(this); } if (this.mLayout != null) { this.mLayout.onAdapterChanged(oldAdapter, this.mAdapter); } this.mRecycler.onAdapterChanged(oldAdapter, this.mAdapter, compatibleWithPrevious); this.mState.mStructureChanged = true; }
能夠看出,上面的代碼主要是針對`Adapter`發生變化的狀況下作出的一些修改,`RecyclerView.AdapterDataObserver`是數據變化接口,當適配器中的數據發生增刪改的時候最終會調用該接口的實現類,從該接口的命名以及註冊操做和取消註冊操做能夠看出其使用的是觀察者模式。`LayoutManager`和`Adapter`設置完成之後就能夠直奔主題了。
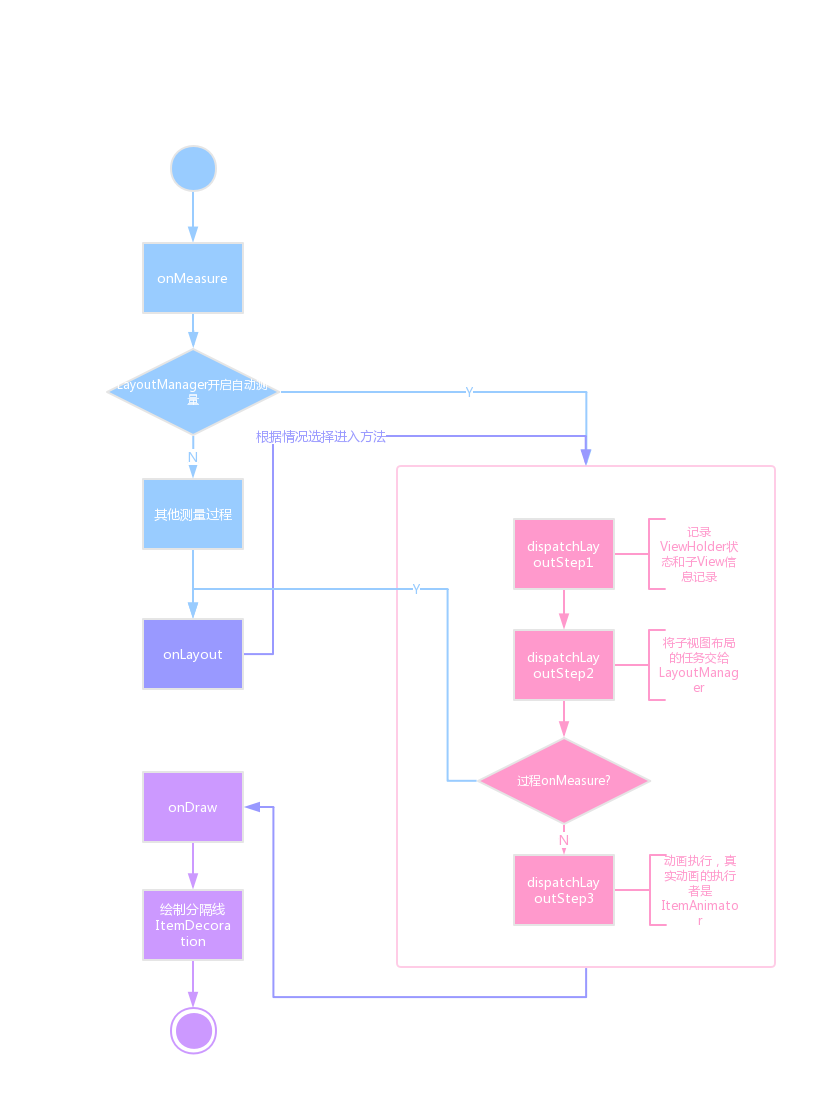
##### 1.3 onMeasure
View工做流程的第一步:
複製代碼
protected void onMeasure(int widthSpec, int heightSpec) { if (this.mLayout == null) { this.defaultOnMeasure(widthSpec, heightSpec); } else { // LinearLayoutManager#isAutoMeasureEnabled爲True // GridLayoutManager繼承子LinearLayoutManager isAutoMeasureEnabled一樣爲true // 這種狀況下,咱們主要分析this.mLayout.isAutoMeasureEnabled()爲true的場景下 if (!this.mLayout.isAutoMeasureEnabled()) { // ... 省略 } else { int widthMode = MeasureSpec.getMode(widthSpec); int heightMode = MeasureSpec.getMode(heightSpec); // ... 測量 最後仍是走ViewGroup測量子佈局的那套 this.mLayout.onMeasure(this.mRecycler, this.mState, widthSpec, heightSpec); Boolean measureSpecModeIsExactly = widthMode == MeasureSpec.EXACTLY && heightMode == MeasureSpec.EXACTLY; // 若是當前的RecyclerView的佈局方式是設置了具體高寬或Match_Parent或mAdapter爲null就直接返回 if (measureSpecModeIsExactly || this.mAdapter == null) { return; } if (this.mState.mLayoutStep == State.STEP_START) { this.dispatchLayoutStep1(); } this.mLayout.setMeasureSpecs(widthSpec, heightSpec); this.mState.mIsMeasuring = true; this.dispatchLayoutStep2(); this.mLayout.setMeasuredDimensionFromChildren(widthSpec, heightSpec); if (this.mLayout.shouldMeasureTwice()) { this.mLayout.setMeasureSpecs(MeasureSpec.makeMeasureSpec(this.getMeasuredWidth(), MeasureSpec.EXACTLY), MeasureSpec.makeMeasureSpec(this.getMeasuredHeight(), MeasureSpec.EXACTLY)); this.mState.mIsMeasuring = true; this.dispatchLayoutStep2(); this.mLayout.setMeasuredDimensionFromChildren(widthSpec, heightSpec); } } } }
顯然,從上面的代碼咱們能夠得出結論:**`measureSpecModeIsExactly`爲`true`或者`Adapter`爲空,咱們會提早結束`onMeasure`的測量過程。**

若是看過`View的工做流程`的同窗應該對`SpecMode`很熟悉,什麼狀況下`SpecMode`會爲`EXACITY `呢?以`RecyclerView`爲例,一般狀況下,若是`RecyclerView`的寬爲具體數值或者`Match_Parent`的時候,那麼它的`SpecMode`很大程度就爲`EXACITY `。`measureSpecModeIsExactly`爲`true`須要保證高和寬的`SpecMode`都爲`EXACITY `,固然,**`View`的`SpecMode`還與父佈局有關**,不瞭解的的同窗能夠查閱一下相關的資料。

若是你的代碼中的RecyclerView沒有使用`Wrap_Content`,那麼大部分使用場景中的`RecyclerView`長寬的`SpecMode`都爲`EXACITY`,我這麼說,不是意味着我要拋棄`return`下方的關鍵方法`RecyclerView#dispatchLayoutStep1`和`RecyclerView#dispatchLayoutStep2`,由於它們在另外一個工做流程`onLayout`中也會執行,因此咱們放到`onLayout`中講解。
##### 1.4 onLayout
View工做流程的第二步:
複製代碼
protected void onLayout(Boolean changed, int l, int t, int r, int b) { TraceCompat.beginSection("RV OnLayout"); this.dispatchLayout(); TraceCompat.endSection(); this.mFirstLayoutComplete = true; }
void dispatchLayout() { if (this.mAdapter == null) { // ... } else if (this.mLayout == null) { // ... } else { this.mState.mIsMeasuring = false; // 根據當前State的不一樣執行不一樣的流程 if (this.mState.mLayoutStep == STEP_START) { this.dispatchLayoutStep1(); this.mLayout.setExactMeasureSpecsFrom(this); this.dispatchLayoutStep2(); } else if (!this.mAdapterHelper.hasUpdates() && this.mLayout.getWidth() == this.getWidth() && this.mLayout.getHeight() == this.getHeight()) { this.mLayout.setExactMeasureSpecsFrom(this); } else { this.mLayout.setExactMeasureSpecsFrom(this); this.dispatchLayoutStep2(); } this.dispatchLayoutStep3(); } }
在`mState`實例初始化中,`mState.mLayoutStep`默認爲`STEP_START`,`RecyclerView#dispatchLayoutStep1`方法確定是要進入的:
複製代碼
private void dispatchLayoutStep1() { // 所有清空位置信息 mViewInfoStore.clear(); // 肯定mState.mRunSimpleAnimations和mState.mRunPredictiveAnimations // ... // 預佈局狀態跟mState.mRunPredictiveAnimations相關 mState.mInPreLayout = mState.mRunPredictiveAnimations; // ... if (mState.mRunSimpleAnimations) { // Step 0: Find out where all non-removed items are, pre-layout int count = mChildHelper.getChildCount(); for (int i = 0; i < count; ++i) { // ... // 存儲子View的位置信息... mViewInfoStore.addToPreLayout(holder, animationInfo); } } if (mState.mRunPredictiveAnimations) { // 其實我也不太理解PreLayout佈局的意義,放出來看看 // Step 1: run prelayout: This will use the old positions of items. The layout manager // is expected to layout everything, even removed items (though not to add removed // items back to the container). This gives the pre-layout position of APPEARING views // which come into existence as part of the real layout.
// 真實佈局以前嘗試佈局一次
	// temporarily disable flag because we are asking for previous layout
	mLayout.onLayoutChildren(mRecycler, mState);
	for (int i = 0; i < mChildHelper.getChildCount(); ++i) {
		//...
		if (!mViewInfoStore.isInPreLayout(viewHolder)) {
			// ...
			if (wasHidden) {
				recordAnimationInfoIfBouncedHiddenView(viewHolder, animationInfo);
			} else {
				mViewInfoStore.addToAppearedInPreLayoutHolders(viewHolder, animationInfo);
			}
		}
	}
	// we don't process disappearing list because they may re-appear in post layout pass.
	clearOldPositions();
} else {
	clearOldPositions();
}
//
mState.mLayoutStep = State.STEP_LAYOUT;
複製代碼
}
private void processAdapterUpdatesAndSetAnimationFlags() { // ... // mFirstLayoutComplete 會在RecyclerView第一次完成onLayout變爲True Boolean animationTypeSupported = mItemsAddedOrRemoved || mItemsChanged; mState.mRunSimpleAnimations = mFirstLayoutComplete && mItemAnimator != null && (mDataSetHasChangedAfterLayout || animationTypeSupported || mLayout.mRequestedSimpleAnimations) && (!mDataSetHasChangedAfterLayout || mAdapter.hasStableIds()); mState.mRunPredictiveAnimations = mState.mRunSimpleAnimations && animationTypeSupported && !mDataSetHasChangedAfterLayout && predictiveItemAnimationsEnabled(); }
咱們須要關注`mState.mRunSimpleAnimations`和`mState.mRunPredictiveAnimations`爲true時機,從代碼上來看,這兩個屬性爲true必須存在`mItemAnimator`,是否意味着子View動畫的執行者`mItemAnimator`,另外,`mViewInfoStore.addToPreLayout(holder, animationInfo);`也得關注,`ViewInfoStore`幫`RecyclerView`記錄了`ViewHolder`中子View的位置信息和狀態。

再看`RecyclerView#dispatchLayoutStep2`方法:
複製代碼
private void dispatchLayoutStep2() { // ... // 預佈局結束 進入真實的佈局過程 this.mState.mInPreLayout = false; // 實際的佈局交給了LayoutManager this.mLayout.onLayoutChildren(this.mRecycler, this.mState); // ... // 是否有動畫 this.mState.mRunSimpleAnimations = this.mState.mRunSimpleAnimations && this.mItemAnimator != null; // 變動狀態 準備播放動畫 STEP_ANIMATIONS-4 this.mState.mLayoutStep = State.STEP_ANIMATIONS; // ... }
在`RecyclerView#dispatchLayoutStep2`方法中咱們能夠看到,`RecyclerView`自身沒有實現給子`View`佈局,而是將佈局方式交給了`LayoutManager`,`LayoutManager`的深刻研究我會在以後的博客和你們討論。

打鐵趁熱,咱們查看`RecyclerView#dispatchLayoutStep3`,代碼較多,精簡後以下:
複製代碼
private void dispatchLayoutStep3() { this.mState.assertLayoutStep(State.STEP_ANIMATIONS); // ... 省略 this.mState.mLayoutStep = State.STEP_START; if (this.mState.mRunSimpleAnimations) { for (int i = this.mChildHelper.getChildCount() - 1; i >= 0; --i) { // ...省略 // 總結下來就是兩個步驟: // 1.添加真實的佈局信息 this.mViewInfoStore.addToPostLayout(holder, animationInfo); } // 2.挨個執行動畫 this.mViewInfoStore.process(this.mViewInfoProcessCallback); } //... 清空信息 this.mViewInfoStore.clear(); }
調用執行動畫函數`ViewInfoStore#process`的時候,能夠看到放入參數`mViewInfoProcessCallback`,從名字能夠看出,這是一個回調的接口,因此,我猜動畫的真實的執行應該在實現接口的方法中實現,不過,咱們仍是要先看`ViewInfoStore`中的動畫如何執行:
複製代碼
void process(ProcessCallback callback) { for (int index = mLayoutHolderMap.size() - 1; index >= 0; index --) { final ViewHolder viewHolder = mLayoutHolderMap.keyAt(index); final InfoRecord record = mLayoutHolderMap.removeAt(index); if ((record.flags & FLAG_APPEAR_AND_DISAPPEAR) == FLAG_APPEAR_AND_DISAPPEAR) { // Appeared then disappeared. Not useful for animations. callback.unused(viewHolder); } else if ((record.flags & FLAG_DISAPPEARED) != 0) { // Set as "disappeared" by the LayoutManager (addDisappearingView) if (record.preInfo == null) { // similar to appear disappear but happened between different layout passes. // this can happen when the layout manager is using auto-measure callback.unused(viewHolder); } else { callback.processDisappeared(viewHolder, record.preInfo, record.postInfo); } } else if ((record.flags & FLAG_APPEAR_PRE_AND_POST) == FLAG_APPEAR_PRE_AND_POST) { // Appeared in the layout but not in the adapter (e.g. entered the viewport) callback.processAppeared(viewHolder, record.preInfo, record.postInfo); } else if ((record.flags & FLAG_PRE_AND_POST) == FLAG_PRE_AND_POST) { // Persistent in both passes. Animate persistence callback.processPersistent(viewHolder, record.preInfo, record.postInfo); } else if ((record.flags & FLAG_PRE) != 0) { // Was in pre-layout, never been added to post layout callback.processDisappeared(viewHolder, record.preInfo, null); } else if ((record.flags & FLAG_POST) != 0) { // Was not in pre-layout, been added to post layout callback.processAppeared(viewHolder, record.preInfo, record.postInfo); } else if ((record.flags & FLAG_APPEAR) != 0) { // Scrap view. RecyclerView will handle removing/recycling this. } else if (DEBUG) { throw new IllegalStateException("record without any reasonable flag combination:/"); } // 釋放record InfoRecord.recycle(record); } }
// 回調的接口 interface ProcessCallback { void processDisappeared(ViewHolder var1, @NonNull ItemHolderInfo var2, @Nullable ItemHolderInfo var3); void processAppeared(ViewHolder var1, @Nullable ItemHolderInfo var2, ItemHolderInfo var3); void processPersistent(ViewHolder var1, @NonNull ItemHolderInfo var2, @NonNull ItemHolderInfo var3); void unused(ViewHolder var1); }
以前存儲的和`ViewHolder`位置狀態相關`InfoRecord `被一個個取出,而後將`ViewHolder`和`InfoRecord`交給`ProcessCallback`,如咱們所料,`ViewInfoStore#process`只是對`ViewHolder`進行分類,具體的實現仍是在`RecyclerView`中的回調,最後查看一下具體實現:
複製代碼
this.mViewInfoProcessCallback = new ProcessCallback() { // ... 這裏咱們只展現一個方法就好了 public void processAppeared(RecyclerView.ViewHolder viewHolder, RecyclerView.ItemAnimator.ItemHolderInfo preInfo, RecyclerView.ItemAnimator.ItemHolderInfo info) { RecyclerView.this.animateAppearance(viewHolder, preInfo, info); } // ... };
void animateAppearance(@NonNull RecyclerView.ViewHolder itemHolder, @Nullable RecyclerView.ItemAnimator.ItemHolderInfo preLayoutInfo, @NonNull RecyclerView.ItemAnimator.ItemHolderInfo postLayoutInfo) { itemHolder.setIsRecyclable(false); if (this.mItemAnimator.animateAppearance(itemHolder, preLayoutInfo, postLayoutInfo)) { this.postAnimationRunner(); } }
限於篇幅,這裏我只展現了`ProcessCallback`中實現的一個方法`processAppeared`,在該方法中,它調用了`RecyclerView#animateAppearance`方法,動畫的任務最終也交給了`RecyclerView.ItemAnimator`,`RecyclerView.ItemAnimator`可由用戶自定義實現。

這裏有必要說明一下,一些刪除或者新增操做,經過使用適配器中通知刪除或者新增的方法,最終仍是會通知界面進行重繪。

到這兒,咱們能夠總結一下,`onLayout`過程當中,`RecyclerView`將子視圖佈局的任務交給了`LayoutMananger`,一樣的,子視圖動畫也不是`RecyclerView`自身完成的,動畫任務被交給了`RecyclerView.ItemAnimator`,這也就解決了咱們一開始提出的兩個問題:
1. 佈局多樣性的緣由
2. 佈局動畫多樣性的緣由

至於`LayoutManager`和`RecyclerView.ItemAnimator`更深層次的探討,我將會在後面的博客中進行。

##### 1.5 onDraw
`RecylcerView`中的`onDraw`方法比較簡單,僅僅繪製了`ItemDecoration`,一樣須要用戶自定義實現:
複製代碼
public void onDraw(Canvas c) { super.onDraw(c); int count = this.mItemDecorations.size(); for (int i = 0; i < count; ++i) { ((RecyclerView.ItemDecoration)this.mItemDecorations.get(i)).onDraw(c, this, this.mState); } }
而子View的繪製其實在`ViewGroup#dispatchDraw`實現的,這裏再也不繼續討論了。
若是你沒看懂,不要緊,`RecyclerView`在三大工程流程中大概作了以下的事:
### 2. View管理-Recycler
在上文中,咱們簡要了解**RecyclerView繪製的三大流程以及`LayoutManager`和`ItemAnimator`承擔的任務**。顯然,咱們忽略了適配器`Adapter`和緩存管理`Recycler`,下面咱們就重點談談這兩位。
上文中,咱們瞭解到在`RecyclerView#dispatchLayoutStep2`方法中,給子View定位的任務交給了`LayoutManager`:
複製代碼
mLayout.onLayoutChildren(mRecycler, mState);
簡要的介紹一下`LayoutManger#onLayoutChildren`的工做內容:
1. 若是當前`RecyclerView`中還存在子`View`,移除全部的子`View`,將移除的`ViewHolder`添加進`Recycler`。
2. 一次經過`Recycler`獲取一個子View。
3. 重複進行2,直到獲取的子View填充完`RecyclerView`便可。
雖然上面的內容很簡單,可是`LayoutManager`的實際工做內容要複雜的多,那麼 `Recycler`工做機制是怎樣的呢?咱們來一探究竟。
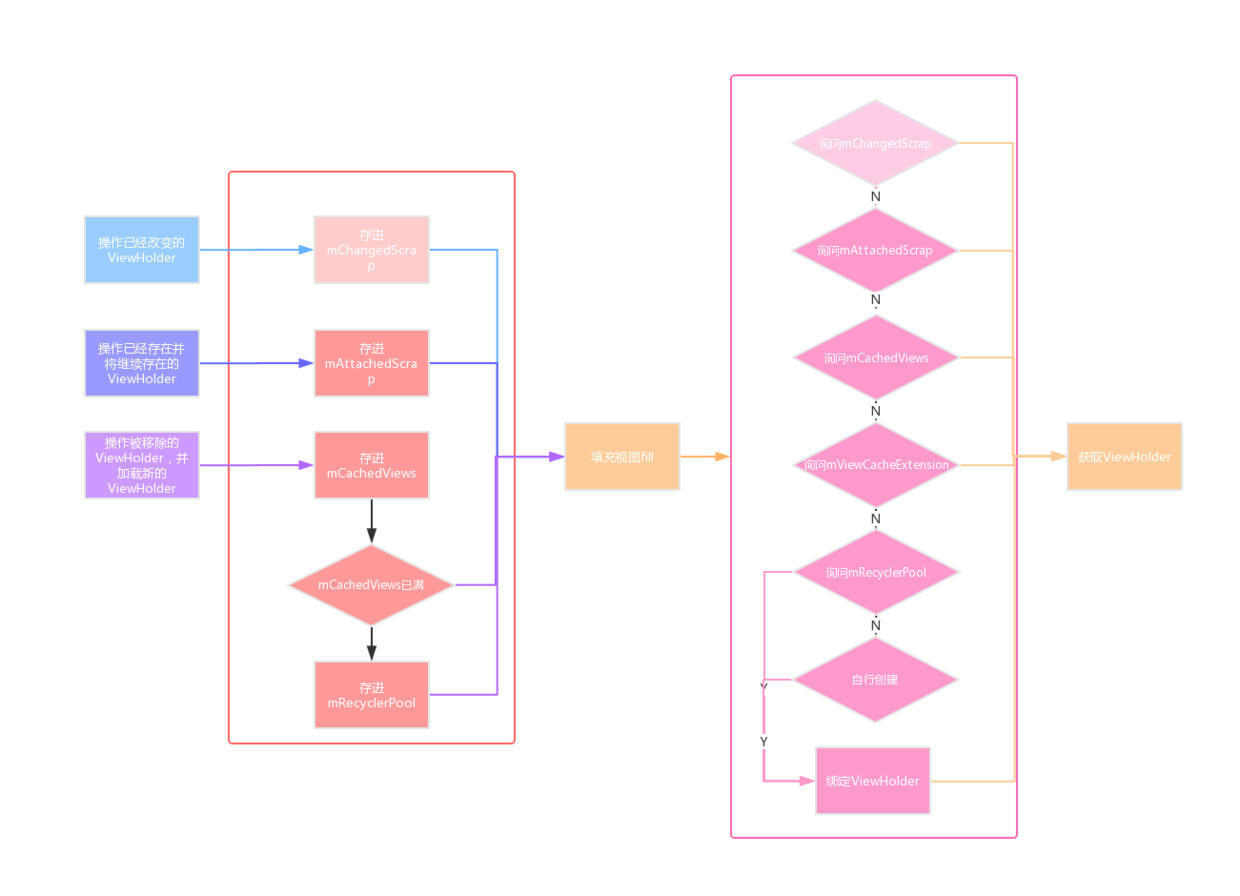
##### 2.1 Recycler重要組成
先看組成部分:
|緩存級別|參與對象|做用|
|:--:|:--|:--|
|一級緩存|`mAttachedScrap`、`mChangedScrap`|`mChangedScrap`僅參與預佈局,`mAttachedScrap`存放還會被複用的`ViewHolder`|
|二級緩存|`mCachedViews`|最多存放2個緩存`ViewHolder`|
|三級緩存|`mViewCacheExtension`|需開發者自定義實現|
|四級緩存|`mRecyclerPool`|能夠理解`RecyclerPool`是`(int,ArrayList<ViewHolder>)`的`SparseArray`,鍵是`viewType`,每一個`viewType`最多能夠存放5個`ViewHolder`|
##### 2.2 獲取ViewHolder
入口是`Recycler#getViewForPosition`,有一個位置的參數:
複製代碼
public View getViewForPosition(int position) { return getViewForPosition(position, false); }
// 看函數名稱就知道,它是嘗試獲取ViewHolder View getViewForPosition(int position, Boolean dryRun) { return tryGetViewHolderForPositionByDeadline(position, dryRun, FOREVER_NS).itemView; }
經過名字就能夠猜到函數的意思了,`ViewHolder`中的`itemView`就是咱們要獲取的子視圖,`ViewHolder`是如何獲取的呢?
複製代碼
ViewHolder tryGetViewHolderForPositionByDeadline(int position, Boolean dryRun, long deadlineNs) { //... ViewHolder holder = null; // 第一步 從 mChangedScrap 中獲取 // PreLayout從名字能夠看出,它不是真實的佈局,不過我不是特別清楚 // 預佈局的意義。 // 除此以外,它其實沒有意義的,沒有參與實際佈局的緩存過程當中。 if (mState.isPreLayout()) { holder = getChangedScrapViewForPosition(position); fromScrapOrHiddenOrCache = holder != null; } // 第二步 從 mAttachedScrap或者mCachedViews 中獲取 // 若是RecyclerView以前就有ViewHolder,而且這些ViewHolder以後還要 // 繼續展示,在Layout過程當中,它會將這些ViewHolder先取出來存放進mAttachedScrap, // 填充的時候再從mAttachedScrap取出 if (holder == null) { holder = getScrapOrHiddenOrCachedHolderForPosition(position, dryRun); // ... } if (holder == null) { final int offsetPosition = mAdapterHelper.findPositionOffset(position); final int type = mAdapter.getItemViewType(offsetPosition); // 第三步 Find from scrap/cache via stable ids, if exists if (mAdapter.hasStableIds()) { // StableId能夠被當作ViewHolder的惟一標識 holder = getScrapOrCachedViewForId(mAdapter.getItemId(offsetPosition), type, dryRun); //... } // 第四步 mViewCacheExtension須要用戶自定義實現並設置 if (holder == null && mViewCacheExtension != null) { // We are NOT sending the offsetPosition because LayoutManager does not // know it. final View view = mViewCacheExtension .getViewForPositionAndType(this, position, type); //... } if (holder == null) { // 第五步 從RecycledViewPool中獲取 // 經過RecycledViewPool獲取 // 每種ViewType的ViewHolder最多能夠存放五個 holder = getRecycledViewPool().getRecycledView(type); //... } if (holder == null) { // 第六步 緩存中都沒有就從新建立 // 若是緩存中都沒有,就須要從新建立 holder = mAdapter.createViewHolder(RecyclerView.this, type); // ... } } Boolean bound = false; if (mState.isPreLayout() && holder.isBound()) { // ... } else if (!holder.isBound() || holder.needsUpdate() || holder.isInvalid()) { // ... // 沒有綁定就從新綁定 bound = tryBindViewHolderByDeadline(holder, offsetPosition, position, deadlineNs); } // ... return holder; }
從註釋中咱們能夠看到,前三步`ViewHolder`的獲取是利用的`Recycler`的一級緩存和二級緩存,第四步經過`mViewCacheExtension`獲取,第五步經過`RecyuclerPool`的方式獲取,若是連緩存池中都沒有,那麼`Recycler`只好調用`Adapter#createViewHolder`從新建立,這個名稱是咱們的老朋友了,並且仍是在`Adapter`中,咱們簡單瞭解一下`Adapter#createViewHolder`:
複製代碼
public final VH createViewHolder(ViewGroup parent, int viewType) { // ... final VH holder = onCreateViewHolder(parent, viewType); holder.mItemViewType = viewType; // ... return holder; }
public abstract VH onCreateViewHolder(ViewGroup parent, int viewType);
真正建立`ViewHolder`的是`Adapter#onCreateViewHolder`方法,這也是咱們繼承適配器`Adapter`必需要實現的抽象方法,一般,咱們在繼承`Adapter`不會只建立`ViewHolder`,還會作子`View`和數據的綁定,在返回視圖以前,視圖的綁定確定是完成了的,咱們看看視圖綁定發生在哪裏?

咱們再返回上一個方法`Recycler#tryGetViewHolderForPositionByDeadline`中,能夠看到在倒數第四行,在執行`Recycler#tryBindViewHolderByDeadline`方法:
複製代碼
private Boolean tryBindViewHolderByDeadline(ViewHolder holder, int offsetPosition, int position, long deadlineNs) { // ... // 最關鍵的方法就是調用了Adapter#bindViewHolder方法 mAdapter.bindViewHolder(holder, offsetPosition); // ... }
public void onBindViewHolder(VH holder, int position, List payloads) { onBindViewHolder(holder, position); }
public abstract void onBindViewHolder(VH holder, int position);
成功見到咱們必須實現的`Adapter#onBindViewHolder`方法,這些完成之後,子`View`就會被交給`LayoutManager`管理了。

##### 2.2 回收ViewHolder
`ViewHolder`回收的場景有不少種,好比說滑動、數據刪除等等。咱們在這裏以滑動做爲回收的場景,而且只分析手指觸摸時的滑動,滑動的入口在`RecyclerView#onTouchEvent`:
複製代碼
public Boolean onTouchEvent(MotionEvent e) { // ... switch (action) { // ... case MotionEvent.ACTION_MOVE: { // ... if (mScrollState == SCROLL_STATE_DRAGGING) { mLastTouchX = x - mScrollOffset[0]; mLastTouchY = y - mScrollOffset[1]; // 當前滑動狀態設置爲SCROLL_STATE_DRAGGING 須要滑動距離大於閾值 if (scrollByInternal( canScrollHorizontally ? dx : 0, canScrollVertically ? dy : 0, vtev)) { getParent().requestDisallowInterceptTouchEvent(true); } // ... } } break; // ... } // ... return true; }
代碼簡化之後,咱們僅須要關注`RecyclerView#scrollByInternal`:
複製代碼
Boolean scrollByInternal(int x, int y, MotionEvent ev) { // ... if (mAdapter != null) { // ... // 不管是橫向或者縱向都交給了LayoutManager處理 if (x != 0) { consumedX = mLayout.scrollHorizontallyBy(x, mRecycler, mState); unconsumedX = x - consumedX; } if (y != 0) { consumedY = mLayout.scrollVerticallyBy(y, mRecycler, mState); unconsumedY = y - consumedY; } // ... } // ... return consumedX != 0 || consumedY != 0; }
最後仍是交給了`LayoutManager`處理,除去函數嵌套以後,最後又回到了`LayoutManager`的視圖填充的過程,在`2.2章節`中,咱們僅僅討論了該過程當中視圖的獲取,其實,該過程當中,還會涉及到視圖的回收,`LayoutManager`在回收的過程當中,大概作了以下的事情:
1. 找出須要回收的視圖。
2. 通知父佈局也就是`RecyclerView`移除子視圖。
3. 通知`Recycler`進行回收管理。

咱們着重探究**`Recycler`進行回收管理**,回收的入口是`Recycler#recycleView`:
複製代碼
public void recycleView(View view) { // ... ViewHolder holder = getChildViewHolderint(view); // ... recycleViewHolderInternal(holder); }
void recycleViewHolderInternal(ViewHolder holder) { // 一系列檢查 // ... Boolean cached = false; Boolean recycled = false; // ... if (forceRecycle || holder.isRecyclable()) { if (mViewCacheMax > 0 && !holder.hasAnyOfTheFlags(ViewHolder.FLAG_INVALID | ViewHolder.FLAG_REMOVED | ViewHolder.FLAG_UPDATE | ViewHolder.FLAG_ADAPTER_POSITION_UNKNOWN)) { // mViewCacheMax 默認最大值爲2 int cachedViewSize = mCachedViews.size(); if (cachedViewSize >= mViewCacheMax && cachedViewSize > 0) { // 緩存數量大於2的時候將最早進來的ViewHolder移除 recycleCachedViewAt(0); cachedViewSize--; } // ... mCachedViews.add(targetCacheIndex, holder); cached = true; } if (!cached) { addViewHolderToRecycledViewPool(holder, true); recycled = true; } } else { // ... } // ViewInfoStore 中移除 mViewInfoStore.removeViewHolder(holder); }
從上述的`Recycler#recycleViewHolderInternal`方法能夠看出,`ViewHolder`會被優先加入`mCachedViews`,當`mCachedViews`數量大於2的時候,會調用`Recycler#recycleCachedViewAt`方法:
複製代碼
void recycleCachedViewAt(int cachedViewIndex) { // ... ViewHolder viewHolder = mCachedViews.get(cachedViewIndex); // 添加進緩存池RecyclerPool addViewHolderToRecycledViewPool(viewHolder, true); // 從mCachedViews中移除 mCachedViews.remove(cachedViewIndex); }
由於`cachedViewIndex`是2,因此`mCachedViews`中`ViewHolder`數量爲2的時候,會先添加到`mCachedViews`,而後從`mCachedViews`中移除先進來的`ViewHolder`添加進緩存池。
我在這裏選取了一些經常使用的場景,整合出以下圖片:
須要指明的是:
1. `mChangedScrap`實際並未參加真實的緩存過程,它的添加和移除`ViewHolder`都出如今`RecyclerView#dispatchLayoutStep1`方法中的`PreLayout(預佈局)`過程當中。
2. 對於`RecyclerView`中已經顯示並將繼續展現的`ViewHolder`,重繪過程當中,會將`ViewHolder`以及其中的子`View`從`RecyclerView`移出,添加進`mAttachedScrap`中,並在後續的填充子`View`過程當中,從`mAttachedScrap`取出。
3. `mCachedViews`最多隻能緩存兩個`ViewHolder`,若是大於最大緩存數量,會將先進來的`ViewHolder`取出加入`RecycledViewPool`。
4. `RecycledViewPool`針對每種`viewType`的`ViewHolder`提供最大最大數量爲5的緩存。
有了`Recycler`之後:
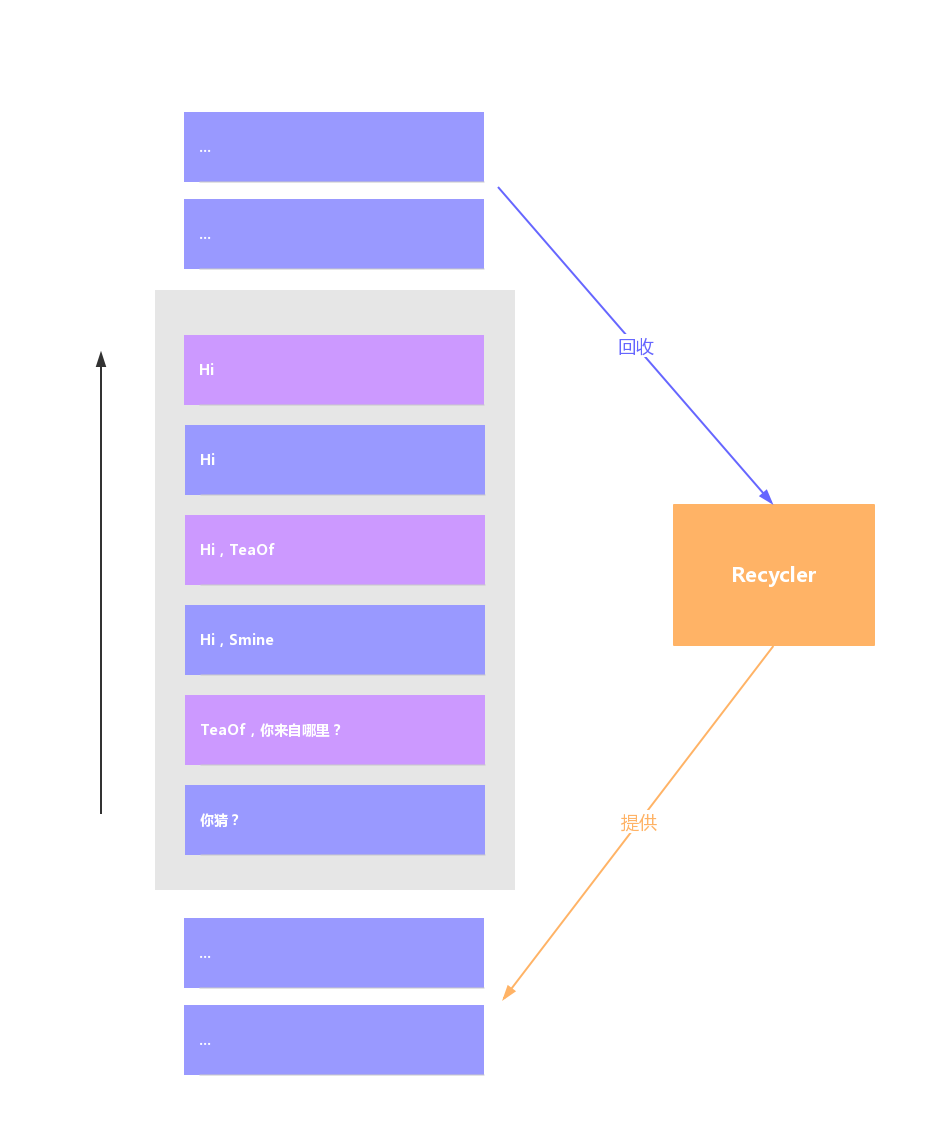
灰色的是小T同窗的手機屏幕,查看聊天記錄的時候,`RecyclerView`不會每次都建立新的`ViewHolder`,也不會一次性將全部的`ViewHolder`都建好,減小了內存和時間的損耗,因此,小T同窗就能夠流暢的查看和女朋友的上千條聊天記錄了~
## 3、淺談設計模式
閱讀源碼的過程當中,發現`RecyclerView`運用了不少設計模式。
看`Adapter`類這個名字,就能夠看出它使用了**適配器模式**,由於涉及到將數據集轉變成`RecyclerView`須要的子視圖。除了適配器模式以外,`Adapter`中還使用**觀察者模式**,這一點能夠從`RecyclerView#setAdapter`方法中能夠看出,設置適配器的時候,會對舊的`Adapter`取消註冊監聽器,接着對新的`Adapter`註冊監聽器,等到數據發生變化的時候,通知給觀察者,觀察者就能夠在`RecyclerView`內愉快地刪除或者新增子視圖了。
接着,看`LayoutManager`這個類,`RecyclerView`將給`View`佈局這個任務交給了抽象類`LayoutManager`,根據不一樣需求,好比線性佈局能夠用`LinearLayoutManager`實現,網格佈局能夠用`GridLayoutManager`。應對同一個佈局問題,`RecyclerView`使用了**策略模式**,給出了不一樣的解決方案,`ItemAnimator`也是如此。
若是感興趣的話,同窗們能夠查看對應的源碼。
## 4、總結
本文中,除了對`Recycler`進行深層次研究外,其餘則點到爲止,大體獲得以下結論:

後續博客中,我將和你們一塊兒學習`RecyclerView`中的其餘部分。
這大概是我寫的最難受的博客之一了,一是`RecyclerView`的源碼很長,看着有點累;二是源碼分析的博客確實不知道怎麼寫,還在持續探索中。哈哈~,終於寫完了第一篇,本人水平有限,不免有誤,歡迎指出喲~
若是你對本系列文章感興趣:
> 第二篇:[《抽絲剝繭RecyclerView - LayoutManager》](https://juejin.cn/post/6844903924256735239)
參考文章:
>[《RecyclerView 源碼解析》](https://juejin.cn/post/6844903459011969037#comment)
[《RecyclerView緩存原理,有圖有真相》](https://juejin.cn/post/6844903661726859271)
[《RecyclerView緩存機制(咋複用?)》](https://juejin.cn/post/6844903778303344647)
[《RecyclerView動畫源碼淺析》](https://juejin.cn/post/6844903743352209421)
[《Understanding RecyclerView Components. Part -2》](https://android.jlelse.eu/understanding-recyclerview-components-part-2-1fd43001a98f)
複製代碼
- 1. 抽絲剝繭RecyclerView - 化整爲零
- 2. 抽絲剝繭RecyclerView - ItemAnimator & Adapter
- 3. 抽絲剝繭RecyclerView - LayoutManager
- 4. 抽絲剝繭NIO
- 5. ASP.NET Core Middleware 抽絲剝繭
- 6. 大道至簡 抽絲剝繭
- 7. 抽絲剝繭spring源碼(一)
- 8. 抽絲剝繭spring源碼(三)
- 9. [譯] MVVM, Coordinators 和 RxSwift 的抽絲剝繭
- 10. 抽絲剝繭spring源碼(二)
- 更多相關文章...
- • Web 語義化 - 網站建設指南
- • 爲什麼使用 XML Schemas? - XML Schema 教程
- • IntelliJ IDEA代碼格式化設置
- • 爲了進字節跳動,我精選了29道Java經典算法題,帶詳細講解
-
每一个你不满意的现在,都有一个你没有努力的曾经。