最新版Swagger 3升級指南和新功能體驗!

Swagger 3.0 發佈已經有一段時間了,它於 2020.7 月 發佈,但目前市面上使用的主流版本仍是 Swagger 2.X 版本和少許的 1.X 版本,然而做爲一名合格的程序員怎麼能不折騰新技術呢?因此本期就你們帶來一篇最新版 Swagger 的內容,本文會帶你們看最新版 Swagger 有哪些改變?又是如何將老版本 Swagger 升級到新版的?html
Swagger 是什麼?
Swagger 是一個用於生成、描述和調用 RESTful 接口的 Web 服務。通俗的來說,Swagger 就是將項目中全部(想要暴露的)接口展示在頁面上,而且能夠進行接口調用和測試的服務。前端
PS:Swagger 遵循了 OpenAPI 規範,OpenAPI 是 Linux 基金會的一個項目,試圖經過定義一種用來描述 API 格式或 API 定義的語言,來規範 RESTful 服務開發過程。
Swagger 官網地址:https://swagger.io/java
Swagger 有什麼用?
從上述 Swagger 定義咱們不難看出 Swagger 有如下 3 個重要的做用:程序員
- 將項目中全部的接口展示在頁面上,這樣後端程序員就不須要專門爲前端使用者編寫專門的接口文檔;
- 當接口更新以後,只須要修改代碼中的 Swagger 描述就能夠實時生成新的接口文檔了,從而規避了接口文檔老舊不能使用的問題;
- 經過 Swagger 頁面,咱們能夠直接進行接口調用,下降了項目開發階段的調試成本。

Swagger 舊版本使用
Swagger 舊版本也就是目前市面上主流的 V2 版本是 Swagger 2.9.2,在講新版本以前,咱們先來回顧一下 Swagger 2.9.2 是如何使用的。web
Swagger 2.9.2 的使用分爲如下 4 步:spring
- 添加依賴
- 開啓 Swagger 功能
- 配置 Swagger 文檔摘要信息
- 調用接口訪問
下面咱們分別來看。後端
1.添加依賴
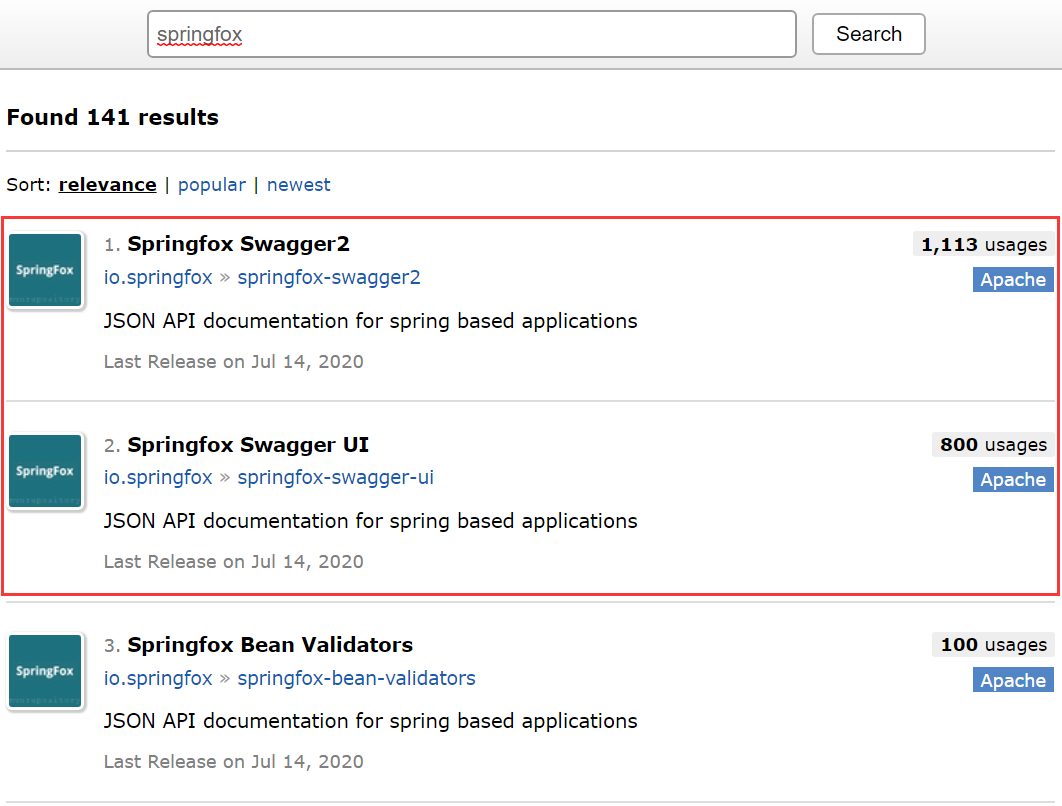
首先,咱們要去 mvnrepository 查詢 Swagger 的依賴,搜索「springfox」關鍵字,獲得結果的前兩條依賴信息,就是咱們想要的結果,以下圖所示:
將這兩個依賴添加帶項目中:api
<!-- https://mvnrepository.com/artifact/io.springfox/springfox-swagger2 -->
<dependency>
    <groupId>io.springfox</groupId>
    <artifactId>springfox-swagger2</artifactId>
    <version>2.9.2</version>
</dependency>

<!-- https://mvnrepository.com/artifact/io.springfox/springfox-swagger-ui -->
<dependency>
    <groupId>io.springfox</groupId>
    <artifactId>springfox-swagger-ui</artifactId>
    <version>2.9.2</version>
</dependency>
爲何是「springfox」?
問:咱們要使用的是 Swagger,爲何要搜索「springfox」?測試
答:Swagger 能夠看做是一個遵循了 OpenAPI 規範的一項技術,而 springfox 則是這項技術的具體實現。 就比如 Spring 中的 AOP 和 DI 同樣,前者是思想,然後者是實現。ui
2.開啓Swagger
在 Spring Boot 的啓動類或配置類中添加 @EnableSwagger2 註釋,開啓 Swagger,部分核心代碼以下:
@EnableSwagger2
@SpringBootApplication
public class Application {...
3.配置摘要信息
import org.springframework.context.annotation.Bean;
import org.springframework.context.annotation.Configuration;
import springfox.documentation.builders.RequestHandlerSelectors;
import springfox.documentation.spi.DocumentationType;
import springfox.documentation.spring.web.plugins.Docket;
import springfox.documentation.swagger2.annotations.EnableSwagger2;

@Configuration
public class SwaggerConfig {
    @Bean
    public Docket createRestApi() {
        return new Docket(DocumentationType.SWAGGER_2) // 1.SWAGGER_2
                .select()
                .apis(RequestHandlerSelectors.basePackage("com.example.swaggerv2.controller")) // 2.設置掃描路徑
                .build();
    }
}
4.訪問Swagger
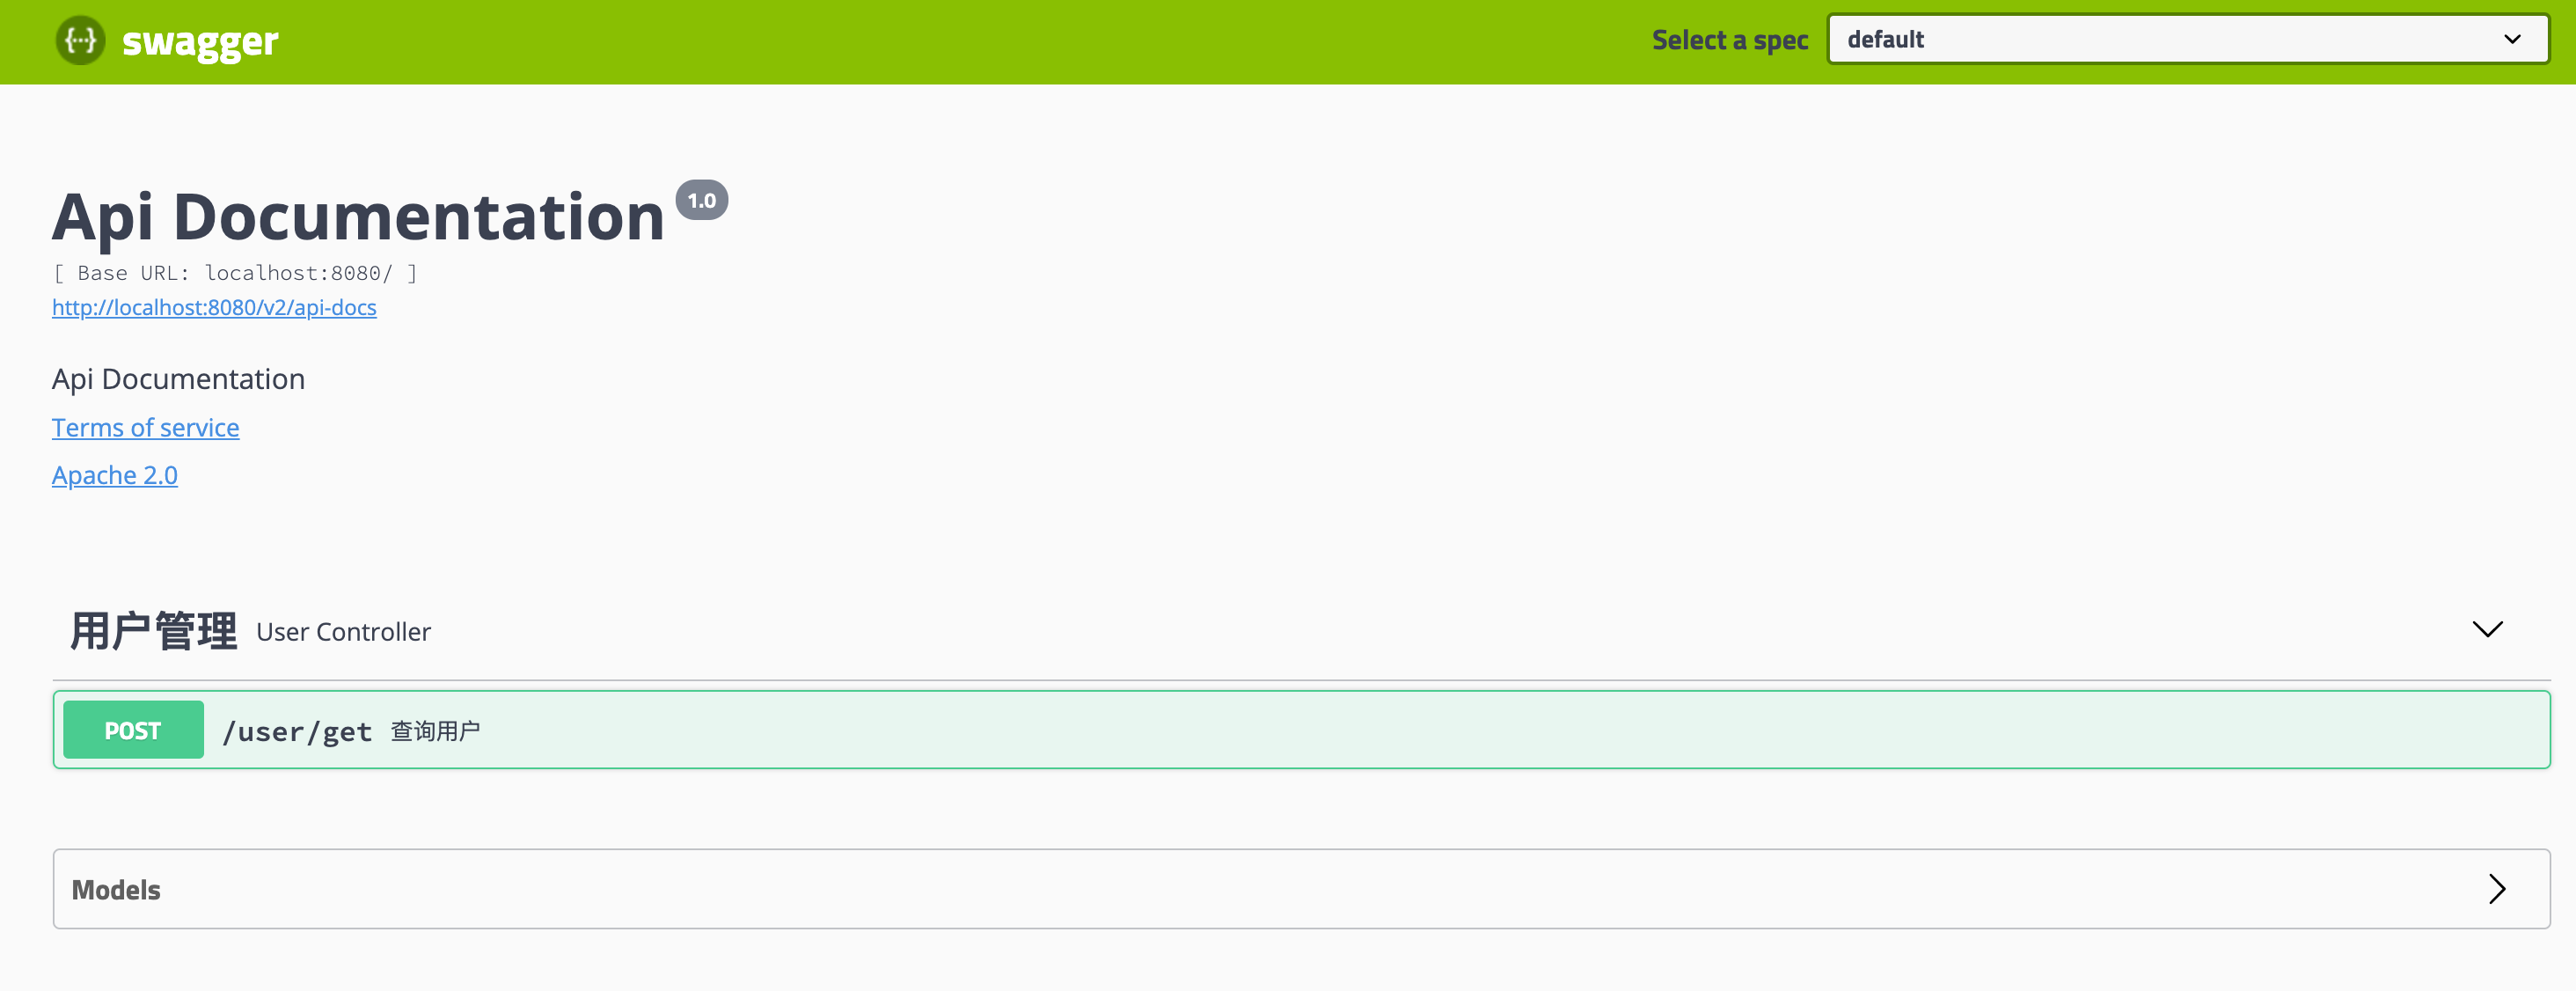
項目正常啓動以後使用「http://localhost:8080/swagger-ui.html」訪問Swagger頁面,以下圖所示:
Swagger 最新版使用
Swagger 最新版的配置步驟和舊版本是同樣,只是每一個具體的配置項又略有不一樣,具體步驟以下。
1.添加依賴
<!-- https://mvnrepository.com/artifact/io.springfox/springfox-boot-starter -->
<dependency>
  <groupId>io.springfox</groupId>
  <artifactId>springfox-boot-starter</artifactId>
  <version>3.0.0</version>
</dependency>
從上述配置能夠看出,Swagger 新版本的依賴項只有一個,而舊版本的依賴項有兩個,相比來講也簡潔了不少。
2.開啓Swagger
在 Spring Boot 的啓動類或配置類中添加 @EnableOpenApi 註釋,開啓 Swagger,部分核心代碼以下:
@EnableOpenApi
@SpringBootApplication
public class Application {...
3.配置摘要信息
import org.springframework.context.annotation.Bean;
import org.springframework.context.annotation.Configuration;
import springfox.documentation.builders.RequestHandlerSelectors;
import springfox.documentation.oas.annotations.EnableOpenApi;
import springfox.documentation.spi.DocumentationType;
import springfox.documentation.spring.web.plugins.Docket;

@Configuration
public class SwaggerConfig {
    @Bean
    public Docket createRestApi() {
        return new Docket(DocumentationType.OAS_30) // v2 不一樣
                .select()
                .apis(RequestHandlerSelectors.basePackage("com.example.swaggerv3.controller")) // 設置掃描路徑
                .build();
    }
}
從上述代碼能夠看出 Docket 的配置中只有文檔的類型設置新老版本是不一樣的,新版本的配置是 OAS_30 而舊版本的配置是 SWAGGER_2。
PS:OAS 是 OpenAPI Specification 的簡稱,翻譯成中文就是 OpenAPI 說明書。
4.訪問Swagger
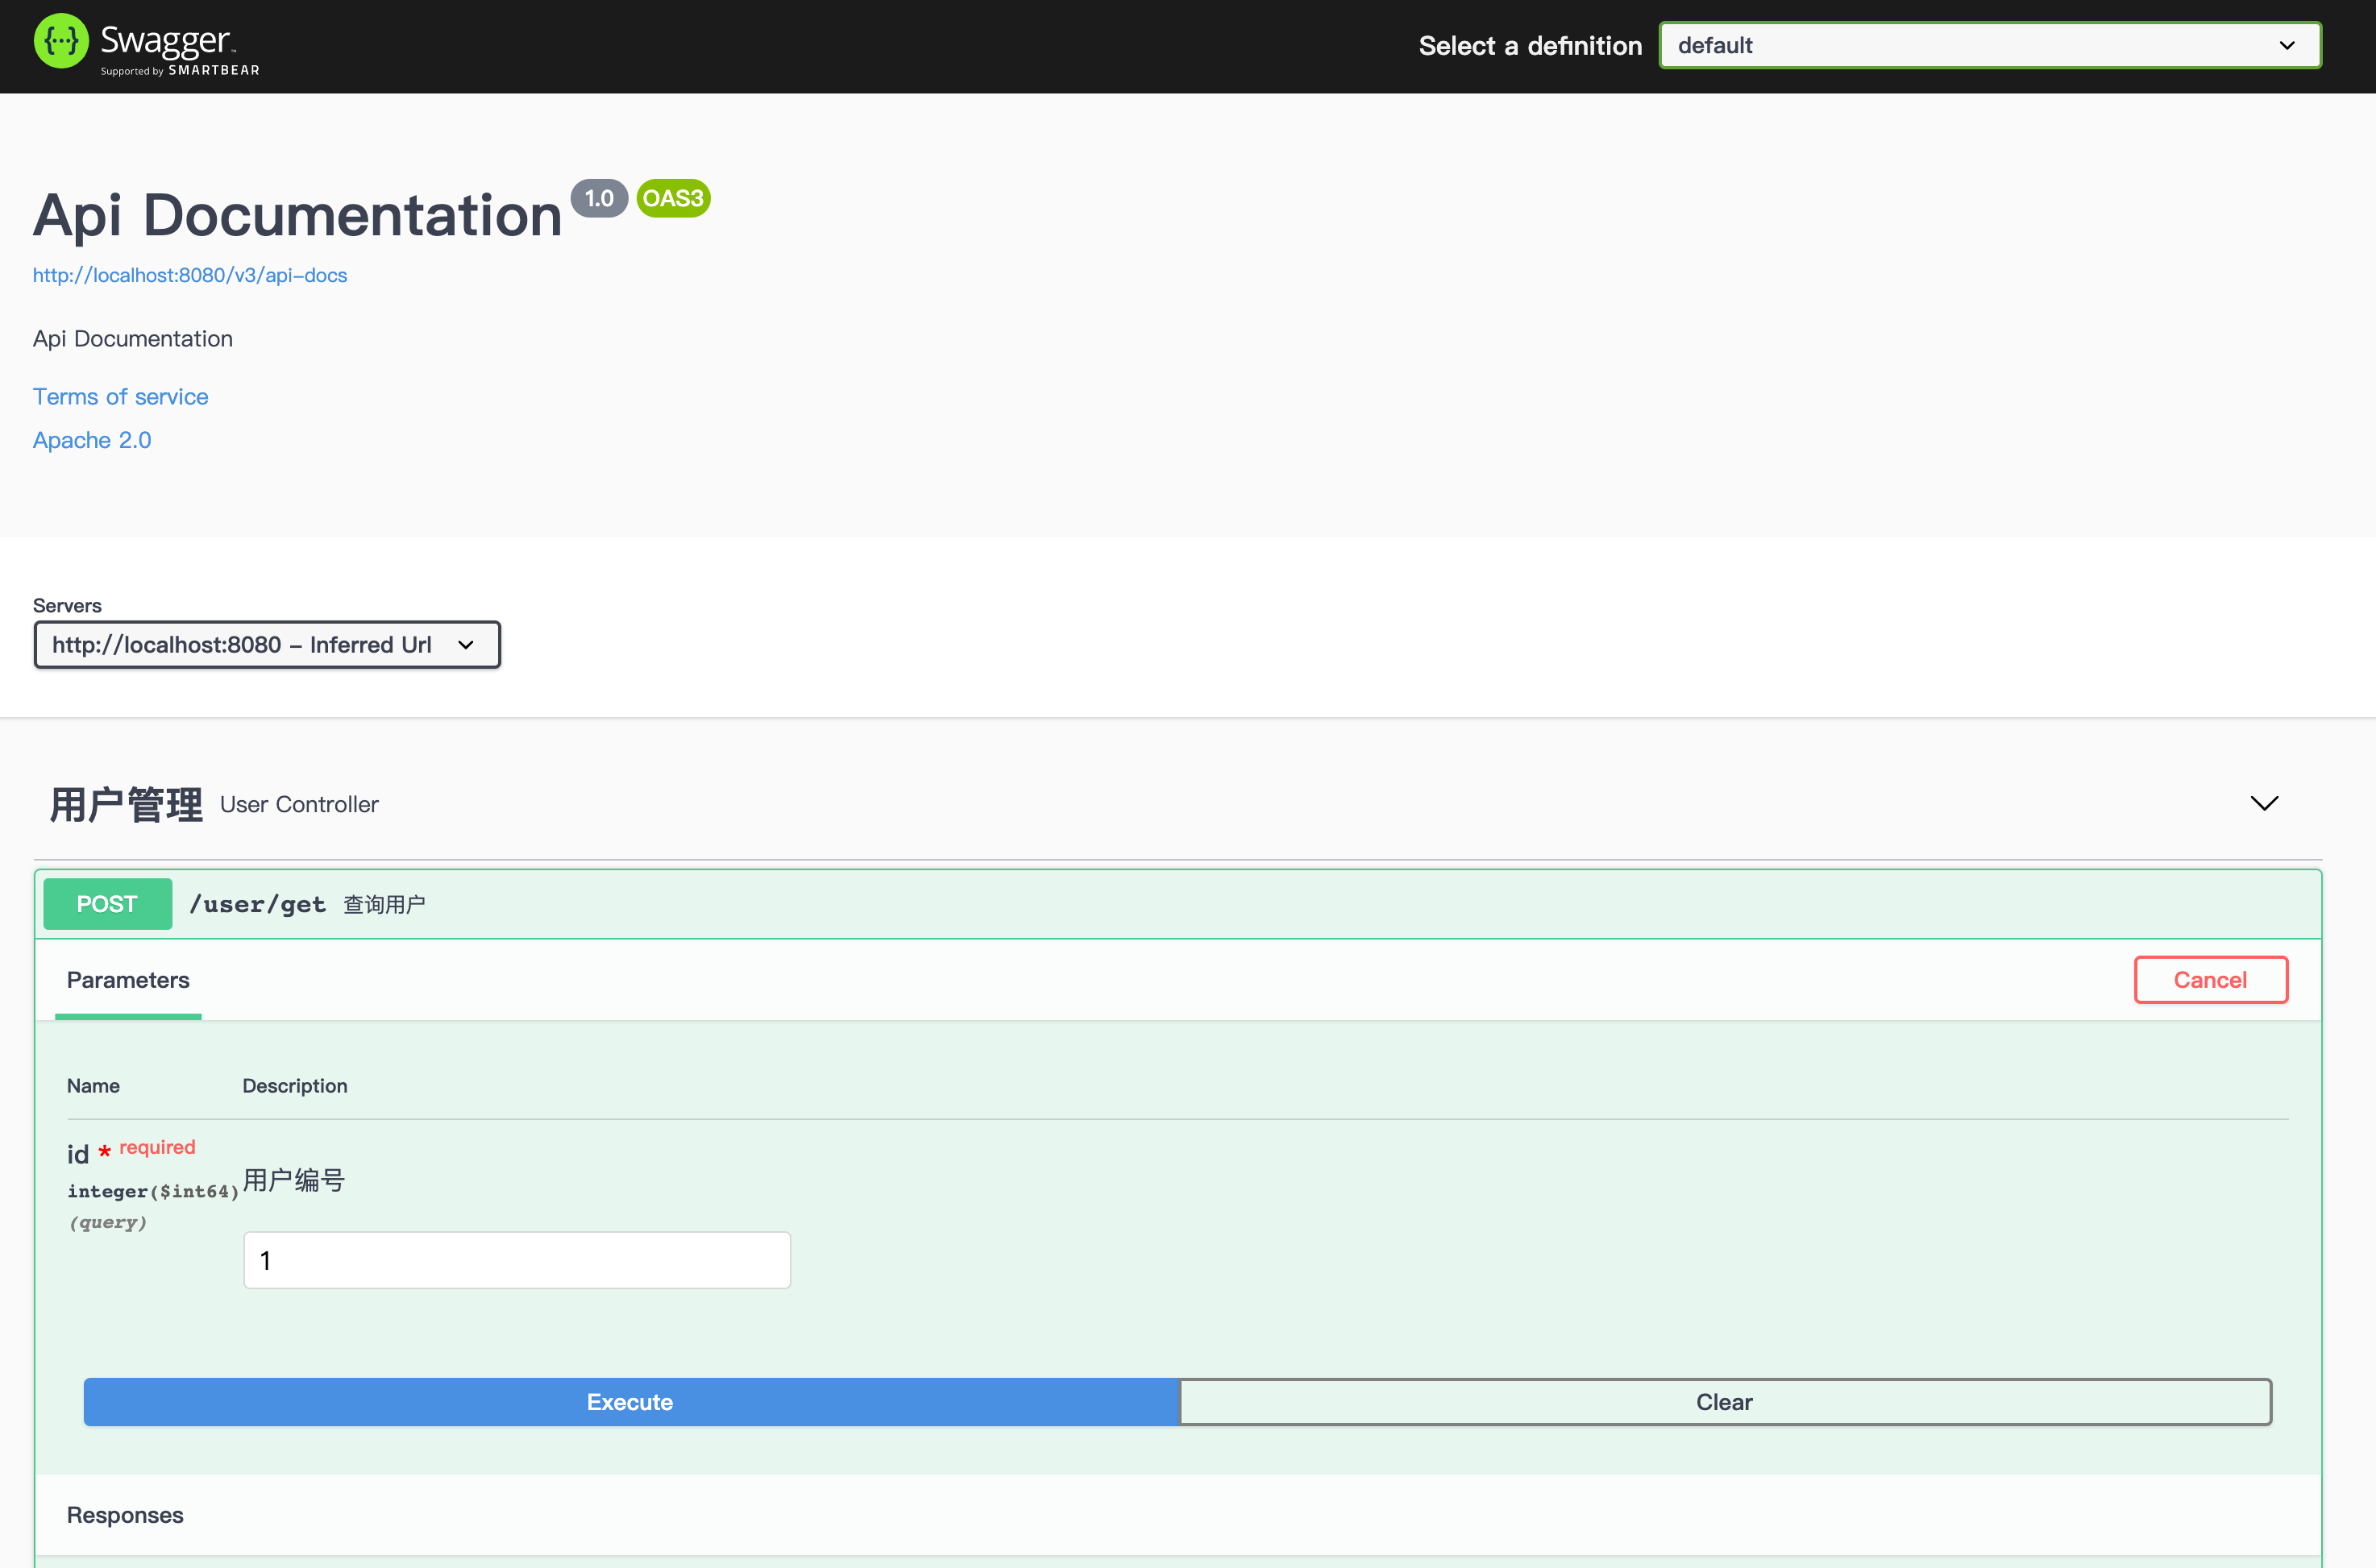
新版本的 Swagger 訪問地址和老版本的地址是不一樣的,新版版的訪問地址是「localhost:8080/swagger-ui/」」,以下圖所示:
新版本 VS 老版本
新版本和老版本的區別主要體如今如下 4 個方面:
- 依賴項的添加不一樣:新版本只須要添加一項,而老版本須要添加兩項;
- 啓動 Swagger 的註解不一樣:新版本使用的是
@EnableOpenApi,而老版本是@EnableSwagger2; - Docket(文檔摘要信息)的文件類型配置不一樣:新版本配置的是
OAS_3,而老版本是SWAGGER_2; - Swagger UI 訪問地址不一樣:新版本訪問地址是「http://localhost:8080/swagger-ui/」,而老版本訪問地址是「http://localhost:8080/swagger-ui.html」。
總結
Swagger 新版本讓人印象深入的優勢有兩個:第一,配置變得簡單了,好比依賴項配置減小了 50%,第二,新版 Swagger 頁面設計風格有了不小的改變,新版的頁面讓人感受更加現代化也更加具備科技感了,整體來講美觀了很多。
值得一提的是 Swagger 的整個升級過程很平滑,從老版本升級到新版本,只須要簡單的配置便可,那些用於描述接口的註解仍是延續了老版本的用法,這樣就能夠在不修改大部分主要代碼的狀況下,能夠成功到最新版本啦。
關注公號「Java中文社羣」查看本文(Swagger 3)視頻版內容。
- 1. Apache Hadoop 3.x 最新狀態以及升級指南
- 2. Spring Cloud 升級最新 Finchley 版本,踩坑指南!
- 3. 升級openSSH到最新版
- 4. MAC升級Nodejs和Npm到最新版
- 5. 剛剛,SeetaFace版本升級!新增活體檢測等功能
- 6. App Store最新審覈指南(2015年3月更新版)
- 7. JBolt 1.5.0新版發佈,升級到支持最新版JFinal和Jetty,實現了在線更新插件功能
- 8. BIOS升級、更新補「漏」指南
- 9. Mac升級Node.js和npm到最新版本指令
- 10. 新思科技最新版本Coverity靜態分析工具功能升級
- 更多相關文章...
- • MySQL 5.7的新特性(新功能) - MySQL教程
- • SQL 指南 - 網站建設指南
- • 算法總結-雙指針
- • Tomcat學習筆記(史上最全tomcat學習筆記)
-
每一个你不满意的现在,都有一个你没有努力的曾经。
- 1. Apache Hadoop 3.x 最新狀態以及升級指南
- 2. Spring Cloud 升級最新 Finchley 版本,踩坑指南!
- 3. 升級openSSH到最新版
- 4. MAC升級Nodejs和Npm到最新版
- 5. 剛剛,SeetaFace版本升級!新增活體檢測等功能
- 6. App Store最新審覈指南(2015年3月更新版)
- 7. JBolt 1.5.0新版發佈,升級到支持最新版JFinal和Jetty,實現了在線更新插件功能
- 8. BIOS升級、更新補「漏」指南
- 9. Mac升級Node.js和npm到最新版本指令
- 10. 新思科技最新版本Coverity靜態分析工具功能升級