前端RN路由入門到實戰
前端路由
1.一、前言
開始今天的話題以前,讓咱們先來了解一下前端路由,Ajax誕生之後,解決了每次用戶操做都要向服務器端發起請求重刷整個頁面的問題,但隨之而來的問題是沒法保存Ajax操做狀態,瀏覽器的前進後退功能也不可用,當下流行的兩種解決方法是:前端
- hash hash本來的做用是爲一個很長的文檔頁添加錨點信息,它自帶不改變url刷新頁面的功能,因此天然而然被用在記錄Ajax操做狀態中了
- history 應該說history是主流的解決方案,瀏覽器的前進後退用的就是這個,它是window對象下的,之前的history提供的方法只能作頁面之間的前進後退 以下:
1.二、history前進後退方法
- histoy.go(number|URL) 可加載歷史列表中的某個具體的頁面
- history.forward() 可加載歷史列表中的下一個 URL
- history.back() 可加載歷史列表中的前一個 URL
1.三、H5新增方法
爲了讓history不只僅能回退到上一個頁面,還能夠回到上一個操做狀態。HTML5新增了三個方法,其中兩個是在history對象裏的:react
- history.pushState(state, title, url)
添加一條歷史記錄, state用於傳遞參數,能夠爲空。title是設置歷史記錄的標題,能夠爲空。url是歷史記錄的URL,不能夠爲空。 - history.replaceState(state, title, url)
將history堆棧中當前的記錄替換成這裏的url,參數同上。
1.四、window下新增方法
window.onpopstate() 監聽url的變化,會忽略hash的變化(hash變化有一個onhashchange事件),可是前面的兩個事件不會觸發它。android
總結:git
單頁面應用或者Ajax操做記錄狀態用的就是hash和h5增長的history API,這就是react-router-dom 擴展的路由實現,也是web應用最經常使用的兩種路由github
1.五、react路由
//引入必要的資源包
import ReactDom from 'react-dom';
import { Router, Route, hashHistory,IndexRoute} from 'react-router';

//路由頁面配置
ReactDom.render(
     <Router history={hashHistory}>
        <Route path='/' component={Page}></Route>
        <Route path='/NewTask' component={NewTask} />
        <Route path='/Redeem' component={Redeem} />
        <Route path='/Rule' component={Rule} />
    </Router>
    ,document.getElementById("app"));
靜態路由
當啓動react項目時,會先生成好一個路由表,發生頁面跳轉時,react會根據地址到路由表中找到對應的處理頁面或處理方法web
動態路由
而動態路由不是做爲一個項目運行的配置文件存儲在外部,它在項目render的時候纔開始定義,router的做者認爲route應當和其它普通組件同樣,它的做用不是提供路由配置,而是一個普通的UI組件npm
React Native路由
2.一、RN中嘗試react-router的使用
import React, { Component } from 'react';
import { Provider } from 'react-redux';
import { StatusBarIOS,Platform } from 'react-native';
import { createMemoryHistory, Router, IndexRoute, Route } from 'react-router';
import { createNavigatorRouter } from 'react-native-navigator-router';


<Provider store={store}>
    <Router history={createMemoryHistory('/')}>
        <Route path='/' component={createNavigatorRouter()}>
            <IndexRoute component={App} />
            <Route path="/about" component={AllRoute} />
        </Route>
    </Router>
</Provider>
因 React Native 版本設計到0.44以後,原先的 RN 路由徹底失效了redux
運行直接報錯,createMemoryHistory('/') 異常react-native
具體緣由仍是不太明白,應該是移除了react-router的使用方式,目前數組
2.二、RN Navigator
首先從原理上,Navigator是用來做爲組件之間的導航器。而缺少相似Router性質的東西時,最簡單的辦法是將下個組件(也叫場景Scene),直接告訴導航器。因此就須要在頁面的上面引入下個組件
export default class SampleComponent extends React.Component {
        render() {
            let defaultName = 'FirstPageComponent';// 第一個要展現的組件
            let defaultComponent = FirstPageComponent;
            return (
            <Navigator
              initialRoute={{ name: defaultName, component: defaultComponent }}
              configureScene={(route) => {
                return Navigator.SceneConfigs.VerticalDownSwipeJump;
              }}
              renderScene={(route, navigator) => {
                let Component = route.component;
                return <Component {...route.params} navigator={navigator} />
              }} />
            );
        }
    }
initialRoute={{ name: defaultName, component: defaultComponent }}
Navigator實現跳轉,是經過Push和Pop方法,至關因而一個數組,每要跳到下個Scene(場景),就把下個頁面push到這個數組中,當想要後退的時候,再把這個Pop出去
react-native 0.44 開始 再也不支持 Navigatior
2.三、iOS NavigatorIOS
NavigatorIOS使用
- 首先咱們須要給他指定一個路由,這樣它才能知道顯示哪一個頁面
- 和 Navigator 同樣 NavigatorIOS 須要有個根視圖來完成初始化,因此咱們須要先建立一個組件來描述這個界面,並將這個組件經過路由的形式告訴 NavigatorIOS,這樣就能夠將這個界面展現出來
一、根視圖
首先,建立一個 Home 組件,用來做爲 NavigatorIOS 的根視圖
視圖部分:
render() {
        return (
            <ScrollView style={styles.flex}>
                <View style={styles.container}>
                    <Text onPress={this.goTo.bind(this)}>點我跳轉詳情</Text>
                </View>
            </ScrollView>
        );
    }
樣式部分:
const styles = StyleSheet.create({
    flex: {
        flex: 1,
        marginTop: 65
    },
    listItem: {
        height: 40,
        marginLeft: 10,
        marginRight: 10,
        borderBottomWidth: 1,
        borderBottomColor: "#ddd",
        justifyContent: "center"
    },
    listItemFont: {
        fontSize: 16
    },
    container: {
        justifyContent: "center",
        alignItems: "center"
    }
});
二、實例化路由設置
而後咱們實例化一個 NavigatorIOS 並設置路由
class Test extends Component {
    render() {
        return (
            <NavigatorIOS
                style={{ flex: 1 }}
                initialRoute={{
                    component: List,// 要跳轉的頁面
                    title: "列表",// 跳轉頁面導航欄標題
                    passProps: {}
                }}
            />
        );
    }
}
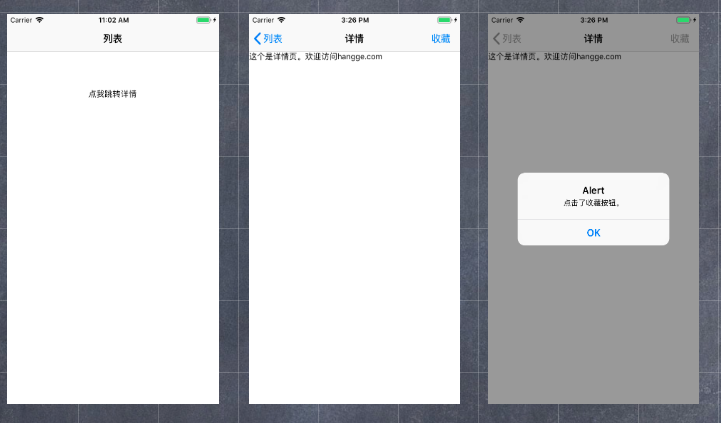
三、效果

四、跳轉和返回
return (
                <View style={styles.container}>
                    <TouchableOpacity
                        onPress={() => {this.props.navigator.push({
                            component:Detail,     // 須要跳轉的頁面
                            title:'詳情'       // 跳轉頁面導航欄標題
                            rightButtonTitle: "收藏",//跳轉頁面導航右側按鈕
                            onRightButtonPress: function() {//右側按鈕點擊回調事件
                                alert("點擊了收藏按鈕。");
                            }
                        })}}
                    >
                        <Text>點擊跳轉頁面</Text>
                    </TouchableOpacity>
                </View>
            );
五、總體效果
react-navigation
3.0、引言
因爲前面介紹的幾種路由方式要麼隨着RN版本更新已再也不支持,要麼是單平臺支持性;RN官方在0.44版本之後把導航路由集中到了react-navigation庫裏面,而且官方也事件使用react-navigation,少用第三方插件
添加react-navigation
該庫包含三類組件:
- StackNavigator:用來跳轉頁面和傳遞參數
- TabNavigator:相似底部導航欄,用來在同一屏切換不一樣頁面
- DrawerNavigator:側滑菜單導航欄,用於輕鬆設置帶抽屜的屏幕
npm install --save react-navigation
方法引用:
import { StackNavigator } from "react-navigation";
3.一、StackNavigator
組件採用堆棧式的頁面導航來實現各個界面跳轉。它的構造函數:
StackNavigator(RouteConfigs, StackNavigatorConfig)
RouteConfigs:頁面路由配置
StackNavigatorConfig:路由參數配置
3.1.一、StackNavigator參數
navigationOptions:配置StackNavigator的一些屬性。

    title:標題,若是設置了這個導航欄和標籤欄的title就會變成同樣的,不推薦使用
    header:能夠設置一些導航的屬性,若是隱藏頂部導航欄只要將這個屬性設置爲null
    headerTitle:設置導航欄標題,推薦
    headerBackTitle:設置跳轉頁面左側返回箭頭後面的文字,默認是上一個頁面的標題。能夠自定義,也能夠設置爲null
    headerTruncatedBackTitle:設置當上個頁面標題不符合返回箭頭後的文字時,默認改爲"返回"
    headerRight:設置導航條右側。能夠是按鈕或者其餘視圖控件
    headerLeft:設置導航條左側。能夠是按鈕或者其餘視圖控件
    headerStyle:設置導航條的樣式。背景色,寬高等
    headerTitleStyle:設置導航欄文字樣式
    headerBackTitleStyle:設置導航欄‘返回’文字樣式
    headerTintColor:設置導航欄顏色
    headerPressColorAndroid:安卓獨有的設置顏色紋理,須要安卓版本大於5.0
    gesturesEnabled:是否支持滑動返回手勢,iOS默認支持,安卓默認關閉


screen:對應界面名稱,須要填入import以後的頁面

mode:定義跳轉風格

   card:使用iOS和安卓默認的風格

   modal:iOS獨有的使屏幕從底部畫出。相似iOS的present效果

headerMode:返回上級頁面時動畫效果

   float:iOS默認的效果

   screen:滑動過程當中,整個頁面都會返回

   none:無動畫

cardStyle:自定義設置跳轉效果

   transitionConfig: 自定義設置滑動返回的配置

   onTransitionStart:當轉換動畫即將開始時被調用的功能

   onTransitionEnd:當轉換動畫完成,將被調用的功能

path:路由中設置的路徑的覆蓋映射配置

initialRouteName:設置默認的頁面組件,必須是上面已註冊的頁面組件

initialRouteParams:初始路由參數
3.1.二、RouteConfigs配置
能夠只配置RouteConfigs參數
RouteConfigs參數表示各個頁面路由配置,React開發中的 Router路由配置 ,它是讓導航器知道須要導航的路由對應的頁面
RN頁面路由配置:
const AppIndex = StackNavigator(
    {
        Task: {
            screen: Task,
            //加載首屏須要在navigationOptions裏面配置首頁導航信息
        navigationOptions: ({ navigation }) => ({
                headerTitle: "首頁",
                headerBackTitle: null
            })
        },
        NewTask: {
            screen: NewTask
        },
        Redeem: {
            screen: Redeem
        },
        Rule: {
            screen: Rule
        }
    }
);
3.1.三、路由跳轉
已經配置好導航器以及對應的路由頁面了,可是要完成頁面之間的跳轉,還須要 navigation;
在導航器中的每個頁面,都有 navigation 屬性
頁面的配置選項 navigationOptions 一般還能夠在對應頁面中去靜態配置,好比在 Redeem 頁面中
(注意:若是默認是首頁的話就不要再頁面中聲明static navigationOptions了)
class Redeem extends Component {
    static navigationOptions = ({ navigation }) => ({
        headerTitle: `${navigation.state.params.title}`,
        headerRight: (
            <View style={{ flexDirection: "row" }}>
                <Text
                    style={{ color: "#333", marginRight: 13 }}
                    onPress={() =>navigation.state.params ? navigation.state.params.jumpToRule() : null
                    }>
                    兌換規則
                </Text>
            </View>
        )
    });
    .....
}
通常子頁面navigationOptions參數最好都在子頁面裏面去配置,不要在首頁到導航參數裏面配置,方便調用本類方法
3.1.四、navigation屬性
navigate - 跳轉到其餘頁面
調用這個方法能夠跳轉到導航器中的其餘頁面,此方法有三個參數
- routeName 導航器中配置的路由名稱
- params 傳遞參數到下一個頁面
- action action
首先在頁面須要跳轉的地方聲明navigate
const { navigate } = this.props.navigation;
而後經過點擊事件調用navigate跳轉
//首頁跳轉積分兌換頁面
<TouchableOpacity
    style={styles.redeem}
    onPress={() => navigate("Redeem", { title: "積分兌換" })}>
    <Text style={styles.redeemText}>積分兌換</Text>
</TouchableOpacity>
//積分兌換頁面跳轉兌換規則頁面
jumpToRule = () => {
        const { navigate } = this.props.navigation;
        navigate("Rule", { title: "積分兌換規則" });
    }
state - 當前頁面導航器的狀態
state 裏面包含有傳遞過來的參數 params 、 key 、路由名稱 routeName
{
    params: { param: 'i am the param' },
    key: 'id-1500546317301-1',
    routeName: 'Redeem'
}
使用:
headerTitle: `${navigation.state.params.title}`
setParams - 更改路由的參數
更改當前頁面路由的參數,好比能夠用來更新頭部的按鈕或者標題
setParams的使用:
//導航右側按鈕 點擊調用原本方法
headerRight: (
            <View style={{ flexDirection: "row" }}>
                <Text
                    style={{ color: "#333", marginRight: 13 }}
                    onPress={() =>
                        navigation.state.params ? navigation.state.params.jumpToRule() : null
                    }>
                    兌換規則
                </Text>
            </View>
        )
說明:
若是導航欄上的的按鈕點擊是須要調用本類方法時不能直接this.jumpToRule(),須要在聲明週期的componentDidMount中經過navigation中的setParams把函數註冊到導航器中
componentDidMount() {
    this.props.navigation.setParams({ jumpToRule: this.jumpToRule });
}
goBack - 返回 回退
能夠不傳,也能夠傳參數,還能夠傳 null
this.props.navigation.goBack(); // 回退到上一個頁面
this.props.navigation.goBack(null); // 回退到任意一個頁面
this.props.navigation.goBack('Home'); // 回退到Home頁面
dispatch - 發送一個action
3.二、TabNavigator
組件採用堆棧式的頁面導航來實現各個界面跳轉。它的構造函數:
TabNavigator(RouteConfigs, TabNavigatorConfig)
RouteConfigs:頁面tab配置
TabNavigatorConfig:參數配置
3.2.一、參數配置
screen:和導航的功能是同樣的,對應界面名稱,能夠在其餘頁面經過這個screen傳值和跳轉。


navigationOptions:配置TabNavigator的一些屬性

title:標題,會同時設置導航條和標籤欄的title

tabBarVisible:是否隱藏標籤欄。默認不隱藏(true)

tabBarIcon:設置標籤欄的圖標。須要給每一個都設置

tabBarLabel:設置標籤欄的title。推薦

導航欄配置

tabBarPosition:設置tabbar的位置,iOS默認在底部,安卓默認在頂部。(屬性值:'top','bottom')

swipeEnabled:是否容許在標籤之間進行滑動

animationEnabled:是否在更改標籤時顯示動畫

lazy:是否根據須要懶惰呈現標籤,而不是提早,意思是在app打開的時候將底部標籤欄所有加載,默認false,推薦爲true

trueinitialRouteName: 設置默認的頁面組件

backBehavior:按 back 鍵是否跳轉到第一個Tab(首頁), none 爲不跳轉

tabBarOptions:配置標籤欄的一些屬性iOS屬性

activeTintColor:label和icon的前景色 活躍狀態下

activeBackgroundColor:label和icon的背景色 活躍狀態下

inactiveTintColor:label和icon的前景色 不活躍狀態下

inactiveBackgroundColor:label和icon的背景色 不活躍狀態下

showLabel:是否顯示label,默認開啓 style:tabbar的樣式

labelStyle:label的樣式安卓屬性

activeTintColor:label和icon的前景色 活躍狀態下

inactiveTintColor:label和icon的前景色 不活躍狀態下

showIcon:是否顯示圖標,默認關閉

showLabel:是否顯示label,默認開啓 style:tabbar的樣式

labelStyle:label的樣式 upperCaseLabel:是否使標籤大寫,默認爲true

pressColor:material漣漪效果的顏色(安卓版本須要大於5.0)

pressOpacity:按壓標籤的透明度變化(安卓版本須要小於5.0)

scrollEnabled:是否啓用可滾動選項卡 tabStyle:tab的樣式

indicatorStyle:標籤指示器的樣式對象(選項卡底部的行)。安卓底部會多出一條線,能夠將height設置爲0來暫時解決這個問題

labelStyle:label的樣式

iconStyle:圖標樣式
導入必要組件:
import { TabNavigator } from "react-navigation";
import Home from "./category/Home";
import Feedback from "./category/feedback/feedback";
定義TabNavigator:
const MyTab = TabNavigator(
    {
        Home: {
            screen: Home,
            navigationOptions: ({ navigation }) => ({
                headerTitle: "首頁",
                tabBarLabel: "首頁",
                headerBackTitle: null
            })
        },
        Feed: {
            screen: Feedback,
            navigationOptions: ({ navigation }) => ({
                headerTitle: "意見反饋",
                tabBarLabel: "個人",
                headerBackTitle: null,
            })
        }
    },
    {
        tabBarComponent: TabBarBottom,
        tabBarPosition: "bottom", //設置tabbar的位置,iOS默認在底部,安卓默認在頂部。(屬性值:'top','bottom')
        swipeEnabled: true, //是否容許在標籤之間滑動
        animationEnabled: false, //是否在更改標籤時顯示動畫
        lazy: true, //是否根據須要懶惰呈現標籤,而不是提早製做,意思是在app打開的時候將底部標籤欄所有加載,默認false,推薦改爲true
        tabBarOptions: {
            activeTintColor: "#ff552e", //label和icon的前景色 活躍狀態下(選中)
            // activeBackgroundColor:'blue',//label和icon的背景色 活躍狀態下
            inactiveTintColor: "#333", //label和icon的前景色 不活躍狀態下
            showLabel: true, //是否顯示label,默認開啓
            showIcon: true, // android 默認不顯示 icon, 須要設置爲 true 纔會顯示
            style: { backgroundColor: "#ffffff" }, //tabbar的樣式
            labelStyle: {
                fontSize: 14 // 文字大小
            }
        }
    }
);
3.三、頁面導航和頁面切換混合使用
const MyTab = TabNavigator(
    {
        Home: {
            screen: Home,
            navigationOptions: ({ navigation }) => ({
                headerTitle: "首頁",
                tabBarLabel: "首頁",
                headerBackTitle: null,
                tabBarIcon: ({ tintColor }) => (
                    <Image
                        style={styles.imageStyle}
                        source={
                            tintColor == "#ff552e"
                                ? require("./img/yingxiao/ac-jingxuan.png")
                                : require("./img/yingxiao/jingxuan.png")
                        }
                    />
                )
            })
        },
        Feed: {
            screen: Feedback,
            navigationOptions: ({ navigation }) => ({
                headerTitle: "意見反饋",
                tabBarLabel: "個人",
                headerBackTitle: null,
                headerRight: (
                    <Text
                        style={{ color: "#333", marginRight: 14, fontSize: 16 }}
                        onPress={() =>
                            navigation.state.params ? navigation.state.params.submit() : null
                        }>
                        提交
                    </Text>
                ),
                tabBarIcon: ({ tintColor }) => (
                    <Image
                        style={styles.imageStyle}
                        source={
                            tintColor == "#ff552e"
                                ? require("./img/yingxiao/ac-laidiantong.png")
                                : require("./img/yingxiao/laidiantong.png")
                        }
                    />
                )
            })
        }
    },
    {
        tabBarComponent: TabBarBottom,
        tabBarPosition: "bottom", //設置tabbar的位置,iOS默認在底部,安卓默認在頂部。(屬性值:'top','bottom')
        swipeEnabled: true, //是否容許在標籤之間滑動
        animationEnabled: false, //是否在更改標籤時顯示動畫
        lazy: true, //是否根據須要懶惰呈現標籤,而不是提早製做,意思是在app打開的時候將底部標籤欄所有加載,默認false,推薦改爲true
        tabBarOptions: {
            activeTintColor: "#ff552e", //label和icon的前景色 活躍狀態下(選中)
            // activeBackgroundColor:'blue',//label和icon的背景色 活躍狀態下
            inactiveTintColor: "#333", //label和icon的前景色 不活躍狀態下
            showLabel: true, //是否顯示label,默認開啓
            showIcon: true, // android 默認不顯示 icon, 須要設置爲 true 纔會顯示
            style: { backgroundColor: "#ffffff" }, //tabbar的樣式
            labelStyle: {
                fontSize: 14 // 文字大小
            }
        }
    }
);
const AppIndex = StackNavigator(
    {
        Main: {
            screen: MyTab
        },
        Task: {
            screen: Task
        },
        NewTask: {
            screen: NewTask
        },
        Redeem: {
            screen: Redeem
        },
        Rule: {
            screen: Rule
        },
        Test: {
            screen: Test
        }
    },
    {
        initialRouteName: "Task", // 默認顯示界面
        navigationOptions: {
            headerTitle: "每日任務",
            headerBackTitle: null,
            // headerBackTitle: "返回",
            headerTintColor: "#333",
            cardStack: {
                gesturesEnabled: true //是否容許右滑返回,在iOS上默認爲true,在Android上默認爲false
            }
        },
        // mode: "card", // 頁面切換模式, 左右是card(至關於iOS中的push效果), 上下是modal(至關於iOS中的modal效果)
        headerMode: "screen", // 導航欄的顯示模式, screen: 有漸變透明效果, float: 無透明效果, none: 隱藏導航欄
        onTransitionStart: () => {}, // 回調
        onTransitionEnd: () => {} // 回調
    }
);
- 1. web前端入門到實戰:前端網頁全局屬性
- 2. web前端入門到實戰:CSS flex佈局入門
- 3. web前端入門到實戰:css文本兩端對齊
- 4. nodejs入門到實戰-03-路由和數據庫mongodb
- 5. web前端入門到實戰:實現圖形驗證碼
- 6. web前端入門到實戰:CSS3 動畫的實現
- 7. React前端開發入門與實戰
- 8. 前端入門——HTML&CSS實戰1
- 9. Web前端JQuery入門實戰案例
- 10. 【前端開發】HTML入門與實戰
- 更多相關文章...
- • Memcached入門教程 - NoSQL教程
- • traceroute命令進行路由跟蹤 - TCP/IP教程
- • Java Agent入門實戰(一)-Instrumentation介紹與使用
- • Java Agent入門實戰(三)-JVM Attach原理與使用
-
每一个你不满意的现在,都有一个你没有努力的曾经。