Android之AlertDialog的基本使用
坦白說,AlertDialog我在工做中用得並很少,由於AlertDialog的樣式比較固定和呆板,爲了和App的總體設計匹配,通常都是使用自定義的Dialog,只有在要求不高時用一下。可是做爲Android的基礎控件之一,掌握它是十分有必要。網上相關的資料已經多如牛毛,一搜就有好幾頁。但我仍是決定寫一篇本身的博客。html
一、建立AlertDialog
首先,咱們來了解一下AlertDialog的大致建立順序。與TextView、Button這些控件稍有不一樣,AlertDialog並非初始化(findViewById)以後就直接調用各類方法了。仔細想一想AlertDialog的使用場景, 它並不像TextView和Button那些控件似的通常都是固定在界面上,而是在某個時機纔會觸發出來(好比用戶點擊了某個按鈕或者斷網了)。因此AlertDialog並不須要到佈局文件中建立,而是在代碼中經過構造器(AlertDialog.Builder)來構造標題、圖標和按鈕等內容的。java
建立構造器
AlertDialog.Builder的對象;android經過構造器的對象調用setTitle、setMessage等方法構造對話框的標題、信息和圖標等內容;數據庫
根據須要,設置正面按鈕、負面按鈕和中立按鈕;segmentfault
調用create方法建立AlertDialog的對象;app
AlertDialog的對象調用show方法,讓對話框在界面上顯示。ide
AlertDialog.Builder本身也有一個show方法,能夠顯示對話框,因此上面的第四、第5步能夠簡化爲一步。佈局
下面,咱們就來簡單建立幾種經常使用的AlertDialog吧。新建一個工程,在MainActivity上放置不一樣的按鈕,點擊按鈕就會有相應的對話框彈出。ui
二、提示對話框
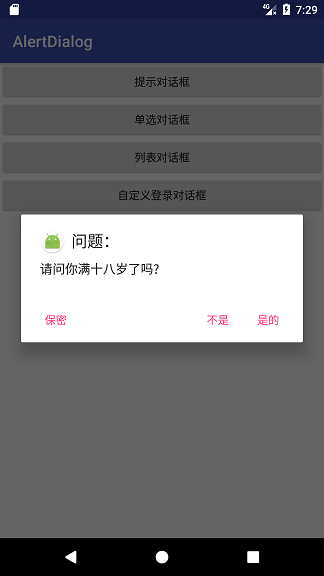
提示對話框應該是最多見的AlertDialog了,中上方是提示文字,底部是「取消」、「肯定」等按鈕。結合前面的建立步驟,相信下面的代碼不難理解。google
/**
     * 提示對話框
     *
     * @param view
     */
    public void tipClick(View view) {
        AlertDialog.Builder builder = new AlertDialog.Builder(context);
        builder.setTitle("問題:");
        builder.setMessage("請問你滿十八歲了嗎?");
        builder.setIcon(R.mipmap.ic_launcher_round);
        //點擊對話框之外的區域是否讓對話框消失
        builder.setCancelable(true);
        //設置正面按鈕
        builder.setPositiveButton("是的", new DialogInterface.OnClickListener() {
            @Override
            public void onClick(DialogInterface dialog, int which) {
                Toast.makeText(context, "你點擊了是的", Toast.LENGTH_SHORT).show();
                dialog.dismiss();
            }
        });
        //設置反面按鈕
        builder.setNegativeButton("不是", new DialogInterface.OnClickListener() {
            @Override
            public void onClick(DialogInterface dialog, int which) {
                Toast.makeText(context, "你點擊了不是", Toast.LENGTH_SHORT).show();
                dialog.dismiss();
            }
        });
        //設置中立按鈕
        builder.setNeutralButton("保密", new DialogInterface.OnClickListener() {
            @Override
            public void onClick(DialogInterface dialog, int which) {
                Toast.makeText(context, "你選擇了保密", Toast.LENGTH_SHORT).show();
                dialog.dismiss();
            }
        });
        AlertDialog dialog = builder.create();
        //對話框顯示的監聽事件
        dialog.setOnShowListener(new DialogInterface.OnShowListener() {
            @Override
            public void onShow(DialogInterface dialog) {
                Log.e(TAG,"對話框顯示了");
            }
        });
        //對話框消失的監聽事件
        dialog.setOnCancelListener(new DialogInterface.OnCancelListener() {
            @Override
            public void onCancel(DialogInterface dialog) {
                Log.e(TAG,"對話框消失了");
            }
        });
        //顯示對話框
        dialog.show();
    }
具體介紹一下用到的方法吧:
setTitle:設置對話框的標題,好比「提示」、「警告」等;setMessage:設置對話框要傳達的具體信息;setIcon:設置對話框的圖標;setCancelable:點擊對話框之外的區域是否讓對話框消失,默認爲true;setPositiveButton:設置正面按鈕,表示「積極」、「確認」的意思,第一個參數爲按鈕上顯示的文字,下同;setNegativeButton:設置反面按鈕,表示「消極」、「否定」、「取消」的意思;setNeutralButton:設置中立按鈕;setOnShowListener:對話框顯示時觸發的事件;setOnCancelListener:對話框消失時觸發的事件。
固然,這些設置並非非要不可,而是根據本身須要而定。好比標題、圖標這些就可要可不要。
效果圖以下:
你或許會有這樣的疑問:既然底部那些按鈕的文字和點擊事件的內容都是咱們本身來寫的,那不是能夠把正面按鈕的內容和反面按鈕的內容互換嗎?看看運行後的效果圖就會發現,反面按鈕是在正面按鈕的左邊的,因此考慮到用戶的操做習慣和代碼的語義,咱們最好仍是按照API來寫。
三、單選對話框
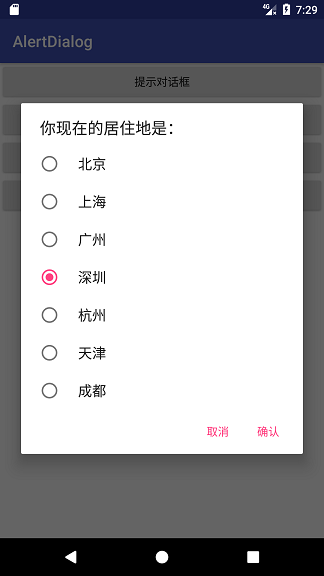
單選對話框的內容就是一個單項選擇列表,須要用到setSingleChoiceItems方法,參數一是列表數據,參數二是默認選中的item,,參數三則是點擊監聽接口,咱們要實現這樣一個小功能,用戶在選好某一項以後記下其選擇,下次點開對話框時就默認選中該項。
/**
     * 單選對話框
     *
     * @param v
     */
    private int checkedItem = 0; //默認選中的item
    public void singleClick(View v) {
        AlertDialog.Builder builder = new AlertDialog.Builder(context);
        builder.setTitle("你如今的居住地是:");
        String[] cities = {"北京", "上海", "廣州", "深圳", "杭州", "天津", "成都"};

        builder.setSingleChoiceItems(cities, checkedItem, new DialogInterface.OnClickListener() {
            @Override
            public void onClick(DialogInterface dialog, int which) {
                checkedItem = which;
            }
        });
        //設置正面按鈕
        builder.setPositiveButton("確認", new DialogInterface.OnClickListener() {
            @Override
            public void onClick(DialogInterface dialog, int which) {
                dialog.dismiss();
            }
        });
        //設置反面按鈕
        builder.setNegativeButton("取消", new DialogInterface.OnClickListener() {
            @Override
            public void onClick(DialogInterface dialog, int which) {
                dialog.dismiss();
            }
        });
        AlertDialog dialog = builder.create();
        dialog.show();
    }
實現後的效果:
你可能會把checkedItem的賦值放在肯定按鈕的點擊事件中,這一看彷佛沒什麼問題,可是這樣是錯誤的!仔細閱讀谷歌的API文檔就知道了,setSingleChoiceItems 方法中實現的onClick方法中which表示的是當前選中的列表中的item下標,而setPositiveButton和setNegativeButton方法那裏的which表示的倒是按鈕的種類,正面按鈕中的which值是-1,反面按鈕的是-2,與列表的item是沒有關係的。
例子中的保存選中item的方法有問題的,當Activity被銷燬以後從新建立的話數據就會丟失,要想持久化保存的話要用sharedpreferences或者數據庫。
四、複選對話框
複選對話框是一個能夠重複選中的列表,與單選對話框有點像,不過調用的是setMultiChoiceItems方法,並且多了一個布爾值參數isChecked,表示當前點擊的item是否被選中。
咱們建立一個集合,將點擊選中的item添加到集合中,取消勾選的話就從集合中移除,點擊確認按鈕後就在日誌中打印出來。
/**
     * 複選(列表)對話框
     *
     * @param v
     */
    public void listClick(View v) {
        AlertDialog.Builder builder = new AlertDialog.Builder(context);
        builder.setTitle("請選擇你喜歡的顏色:");
        final String[] colors = {"紅色", "橙色", "黃色", "綠色", "藍色", "靛色", "紫色"};
        final List<String> myColors = new ArrayList<>();
        builder.setMultiChoiceItems(colors, null, new DialogInterface.OnMultiChoiceClickListener() {
            @Override
            public void onClick(DialogInterface dialog, int which, boolean isChecked) {
                if (isChecked) {
                    myColors.add(colors[which]);
                } else {
                    myColors.remove(colors[which]);
                }
            }
        });

        //設置正面按鈕
        builder.setPositiveButton("確認", new DialogInterface.OnClickListener() {
            @Override
            public void onClick(DialogInterface dialog, int which) {
                for (String color : myColors) {
                    Log.e(TAG, "選擇的顏色:" + color);
                }
                dialog.dismiss();
            }
        });
        //設置反面按鈕
        builder.setNegativeButton("取消", new DialogInterface.OnClickListener() {
            @Override
            public void onClick(DialogInterface dialog, int which) {
                myColors.clear();
                dialog.dismiss();
            }
        });
//        AlertDialog dialog = builder.create();
//        dialog.show();
        builder.show();
    }

五、自定義登陸對話框
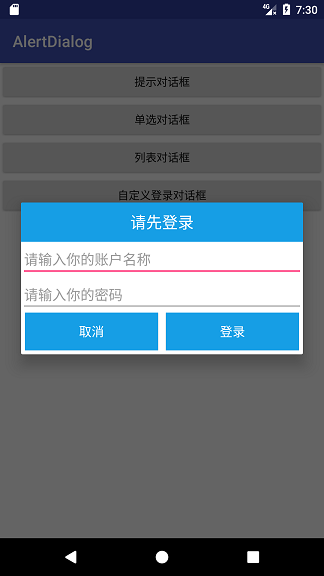
有時候,只顯示簡單的標題和信息是知足不了咱們的要求,好比咱們要實現一個登陸對話框的話,那就須要在對話框上放置EditText輸入框了。AlertDialog早就爲咱們準備好了setView方法,只要往裏面放進咱們須要的對話框的View對象就能夠了。
5.1 自定義登陸對話框佈局文件
<LinearLayout xmlns:android="http://schemas.android.com/apk/res/android"
    android:layout_width="match_parent"
    android:layout_height="match_parent"
    android:gravity="center"
    android:background="@android:color/transparent"
    android:orientation="vertical">

    <TextView
        android:id="@+id/textView"
        android:layout_width="match_parent"
        android:layout_height="50dp"
        android:background="#169ee5"
        android:gravity="center"
        android:text="請先登陸"
        android:textColor="@android:color/white"
        android:textSize="20sp" />

    <EditText
        android:id="@+id/et_name"
        android:layout_width="match_parent"
        android:layout_height="wrap_content"
        android:hint="請輸入你的帳戶名稱"
        android:textCursorDrawable="@drawable/edittext_cursor_color"
        android:textSize="18sp" />

    <EditText
        android:id="@+id/et_pwd"
        android:layout_width="match_parent"
        android:layout_height="wrap_content"
        android:hint="請輸入你的密碼"
        android:textCursorDrawable="@drawable/edittext_cursor_color"
        android:textSize="18sp" />

    <LinearLayout
        android:layout_width="match_parent"
        android:layout_height="wrap_content"
        android:layout_marginBottom="5dp"
        android:orientation="horizontal"
        android:paddingLeft="5dp"
        android:paddingRight="5dp">

        <Button

            android:id="@+id/btn_cancel"
            android:layout_width="0dp"
            android:layout_height="wrap_content"
            android:layout_marginRight="10dp"
            android:layout_weight="1"
            android:background="#169ee5"
            android:text="取消"
            android:textColor="@android:color/white"
            android:textSize="16sp" />

        <Button
            android:id="@+id/btn_login"
            android:layout_width="0dp"
            android:layout_height="wrap_content"
            android:layout_weight="1"
            android:background="#169ee5"
            android:text="登陸"
            android:textColor="@android:color/white"
            android:textSize="16sp" />

    </LinearLayout>

</LinearLayout>
5.2 代碼邏輯
setView方法是經過AlertDialog的對象調用的,因此這裏的代碼順序會稍有不一樣:咱們要先建立AlertDialog對象和View對象,而後再去初始化對話框中的控件。
/**
     * 自定義登陸對話框
     *
     * @param v
     */
    public void customClick(View v) {
        AlertDialog.Builder builder = new AlertDialog.Builder(context);
        final AlertDialog dialog = builder.create();
        View dialogView = View.inflate(context, R.layout.dialog_login, null);
        //設置對話框佈局
        dialog.setView(dialogView);
        dialog.show();
        EditText etName = (EditText) dialogView.findViewById(R.id.et_name);
        EditText etPwd = (EditText) dialogView.findViewById(R.id.et_pwd);
        final String name = etName.getText().toString();
        final String pwd = etPwd.getText().toString();
        Button btnLogin = (Button) dialogView.findViewById(R.id.btn_login);
        Button btnCancel = (Button) dialogView.findViewById(R.id.btn_cancel);
        btnLogin.setOnClickListener(new View.OnClickListener() {
            @Override
            public void onClick(View v) {
                if (TextUtils.isEmpty(name) && TextUtils.isEmpty(pwd)) {
                    Toast.makeText(context, "用戶名和密碼均不能爲空", Toast.LENGTH_SHORT).show();
                    return;
                }
                Log.e(TAG, "用戶名:" + name);
                Log.e(TAG, "密碼:" + pwd);
                dialog.dismiss();
            }
        });
        btnCancel.setOnClickListener(new View.OnClickListener() {
            @Override
            public void onClick(View v) {
                dialog.dismiss();
            }
        });
    }

六、總結
關於AlertDialog的知識固然不止這麼多,你們能夠點擊參考文獻中的連接去閱讀API文檔。至於源碼嘛,只是一些佈局和簡單代碼,就不上傳了。值得一提的是,我本來還想自定義一個仿iOS風格的對話框(雖然以前自定義Dialog實現過了),可是圓角邊框的效果始終實現不了,也試着去查了源碼,無奈限於水平最終未果。在此也但願有朋友能解答個人困惑,不勝感激。
七、參考文獻
- 1. Android中AlertDialog的基本使用
- 2. Android筆記系列--AlertDialog基本使用
- 3. Android之AlertDialog應用
- 4. AlertDialog的使用
- 5. Android自定義AlertDialog的使用
- 6. Android中AlertDialog的簡單使用
- 7. Android AlertDialog
- 8. android之recyclerview的基本使用
- 9. AlertDialog 使用
- 10. Android之AlertDialog對話框
- 更多相關文章...
- • Redis基本安裝和使用 - Redis教程
- • Lua 基本語法 - Lua 教程
- • Kotlin學習(二)基本類型
- • Kotlin學習(一)基本語法
-
每一个你不满意的现在,都有一个你没有努力的曾经。