我想挑戰下個人軟肋,動手實現個Spring應用上下文!
做者:小傅哥
博客:https://bugstack.cnhtml
沉澱、分享、成長,讓本身和他人都能有所收穫!😄
目錄
- [x] 第 1 章:開篇介紹,我要帶你擼 Spring 啦!
- [x] 第 2 章:小試牛刀,實現一個簡單的Bean容器
- [x] 第 3 章:初顯身手,運用設計模式,實現 Bean 的定義、註冊、獲取
- [x] 第 4 章:嶄露頭角,基於Cglib實現含構造函數的類實例化策略
- [x] 第 5 章:一舉成名,爲Bean對象注入屬性和依賴Bean的功能實現
- [x] 第 6 章:氣吞山河,設計與實現資源加載器,從Spring.xml解析和註冊Bean對象
- [x] 第 7 章:所向披靡,實現應用上下文,自動識別、資源加載、擴展機制
- [ ] 第 8 章:待歸檔...
1、前言
你這代碼,可不能寫死了呀!java
依照項目落地經驗來看,咱們在承接緊急的產品需求時候,一般會選擇在原有同類項目中進行擴展,若是沒有相關類型項目的儲備,也可能會選擇臨時搭建出一個工程來實現產品的需求。但這個時候就會遇到很是現實的問題,選擇完整的設計和開發就可能知足不了上線時間,臨時拼湊式的完成需求又可能不具有上線後響應產品的臨時調整。面試
上線後的調整有哪些呢?項目剛一上線,運營了還不到半天,老闆發現本身的配置的活動好像金額配置的過小了,用戶都不來,割不到韭菜呀。趕忙半夜聯繫產品,來來來,你給我這改改,那修修,把人均優惠1萬元放大大的,把可能兩字縮小放在後面。再把優惠的獎金池配置從10元調整11元,快快快,趕忙修改,你修改了我們能賺1個億!!!spring
好傢伙,項目是臨時開發堆出來的,沒有後臺系統、沒有配置中心、沒有模塊拆分,老闆一句句改改改,產品來傳達催促,最後背鍋的可就是研發了。你這不能寫死,這優惠配置得抽出來,這文案也後臺下發吧,這接口入參也寫死了,再寫一個新接口吧! 一頓操做猛如虎,研發搬磚修接口,運營折騰好幾宿,最後PV150!數據庫
不管業務、產品、運營如何,但就研發自身來說,儘量的要不避免臨時堆出一個服務來,尤爲是在團隊建設初期或者運營思路常常調整的狀況下,更要注重設計細節和實現方案。哪怕去報風險延期,也不要讓本身背上一個明知是爛坑還要接的活。設計模式
而本章節說到不把代碼寫死,就是由於咱們須要繼續在手寫 Spring 框架中繼續擴展新的功能,如一個Bean的定義和實例化的過程先後,是否能夠知足咱們進行自定義擴展,對Bean對象執行一些修改、加強、記錄等操做呢? 這個過程基本就是你在使用 Spring 容器框架時候作的一些中間件擴展開發。架構
2、目標
若是你在本身的實際工做中開發過基於 Spring 的技術組件,或者學習過關於 SpringBoot 中間件設計和開發 等內容。那麼你必定會繼承或者實現了 Spring 對外暴露的類或接口,在接口的實現中獲取了 BeanFactory 以及 Bean 對象的獲取等內容,並對這些內容作一些操做,例如:修改 Bean 的信息,添加日誌打印、處理數據庫路由對數據源的切換、給 RPC 服務鏈接註冊中心等。app
在對容器中 Bean 的實例化過程添加擴展機制的同時,還須要把目前關於 Spring.xml 初始化和加載策略進行優化,由於咱們不太可能讓面向 Spring 自己開發的 DefaultListableBeanFactory 服務,直接給予用戶使用。修改點以下:框架

- DefaultListableBeanFactory、XmlBeanDefinitionReader,是咱們在目前 Spring 框架中對於服務功能測試的使用方式,它能很好的體現出 Spring 是如何對 xml 加載以及註冊Bean對象的操做過程,但這種方式是面向 Spring 自己的,還不具有必定的擴展性。
- 就像咱們如今須要提供出一個能夠在 Bean 初始化過程當中,完成對 Bean 對象的擴展時,就很難作到自動化處理。因此咱們要把 Bean 對象擴展機制功能和對 Spring 框架上下文的包裝融合起來,對外提供完整的服務。
3、設計
爲了能知足於在 Bean 對象從註冊到實例化的過程當中執行用戶的自定義操做,就須要在 Bean 的定義和初始化過程當中插入接口類,這個接口再有外部去實現本身須要的服務。那麼在結合對 Spring 框架上下文的處理能力,就能夠知足咱們的目標需求了。總體設計結構以下圖:ide
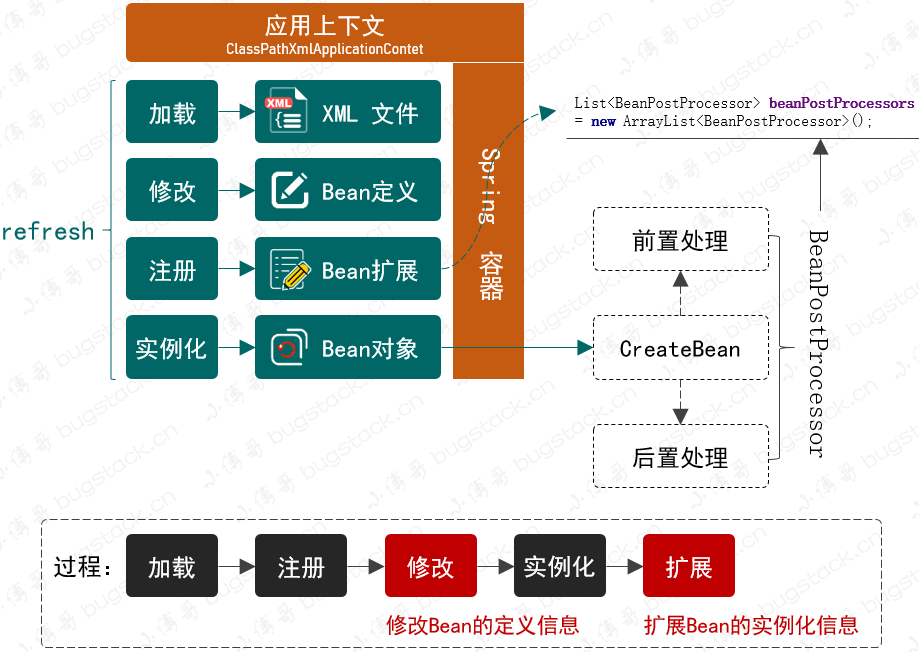
- 知足於對 Bean 對象擴展的兩個接口,其實也是 Spring 框架中很是具備重量級的兩個接口:
BeanFactoryPostProcess和BeanPostProcessor,也幾乎是你們在使用 Spring 框架額外新增開發本身組建需求的兩個必備接口。 - BeanFactoryPostProcessor,是由 Spring 框架組建提供的容器擴展機制,容許在 Bean 對象註冊後但未實例化以前,對 Bean 的定義信息
BeanDefinition執行修改操做。 - BeanPostProcessor,也是 Spring 提供的擴展機制,不過 BeanPostProcessor 是在 Bean 對象實例化以後修改 Bean 對象,也能夠替換 Bean 對象。這部分與後面要實現的 AOP 有着密切的關係。
- 同時若是隻是添加這兩個接口,不作任何包裝,那麼對於使用者來講仍是很是麻煩的。咱們但願於開發 Spring 的上下文操做類,把相應的 XML 加載 、註冊、實例化以及新增的修改和擴展都融合進去,讓 Spring 能夠自動掃描到咱們的新增服務,便於用戶使用。
4、實現
1. 工程結構
small-spring-step-06
└── src
    ├── main
    │   └── java
    │       └── cn.bugstack.springframework
    │           ├── beans
    │           │   ├── factory
    │           │   │   ├── factory
    │           │   │   │   ├── AutowireCapableBeanFactory.java
    │           │   │   │   ├── BeanDefinition.java
    │           │   │   │   ├── BeanFactoryPostProcessor.java
    │           │   │   │   ├── BeanPostProcessor.java
    │           │   │   │   ├── BeanReference.java
    │           │   │   │   ├── ConfigurableBeanFactory.java
    │           │   │   │   └── SingletonBeanRegistry.java
    │           │   │   ├── support
    │           │   │   │   ├── AbstractAutowireCapableBeanFactory.java
    │           │   │   │   ├── AbstractBeanDefinitionReader.java
    │           │   │   │   ├── AbstractBeanFactory.java
    │           │   │   │   ├── BeanDefinitionReader.java
    │           │   │   │   ├── BeanDefinitionRegistry.java
    │           │   │   │   ├── CglibSubclassingInstantiationStrategy.java
    │           │   │   │   ├── DefaultListableBeanFactory.java
    │           │   │   │   ├── DefaultSingletonBeanRegistry.java
    │           │   │   │   ├── InstantiationStrategy.java
    │           │   │   │   └── SimpleInstantiationStrategy.java
    │           │   │   ├── support
    │           │   │   │   └── XmlBeanDefinitionReader.java
    │           │   │   ├── BeanFactory.java
    │           │   │   ├── ConfigurableListableBeanFactory.java
    │           │   │   ├── HierarchicalBeanFactory.java
    │           │   │   └── ListableBeanFactory.java
    │           │   ├── BeansException.java
    │           │   ├── PropertyValue.java
    │           │   └── PropertyValues.java
    │           ├── context
    │           │   ├── support
    │           │   │   ├── AbstractApplicationContext.java
    │           │   │   ├── AbstractRefreshableApplicationContext.java
    │           │   │   ├── AbstractXmlApplicationContext.java
    │           │   │   └── ClassPathXmlApplicationContext.java
    │           │   ├── ApplicationContext.java
    │           │   └── ConfigurableApplicationContext.java
    │           ├── core.io
    │           │   ├── ClassPathResource.java
    │           │   ├── DefaultResourceLoader.java
    │           │   ├── FileSystemResource.java
    │           │   ├── Resource.java
    │           │   ├── ResourceLoader.java
    │           │   └── UrlResource.java
    │           └── utils
    │               └── ClassUtils.java
    └── test
        └── java
            └── cn.bugstack.springframework.test
                ├── bean
                │   ├── UserDao.java
                │   └── UserService.java
                ├── common
                │   ├── MyBeanFactoryPostProcessor.java
                │   └── MyBeanPostProcessor.java
                └── ApiTest.java
工程源碼:公衆號「bugstack蟲洞棧」,回覆:Spring 專欄,獲取完整源碼
Spring 應用上下文和對Bean對象擴展機制的類關係,如圖 7-3

- 在整個類圖中主要體現出來的是關於 Spring 應用上下文以及對 Bean 對象擴展機制的實現。
- 以繼承了 ListableBeanFactory 接口的 ApplicationContext 接口開始,擴展出一系列應用上下文的抽象實現類,並最終完成
ClassPathXmlApplicationContext類的實現。而這個類就是最後交給用戶使用的類。 - 同時在實現應用上下文的過程當中,經過定義接口:
BeanFactoryPostProcessor、BeanPostProcessor兩個接口,把關於對 Bean 的擴展機制串聯進去了。
2. 定義 BeanFactoryPostProcessor
cn.bugstack.springframework.beans.factory.config.BeanFactoryPostProcessor
public interface BeanFactoryPostProcessor {

    /**
     * 在全部的 BeanDefinition 加載完成後,實例化 Bean 對象以前,提供修改 BeanDefinition 屬性的機制
     *
     * @param beanFactory
     * @throws BeansException
     */
    void postProcessBeanFactory(ConfigurableListableBeanFactory beanFactory) throws BeansException;

}
- 在 Spring 源碼中有這樣一段描述
Allows for custom modification of an application context's bean definitions,adapting the bean property values of the context's underlying bean factory.其實也就是說這個接口是知足於在全部的 BeanDefinition 加載完成後,實例化 Bean 對象以前,提供修改 BeanDefinition 屬性的機制。
3. 定義 BeanPostProcessor
cn.bugstack.springframework.beans.factory.config.BeanPostProcessor
public interface BeanPostProcessor {

    /**
     * 在 Bean 對象執行初始化方法以前,執行此方法
     *
     * @param bean
     * @param beanName
     * @return
     * @throws BeansException
     */
    Object postProcessBeforeInitialization(Object bean, String beanName) throws BeansException;

    /**
     * 在 Bean 對象執行初始化方法以後,執行此方法
     *
     * @param bean
     * @param beanName
     * @return
     * @throws BeansException
     */
    Object postProcessAfterInitialization(Object bean, String beanName) throws BeansException;

}
- 在 Spring 源碼中有這樣一段描述
Factory hook that allows for custom modification of new bean instances,e.g. checking for marker interfaces or wrapping them with proxies.也就是提供了修改新實例化 Bean 對象的擴展點。 - 另外此接口提供了兩個方法:
postProcessBeforeInitialization用於在 Bean 對象執行初始化方法以前,執行此方法、postProcessAfterInitialization用於在 Bean 對象執行初始化方法以後,執行此方法。
4. 定義上下文接口
cn.bugstack.springframework.context.ApplicationContext
public interface ApplicationContext extends ListableBeanFactory {
}
- context 是本次實現應用上下文功能新增的服務包
- ApplicationContext,繼承於 ListableBeanFactory,也就繼承了關於 BeanFactory 方法,好比一些 getBean 的方法。另外 ApplicationContext 自己是 Central 接口,但目前還不須要添加一些獲取ID和父類上下文,因此暫時沒有接口方法的定義。
cn.bugstack.springframework.context.ConfigurableApplicationContext
public interface ConfigurableApplicationContext extends ApplicationContext {

    /**
     * 刷新容器
     *
     * @throws BeansException
     */
    void refresh() throws BeansException;

}
- ConfigurableApplicationContext 繼承自 ApplicationContext,並提供了 refresh 這個核心方法。若是你有看過一些 Spring 源碼,那麼必定會看到這個方法。 接下來也是須要在上下文的實現中完成刷新容器的操做過程。
5. 應用上下文抽象類實現
cn.bugstack.springframework.context.support.AbstractApplicationContext
public abstract class AbstractApplicationContext extends DefaultResourceLoader implements ConfigurableApplicationContext {

    @Override
    public void refresh() throws BeansException {
        // 1. 建立 BeanFactory,並加載 BeanDefinition
        refreshBeanFactory();

        // 2. 獲取 BeanFactory
        ConfigurableListableBeanFactory beanFactory = getBeanFactory();

        // 3. 在 Bean 實例化以前,執行 BeanFactoryPostProcessor (Invoke factory processors registered as beans in the context.)
        invokeBeanFactoryPostProcessors(beanFactory);

        // 4. BeanPostProcessor 須要提早於其餘 Bean 對象實例化以前執行註冊操做
        registerBeanPostProcessors(beanFactory);

        // 5. 提早實例化單例Bean對象
        beanFactory.preInstantiateSingletons();
    }

    protected abstract void refreshBeanFactory() throws BeansException;

    protected abstract ConfigurableListableBeanFactory getBeanFactory();

    private void invokeBeanFactoryPostProcessors(ConfigurableListableBeanFactory beanFactory) {
        Map<String, BeanFactoryPostProcessor> beanFactoryPostProcessorMap = beanFactory.getBeansOfType(BeanFactoryPostProcessor.class);
        for (BeanFactoryPostProcessor beanFactoryPostProcessor : beanFactoryPostProcessorMap.values()) {
            beanFactoryPostProcessor.postProcessBeanFactory(beanFactory);
        }
    }

    private void registerBeanPostProcessors(ConfigurableListableBeanFactory beanFactory) {
        Map<String, BeanPostProcessor> beanPostProcessorMap = beanFactory.getBeansOfType(BeanPostProcessor.class);
        for (BeanPostProcessor beanPostProcessor : beanPostProcessorMap.values()) {
            beanFactory.addBeanPostProcessor(beanPostProcessor);
        }
    }

    //... getBean、getBeansOfType、getBeanDefinitionNames 方法

}
- AbstractApplicationContext 繼承 DefaultResourceLoader 是爲了處理
spring.xml配置資源的加載。 以後是在 refresh() 定義實現過程,包括:
-
- 建立 BeanFactory,並加載 BeanDefinition
-
- 獲取 BeanFactory
-
- 在 Bean 實例化以前,執行 BeanFactoryPostProcessor (Invoke factory processors registered as beans in the context.)
-
- BeanPostProcessor 須要提早於其餘 Bean 對象實例化以前執行註冊操做
-
- 提早實例化單例Bean對象
-
- 另外把定義出來的抽象方法,refreshBeanFactory()、getBeanFactory() 由後面的繼承此抽象類的其餘抽象類實現。
6. 獲取Bean工廠和加載資源
cn.bugstack.springframework.context.support.AbstractRefreshableApplicationContext
public abstract class AbstractRefreshableApplicationContext extends AbstractApplicationContext {

    private DefaultListableBeanFactory beanFactory;

    @Override
    protected void refreshBeanFactory() throws BeansException {
        DefaultListableBeanFactory beanFactory = createBeanFactory();
        loadBeanDefinitions(beanFactory);
        this.beanFactory = beanFactory;
    }

    private DefaultListableBeanFactory createBeanFactory() {
        return new DefaultListableBeanFactory();
    }

    protected abstract void loadBeanDefinitions(DefaultListableBeanFactory beanFactory);

    @Override
    protected ConfigurableListableBeanFactory getBeanFactory() {
        return beanFactory;
    }

}
- 在 refreshBeanFactory() 中主要是獲取了
DefaultListableBeanFactory的實例化以及對資源配置的加載操做loadBeanDefinitions(beanFactory),在加載完成後便可完成對 spring.xml 配置文件中 Bean 對象的定義和註冊,同時也包括實現了接口 BeanFactoryPostProcessor、BeanPostProcessor 的配置 Bean 信息。 - 但此時資源加載還只是定義了一個抽象類方法
loadBeanDefinitions(DefaultListableBeanFactory beanFactory),繼續由其餘抽象類繼承實現。
7. 上下文中對配置信息的加載
cn.bugstack.springframework.context.support.AbstractXmlApplicationContext
public abstract class AbstractXmlApplicationContext extends AbstractRefreshableApplicationContext {

    @Override
    protected void loadBeanDefinitions(DefaultListableBeanFactory beanFactory) {
        XmlBeanDefinitionReader beanDefinitionReader = new XmlBeanDefinitionReader(beanFactory, this);
        String[] configLocations = getConfigLocations();
        if (null != configLocations){
            beanDefinitionReader.loadBeanDefinitions(configLocations);
        }
    }

    protected abstract String[] getConfigLocations();

}
- 在 AbstractXmlApplicationContext 抽象類的 loadBeanDefinitions 方法實現中,使用 XmlBeanDefinitionReader 類,處理了關於 XML 文件配置信息的操做。
- 同時這裏又留下了一個抽象類方法,getConfigLocations(),此方法是爲了從入口上下文類,拿到配置信息的地址描述。
8. 應用上下文實現類(ClassPathXmlApplicationContext)
cn.bugstack.springframework.context.support.ClassPathXmlApplicationContext
public class ClassPathXmlApplicationContext extends AbstractXmlApplicationContext {

    private String[] configLocations;

    public ClassPathXmlApplicationContext() {
    }

    /**
     * 從 XML 中加載 BeanDefinition,並刷新上下文
     *
     * @param configLocations
     * @throws BeansException
     */
    public ClassPathXmlApplicationContext(String configLocations) throws BeansException {
        this(new String[]{configLocations});
    }

    /**
     * 從 XML 中加載 BeanDefinition,並刷新上下文
     * @param configLocations
     * @throws BeansException
     */
    public ClassPathXmlApplicationContext(String[] configLocations) throws BeansException {
        this.configLocations = configLocations;
        refresh();
    }

    @Override
    protected String[] getConfigLocations() {
        return configLocations;
    }

}
- ClassPathXmlApplicationContext,是具體對外給用戶提供的應用上下文方法。
- 在繼承了 AbstractXmlApplicationContext 以及層層抽象類的功能分離實現後,在此類 ClassPathXmlApplicationContext 的實現中就簡單多了,主要是對繼承抽象類中方法的調用和提供了配置文件地址信息。
9. 在Bean建立時完成前置和後置處理
cn.bugstack.springframework.beans.factory.support.AbstractAutowireCapableBeanFactory
public abstract class AbstractAutowireCapableBeanFactory extends AbstractBeanFactory implements AutowireCapableBeanFactory {

    private InstantiationStrategy instantiationStrategy = new CglibSubclassingInstantiationStrategy();

    @Override
    protected Object createBean(String beanName, BeanDefinition beanDefinition, Object[] args) throws BeansException {
        Object bean = null;
        try {
            bean = createBeanInstance(beanDefinition, beanName, args);
            // 給 Bean 填充屬性
            applyPropertyValues(beanName, bean, beanDefinition);
            // 執行 Bean 的初始化方法和 BeanPostProcessor 的前置和後置處理方法
            bean = initializeBean(beanName, bean, beanDefinition);
        } catch (Exception e) {
            throw new BeansException("Instantiation of bean failed", e);
        }

        addSingleton(beanName, bean);
        return bean;
    }

    public InstantiationStrategy getInstantiationStrategy() {
        return instantiationStrategy;
    }

    public void setInstantiationStrategy(InstantiationStrategy instantiationStrategy) {
        this.instantiationStrategy = instantiationStrategy;
    }

    private Object initializeBean(String beanName, Object bean, BeanDefinition beanDefinition) {
        // 1. 執行 BeanPostProcessor Before 處理
        Object wrappedBean = applyBeanPostProcessorsBeforeInitialization(bean, beanName);

        // 待完成內容:invokeInitMethods(beanName, wrappedBean, beanDefinition);
        invokeInitMethods(beanName, wrappedBean, beanDefinition);

        // 2. 執行 BeanPostProcessor After 處理
        wrappedBean = applyBeanPostProcessorsAfterInitialization(bean, beanName);
        return wrappedBean;
    }

    private void invokeInitMethods(String beanName, Object wrappedBean, BeanDefinition beanDefinition) {

    }

    @Override
    public Object applyBeanPostProcessorsBeforeInitialization(Object existingBean, String beanName) throws BeansException {
        Object result = existingBean;
        for (BeanPostProcessor processor : getBeanPostProcessors()) {
            Object current = processor.postProcessBeforeInitialization(result, beanName);
            if (null == current) return result;
            result = current;
        }
        return result;
    }

    @Override
    public Object applyBeanPostProcessorsAfterInitialization(Object existingBean, String beanName) throws BeansException {
        Object result = existingBean;
        for (BeanPostProcessor processor : getBeanPostProcessors()) {
            Object current = processor.postProcessAfterInitialization(result, beanName);
            if (null == current) return result;
            result = current;
        }
        return result;
    }

}
- 實現 BeanPostProcessor 接口後,會涉及到兩個接口方法,
postProcessBeforeInitialization、postProcessAfterInitialization,分別做用於 Bean 對象執行初始化先後的額外處理。 - 也就是須要在建立 Bean 對象時,在 createBean 方法中添加
initializeBean(beanName, bean, beanDefinition);操做。而這個操做主要主要是對於方法applyBeanPostProcessorsBeforeInitialization、applyBeanPostProcessorsAfterInitialization的使用。 - 另外須要提一下,applyBeanPostProcessorsBeforeInitialization、applyBeanPostProcessorsAfterInitialization 兩個方法是在接口類
AutowireCapableBeanFactory中新增長的。
5、測試
1. 事先準備
cn.bugstack.springframework.test.bean.UserDao
public class UserDao {

    private static Map<String, String> hashMap = new HashMap<>();

    static {
        hashMap.put("10001", "小傅哥");
        hashMap.put("10002", "八杯水");
        hashMap.put("10003", "阿毛");
    }

    public String queryUserName(String uId) {
        return hashMap.get(uId);
    }

}
cn.bugstack.springframework.test.bean.UserService
public class UserService {

    private String uId;
    private String company;
    private String location;
    private UserDao userDao;

    public void queryUserInfo() {
        return userDao.queryUserName(uId);
    }

    // ...get/set
}
- Dao、Service,是咱們日常開發常用的場景。在 UserService 中注入 UserDao,這樣就能體現出Bean屬性的依賴了。
- 另外這裏新增長了 company、location,兩個屬性信息,便於測試 BeanPostProcessor、BeanFactoryPostProcessor 兩個接口對 Bean 屬性信息擴展的做用。
2. 實現 BeanPostProcessor 和 BeanFactoryPostProcessor
cn.bugstack.springframework.test.common.MyBeanFactoryPostProcessor
public class MyBeanFactoryPostProcessor implements BeanFactoryPostProcessor {

    @Override
    public void postProcessBeanFactory(ConfigurableListableBeanFactory beanFactory) throws BeansException {

        BeanDefinition beanDefinition = beanFactory.getBeanDefinition("userService");
        PropertyValues propertyValues = beanDefinition.getPropertyValues();

        propertyValues.addPropertyValue(new PropertyValue("company", "改成:字節跳動"));
    }

}
cn.bugstack.springframework.test.common.MyBeanPostProcessor
public class MyBeanPostProcessor implements BeanPostProcessor {

    @Override
    public Object postProcessBeforeInitialization(Object bean, String beanName) throws BeansException {
        if ("userService".equals(beanName)) {
            UserService userService = (UserService) bean;
            userService.setLocation("改成:北京");
        }
        return bean;
    }

    @Override
    public Object postProcessAfterInitialization(Object bean, String beanName) throws BeansException {
        return bean;
    }

}
- 若是你在 Spring 中作過一些組件的開發那麼必定很是熟悉這兩個類,本文的測試也是實現了這兩個類,對實例化過程當中的 Bean 對象作一些操做。
3. 配置文件
基礎配置,無BeanFactoryPostProcessor、BeanPostProcessor,實現類
<?xml version="1.0" encoding="UTF-8"?>
<beans>

    <bean id="userDao" class="cn.bugstack.springframework.test.bean.UserDao"/>

    <bean id="userService" class="cn.bugstack.springframework.test.bean.UserService">
        <property name="uId" value="10001"/>
        <property name="company" value="騰訊"/>
        <property name="location" value="深圳"/>
        <property name="userDao" ref="userDao"/>
    </bean>

</beans>
加強配置,有BeanFactoryPostProcessor、BeanPostProcessor,實現類
<?xml version="1.0" encoding="UTF-8"?>
<beans>

    <bean id="userDao" class="cn.bugstack.springframework.test.bean.UserDao"/>

    <bean id="userService" class="cn.bugstack.springframework.test.bean.UserService">
        <property name="uId" value="10001"/>
        <property name="company" value="騰訊"/>
        <property name="location" value="深圳"/>
        <property name="userDao" ref="userDao"/>
    </bean>

    <bean class="cn.bugstack.springframework.test.common.MyBeanPostProcessor"/>
    <bean class="cn.bugstack.springframework.test.common.MyBeanFactoryPostProcessor"/>

</beans>
- 這裏提供了兩個配置文件,一個是不包含BeanFactoryPostProcessor、BeanPostProcessor,另一個是包含的。之因此這樣配置主要對照驗證,在運用 Spring 新增長的應用上下文和不使用的時候,都是怎麼操做的。
4. 不用應用上下文
@Test
public void test_BeanFactoryPostProcessorAndBeanPostProcessor(){
    // 1.初始化 BeanFactory
    DefaultListableBeanFactory beanFactory = new DefaultListableBeanFactory();

    // 2. 讀取配置文件&註冊Bean
    XmlBeanDefinitionReader reader = new XmlBeanDefinitionReader(beanFactory);
    reader.loadBeanDefinitions("classpath:spring.xml");

    // 3. BeanDefinition 加載完成 & Bean實例化以前,修改 BeanDefinition 的屬性值
    MyBeanFactoryPostProcessor beanFactoryPostProcessor = new MyBeanFactoryPostProcessor();
    beanFactoryPostProcessor.postProcessBeanFactory(beanFactory);

    // 4. Bean實例化以後,修改 Bean 屬性信息
    MyBeanPostProcessor beanPostProcessor = new MyBeanPostProcessor();
    beanFactory.addBeanPostProcessor(beanPostProcessor);

    // 5. 獲取Bean對象調用方法
    UserService userService = beanFactory.getBean("userService", UserService.class);
    String result = userService.queryUserInfo();
    System.out.println("測試結果:" + result);
}
- DefaultListableBeanFactory 建立 beanFactory 並使用 XmlBeanDefinitionReader 加載配置文件的方式,仍是比較熟悉的。
- 接下來就是對 MyBeanFactoryPostProcessor 和 MyBeanPostProcessor 的處理,一個是在BeanDefinition 加載完成 & Bean實例化以前,修改 BeanDefinition 的屬性值,另一個是在Bean實例化以後,修改 Bean 屬性信息。
測試結果
測試結果:小傅哥,改成:字節跳動,改成:北京

Process finished with exit code 0
- 經過測試結果能夠看到,咱們配置的屬性信息已經與 spring.xml 配置文件中不同了。
5. 使用應用上下文
@Test
public void test_xml() {
    // 1.初始化 BeanFactory
    ClassPathXmlApplicationContext applicationContext = new ClassPathXmlApplicationContext("classpath:springPostProcessor.xml");

    // 2. 獲取Bean對象調用方法
    UserService userService = applicationContext.getBean("userService", UserService.class);
    String result = userService.queryUserInfo();
    System.out.println("測試結果:" + result);
}
- 另外使用新增長的 ClassPathXmlApplicationContext 應用上下文類,再操做起來就方便多了,這纔是面向用戶使用的類,在這裏能夠一步把配置文件交給 ClassPathXmlApplicationContext,也不須要管理一些自定義實現的 Spring 接口的類。
測試結果
測試結果:小傅哥,改成:字節跳動,改成:北京

Process finished with exit code 0
- 這與不用應用上下文的測試結果是同樣,不過如今的方式更加方便了。
6、總結
- 本文主要新增了 Spring 框架中兩個很是重要的接口 BeanFactoryPostProcess、BeanPostProcessor 同時還添加了關於應用上下文的實現,ApplicationContext 接口的定義是繼承 BeanFactory 外新增長功能的接口,它能夠知足於自動識別、資源加載、容器事件、監聽器等功能,同時例如一些國際化支持、單例Bean自動初始化等,也是能夠在這個類裏實現和擴充的。
- 經過本文的實現必定會很是瞭解 BeanFactoryPostProcess、BeanPostProcessor,之後再作一些關於 Spring 中間件的開發時,若是須要用到 Bean 對象的獲取以及修改一些屬性信息,那麼就可使用這兩個接口了。同時 BeanPostProcessor 也是實現 AOP 切面技術的關鍵所在。
- 有人問:
面試問那麼多,但是工做又用不到,是嘎哈麼呢?,嘎哈麼,那你說你開車上橋的時候,會每次都撞兩邊的護欄嗎,不撞是吧,那不要修了哇,直接就鋪一個平板,還省材料了。其實核心技術的原理學習,是更有助於你完成更復雜的架構設計,當你的知識能更全面覆蓋所承接的需求時,也就能更好的作出合理的架構和落地。
7、系列推薦
- 1. Java開發新手應該挑戰一下你的軟肋(文末送書)
- 2. Spring的兩個上下文
- 3. 個人六月更文挑戰總結
- 4. Spring初級:Spring應用上下文
- 5. 個人項目實戰11:SimonShop(下)
- 6. 個人第一個android應用上架,記念一下
- 7. Spring IoC容器與應用上下文的設計與實現
- 8. Spring Cloud上下文:應用程序上下文服務
- 9. 滑動文字實現上下拖動
- 10. Spring 刷新應用上下文refreshContext
- 更多相關文章...
- • 第一個Spring程序 - Spring教程
- • PHP 文件上傳 - PHP教程
- • Docker容器實戰(七) - 容器眼光下的文件系統
- • Spring Cloud 微服務實戰(三) - 服務註冊與發現
-
每一个你不满意的现在,都有一个你没有努力的曾经。
- 1. Appium入門
- 2. Spring WebFlux 源碼分析(2)-Netty 服務器啓動服務流程 --TBD
- 3. wxpython入門第六步(高級組件)
- 4. CentOS7.5安裝SVN和可視化管理工具iF.SVNAdmin
- 5. jedis 3.0.1中JedisPoolConfig對象缺少setMaxIdle、setMaxWaitMillis等方法,問題記錄
- 6. 一步一圖一代碼,一定要讓你真正徹底明白紅黑樹
- 7. 2018-04-12—(重點)源碼角度分析Handler運行原理
- 8. Spring AOP源碼詳細解析
- 9. Spring Cloud(1)
- 10. python簡單爬去油價信息發送到公衆號